If you would like to read the next part in this article series please go to Using Microsoft ForeFront Server Security Management Console (Part 2).
Introduction
If you have a couple of ForeFront Security for Exchange Servers and want to keep the same configuration on all servers, then this article is for you. We are going to cover the process involved in the installation of the FSSMC (ForeFront Server Security Management Console) and how to manage updates, general configuration and reports using FSSMC.
The FSSMC is a web-console interface that allows an Administrator to manage, from a single location, both the ForeFront Security for Exchange and the ForeFront Security for Sharepoint products. Instead of going on each server to define settings, the administrator is able to create a simple job on the console and apply it to all servers or at a specific group of servers. The administrator can deploy packages, see a single summary page containing all viruses, spam and filter statistics, the product has built-in reports such as: SMTP Traffic, Engine and Signature versions and detection reports.
Another feature is the ability to download the latest engines from the internet and then distribute them to the internal computers.
The FSSMC does not require a lot of pre-requisites. If you have a Hyper-V in your environment the FSSMC can be a good candidate to be a virtual machine. The requirements are Windows Server 2003, IIS installed, and it must be a 32bits machine.
Deploying ForeFront Server Security Management Console (FSSMC)
FSSMC can be installed in a standalone server for a small company, but it also supports hierarchy using Primary and Backup topology. If you have a medium to large environment, you should consider using Primary/Backup scenario where you can have redundancy of updates in case of a failure of the primary server.
The installation requirements are really simple, basically you just need to install IIS on a Windows Server 2003 32bits and deploy the software. The IIS portion requirements are described in these following steps:
-
Logged with an account with local administrator privileges on the server that we are going to install FSSMC
-
Click on Start, Settings, Control Panel
-
Double click on Add/Remove Programs
-
Click on Add/Remove Windows Components
-
Select Application Server and click Next (Figure 1)
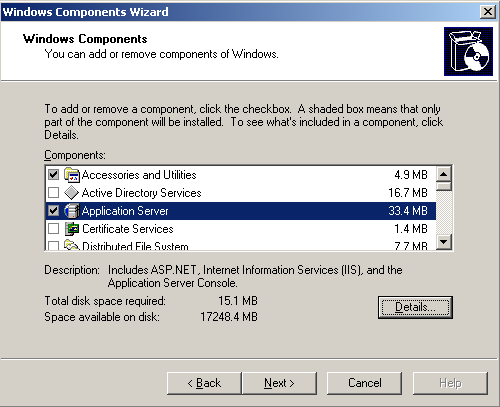
Figure 1
It is now time to download the FSSMC package, found here. As soon as you download the package, double click on Setup.exe.
-
Double click on the installation file, all files will be extracted and the figure shown in the Figure 2 will be displayed. In our environment we are going to use a single server, so let us select Standalone and click on Next.

Figure 2
-
The second page will ask about the SQL Deployment, we can use a SQL Enterprise where we can specify a different server that will host the SQL database used by FSSMC, in this tutorial we will use Express option where a SQL 2005 Express will be installed locally only for the FSSMC purpose. Click Check Prerequisites, as shown in Figure 3.

Figure 3
-
The installation process will validate the current system and all prerequisites that must be installed before the FSSMC installation wizard will be listed. Just click on Yes to start installing all prerequisites.
Note:
Depending of your server configuration it may take some minutes.

Figure 4
-
After finishing the prerequisite installation process, the initial page of the FSSMC Wizard installation will show up, just click on Next. (Figure 5)

Figure 5
-
On the End-User License Agreement page. Select on I accept the terms in the License Agreement option and click on Next.
-
On the Select Installation folder page. Accept the default values and click on Next.
-
On the Ready to install page, click on Install to start the installation process.
-
That’s it! Click Finish and you will be able to see a new Program group on the Start Menu. Basically the ForeFront Security Management Console icon is a link to the web management console of the product. By default is http://localhost/FSSMConsole/default.aspx
FSSM Console Overview
The initial page of the product is At a Glance… as shown in Figure 6. The administrator has a centralized view and is able to manage the product through all available options in the menu on the left; on the central page the administrator will have a traffic summary of all processed messages of all clients that have the client installed, and statistics about Viruses, Filters, Top 5 Viruses and most active Servers will be displayed as well.
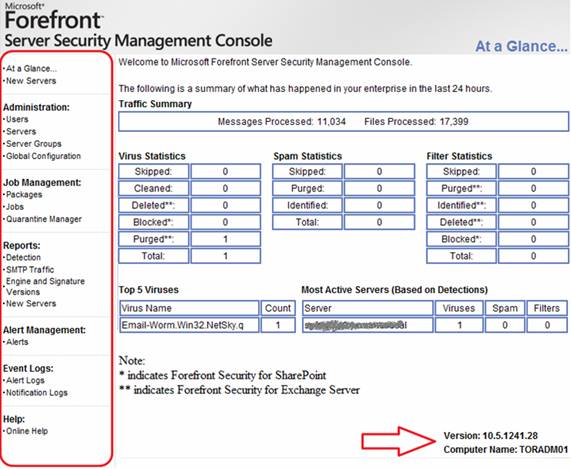
Figure 6
Now that we have installed the FSSMC and we know how to access the initial page. Our next steps are to configure Global settings, add servers to the console and start managing the ForeFront Server Security for Exchange from a central location.
FSSMC Discovery Process
In this part of our tutorial we will be covering the user, server and global configuration sections of the Console and also the first two items from the left menu that are: At a Glance and New Servers.
First things first, by default FSSMC searches for new servers running Exchange Server every night at 1:00AM, and if it finds new servers the information will be displayed on the page At a Glance which is the start page of the Console, an example when a new server is found can be seen in the Figure 7.

Figure 7
As an FSSMC administrator you can manage the discover process changing values of some registry keys in the FSSMC Server. All settings related to the discovery process can be found at; HKEY_LOCAL_MACHINE\SOFTWARE\Microsoft\ForeFront Server Security\Server Management\Services. Most of the settings are self-explanatory and we are not going over each one in detail, but I am going to play around with a couple of them, for example: we can easily change the discover process time changing the value of AutoDiscoveryTime; we can also disable Exchange Server Discover changing the ExchAutoDiscoveryEnable to 0 (The possible values are: 0 disable and 1 enable), as shown in Figure 8.
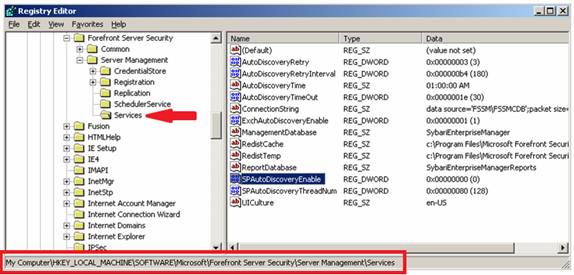
Figure 8
Managing Users
Okay, let’s move forward. The first item under Administration topic is Users on that section we can add users to be administrators of the FSSMC. By default, only the user that installed the software is listed on that section. You can add users clicking on Add Users link (Figure 9), use the format DOMAIN\Username to add users and if you have more than add one per line, you can also search your active directory clicking on Browse button after clicking on the Add Users link, then a list of all current users will be displayed and you can pick the new administrators up. As soon as you add the new users you can send them the link to access the FSSMC and they will be able to manage your environment as well.

Figure 9
Managing Servers and New Servers
In this section, we can add servers manually entering their names, or searching for them on Active Directory. We can also associate them to a Server Group. The only group created during the product installation is Default. We will be looking at the Server Group creation process in a bit.
If you noticed that on the main page you have had new servers discovered they would not show up on the Servers list. In order to add those discovered servers you need to click on New Servers link, as depicted in Figure 10, select the servers that you want to add, define their groups in the column Add to Group and then click on Add Servers.
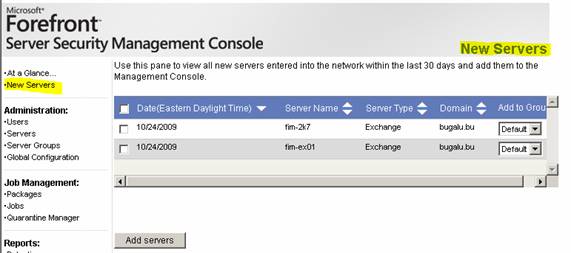
Figure 10
If you don’t have time to wait for the discover services, you can always add them manually, it’s up to you.
No matter which way you added the server, the servers will be always listed on Servers item, on this location we will be able to see all servers their respective agent version and current status.
Managing Server Groups
Under Server Groups item we can manage groups, assign existent servers to different groups, and delete servers from a specific group as well. The usage of groups makes easier to deploy configurations based on the server role, we can create a group just for Hub Transport servers where we can define Transport Scan and also use different sort of protection settings based on the group, on other hand we can have a group for Mailbox Server where we can configure Scan jobs and etc.
We can also create groups based on the ForeFront Server Security, for example: a group for SharePoint and if you still use Exchange Server 2003 and SMTP you may have to create a group for that as well.
Managing Global Configuration
Last but not the least, the final part of the Administration section setup is the Global Configuration. In this section we can configure the SMTP Server that console will be using to send messages out (Figure 11). The recommendation here is to create a mailbox to the FSSMC service, in our scenario we created a mailbox named svc.ForeFront, after filling out all the information we can use the Test E-mail button to validate the configuration.
In this section we still have the Statistics Polling setting where we can define how often the FSSMC will retrieve historical data from the remote servers; the last setting on this page is Download Configuration where we can define the addresses that FSSMC will retrieve updates from Microsoft. If you have a proxy in place to access internet, you can configure such settings on this location. After setting up the global settings just hit Save button.

Figure 11
Conclusion
In this first article we went through the process to install the FSSMC and its prerequisites. We also started to manage Users, Servers and Global Settings. Next article we will be deploying FSSMC agents and pushing ForeFront Security Server for Exchange Server installations to the clients from a central location.
If you would like to read the next part in this article series please go to Using Microsoft ForeFront Server Security Management Console (Part 2).
