If you would like to be notified of when Anderson Patricio releases the next part in this article series please sign up to our MSExchange.org Real-Time Article Update newsletter.
If you would like to read the first part in this article series please go to Using Microsoft ForeFront Server Security Management Console (Part 1).
Introduction
In the previous article from this series, we saw how to add servers to the console, create groups and this kind of stuff. That was just one portion of the configuration, in this article we will be deploying FSSMC agents on our Exchange Servers and after that we will be able to push configuration to them.
Using FSSMC we can also install ForeFront Server Security for Exchange without any manual intervention on Exchange Server. If you do not have FSSMC but you have ForeFront Server Security, the installation process has an option to install remotely, as shown in Figure 1. However, by using FSSMC we can deploy and configure ForeFront for Exchange on all your computers at the same time without having to log on all servers. Cool, isn’t it?

Figure 1
Okay, let us say that we already have installed ForeFront for Exchange on all your Exchange Servers, are there any problems? Definitely not, you just need to deploy FSSMC agent on your servers that already have the software installed and from that point on you can manage all settings through FSSMC.
Deploying the FSSMC agent
The FSSMC agent installation is a simple process, basically we must make sure that we already have the server object listed in the Servers section, as show in Figure 02. Then, we need to select one or more servers that we want to deploy the agent and click on Deploy Agent.
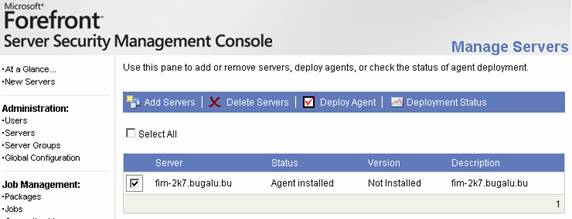
Figure 2
FSSMC will prompt for credentials to install the agent on the remote server (Figure 3). The format of the username has to be DOMAIN\UserName format. If you have different servers with different administrators you can select a username and password for each server (just make clear the option Use these credentials for all servers). Click on Continue.

Figure 3
A pop up page will be displayed and it will be refreshed automatically. This new page will display any information about the installation process and at the end we can validate if the process was successful, as shown in Figure 4. Click Close.

Figure 4
Okay, the agent is now installed, but what are the changes on our Exchange Server? Basically, the agent installs a new service called DeploymentAgent (Figure 5).The default status is manual and this service is responsible to communicate with the FSSMC and also perform tasks that are started through the console.

Figure 5
Another difference that you will notice is a new program group in your Programs menu. The name is Microsoft ForeFront Server Security Management Console and it has 4 applications on this new group which are: Clear ForeFront log, Disable ForeFront log, Enable ForeFront log and ForeFront Remote Diagnostic (as shown in Figure 6). All those applications we will be using during a PSS call with Microsoft or troubleshooting procedure.
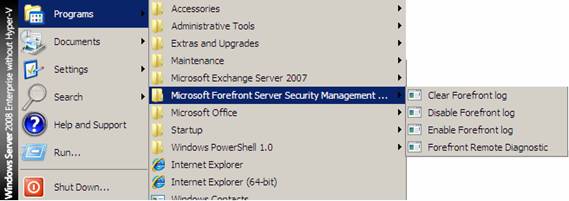
Figure 6
Automating the installation process of ForeFront Server Security for Exchange Server
Our goal in this section is to create a package to install ForeFront Server Security for Exchange Server and create a Deployment Job to install it when required.
The first thing is to get the latest ForeFront for Exchange Server from the following website: www.microsoft.com/ForeFront and download it to a temporary folder in FSSMC server. The process to deploy ForeFront Server Security for Exchange from FSSMC can be summarized in Figure 07.

Figure 7
In order to create the package, logged on the FSSMC main page, let’s click on Packages, and then click on Add Package. In the new page, give a name to the package (for the purposes of this article, I am going to call it ForeFront Security For Exchange). Let us now click on Browse and specify the file that we downloaded in the previous step, and then click on Add (Figure 8) .
Note:
This process may take a while so be patient!

Figure 8
The next page will be about the installation details, all values specified on this page will be used to install on the remote servers. The first three sections of this page are shown in the Figure 9. A brief description of each section is listed below:
-
Target Folders – Specifies the installation path and the Start menu Folder caption
-
Product Key – If you have the license you can fill it in this field. If you don’t the software will work for 120 days-trial mode
-
Engine Selection – This is one of the advantages of ForeFront, you can select up to 5 engines to be configured on the new installation
-
Enable Anti-spam Updates – The installation process will enable automatic updates of anti-spam. You can check this configuration using Get-AntiSpamUpdates on your Hub Transport or Edge Server
-
Microsoft Update – This option is related to update of the ForeFront product itself not engines
-
Proxy Server (optional settings) – The administrator can define Proxy settings. The proxy settings can be enable/disabled, server name configuration and port configuration
-
Quarantine Security Settings – The possible values are Secure or Compatibility. Basically, if you want to apply file and filter contents on messages that are coming from Quarantine
-
Hot Upgrade: Critical File – Possible values are Recycle Services or Abort upgrade. If any file in use must be updated the installation process will take the action configured on this section
-
Hot Upgrade: Mail Flow – This option is related to the Mail flow during the installation. The default value is Recycle Services

Figure 9
Okay the package was created as we can see it in the Figure 10. Now, the next step is to create a Distribution Job, and then link the current package to this new job and afterwards assign which server(s) will be receiving the Deployment Job. The process that we have just been through can be also used to deploy ForeFront Server Security for Exchange/Sharepoint updates.
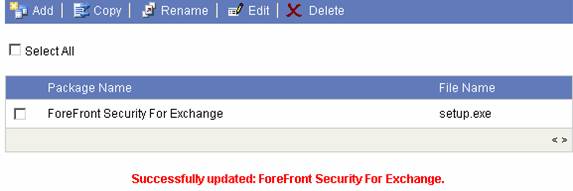
Figure 10
In order to create a Deployment Job, let Us click on Jobs, and click on Deployment Jobs item and click on Create, as shown in Figure 11.
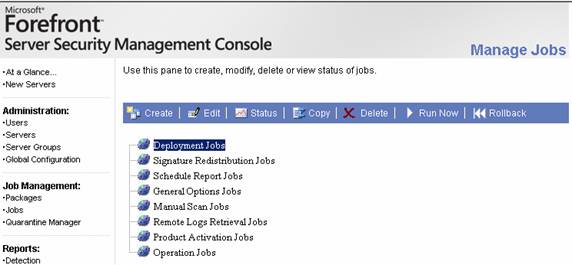
Figure 11
A deployment job has a few settings that can be defined during the creation of the job. Basically, we can define a name, an existent package (We are going to use the package that we have just created), Schedule (If Do not schedule option is selected the job must be run manually afterwards), and E-mail notification where we can add one or more e-mail address to receive the status of the process, as shown in Figure 12.
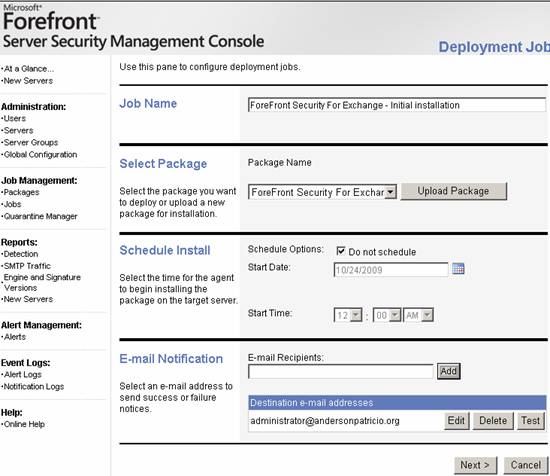
Figure 12
The last part of the Job is which servers and/or groups will receive the current Deployment Job. Let’s click on Finish (Figure 13).
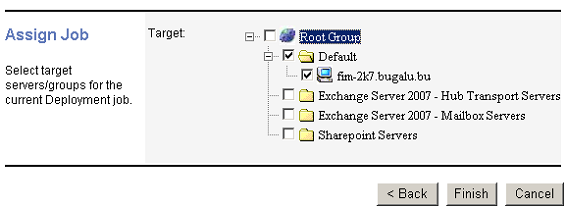
Figure 13
Now that our job has been created, the next step is to click on Run Now, as shown in Figure 14.
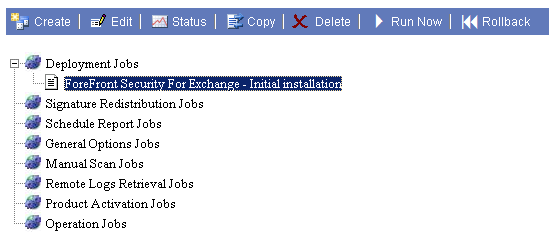
Figure 14
A brief summary of the job will be displayed, make sure that the required servers are listed on the Server List section, after that just click on Run (Figure 15). After that a pop up window will show all tasks that have been performed on the remote server.

Figure 15
Conclusion
In this second article about ForeFront Server Security Management Console we have just covered the automated installation process of the ForeFront Server Security for Exchange.
In the next article we will finish this series by going over how to manage updates, standardize settings across the servers, reports and how to use the Quarantine Manager feature.
If you would like to be notified of when Anderson Patricio releases the next part in this article series please sign up to our MSExchange.org Real-Time Article Update newsletter.
If you would like to read the first part in this article series please go to Using Microsoft ForeFront Server Security Management Console (Part 1).
