Somewhat surprisingly, one of the things that I get asked about relatively often is if there is a way to convert a virtual machine from VMware to Hyper-V or vice versa. There are a number of different ways to get the job done, but I want to show you how to accomplish this task using PowerShell.
Before I begin
Before I get started, there are a couple of things I need to mention. First, I am going to approach this topic from the standpoint of converting a VMware native VMDK file into a VHD or VHDX file that is supported by Microsoft Hyper-V. For the sake of the discussion, I am going to assume that you already know how to extract the VMDK file from your VMware server.
The other thing that I need to mention — and this is the important one — is to make sure to create a backup of your VMware virtual machine before performing any kind of conversion. Even though the processes that I am going to be talking about are relatively safe, converting a virtual machine from one format into another is never a completely risk-free proposition. That being the case, it’s extremely important to have a backup that you can use to put everything back to normal in the event that something goes wrong.
Converting virtual hard disks
My tool of choice for converting VMware virtual hard disks into a format that Hyper-V can use is the Microsoft Virtual Machine Converter, which you can download here.
The download consists of a single MSI file and an optional documentation file. When you open the MSI file, Windows will launch a standard installation wizard that requires you to accept a license agreement and to verify the installation path that you want to use.
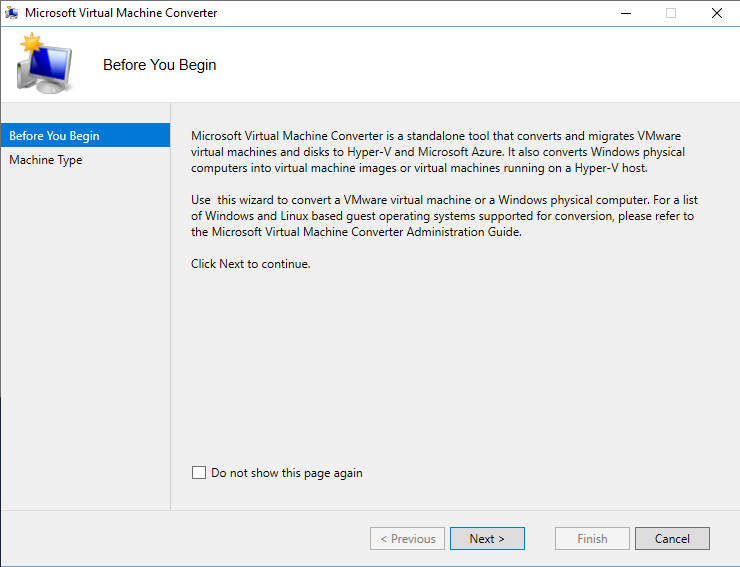
The Microsoft Virtual Machine Converter includes a GUI-based tool, which you can see in the image below. Rather than discussing the GUI, however, I want to show you how to do the conversion using PowerShell.
Admittedly, the idea of chucking the GUI in favor of performing a virtual machine conversion with PowerShell sounds insane. After all, the GUI exists to make our lives easier, so why wouldn’t I use it?
The truth is that if I were converting a single virtual hard disk, I probably would use the GUI. However, PowerShell is a far better option for situations in which a bulk conversion needs to be performed.
Before you will be able to use PowerShell to convert a virtual hard disk file, you will need to import the Virtual Machine Converter module. This module is installed automatically when you install the Virtual Machine Converter, but it still has to be imported into PowerShell. To import the required module, open an elevated PowerShell window, and enter the following command:
Import-Module ‘C:\Program Files\Microsoft Virtual Machine Converter\MvmcCmdlet.psd1’
You can see what this process looks like in the figure below.
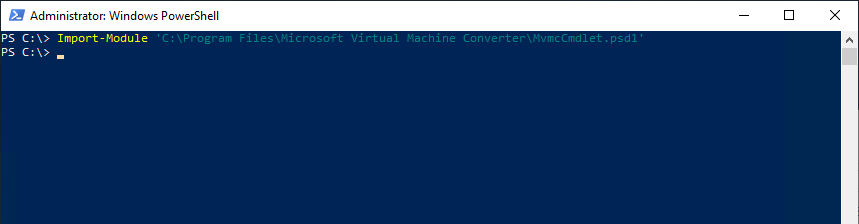
You will need to import the Virtual Machine Converter module into PowerShell before you will be able to perform a virtual machine conversion.
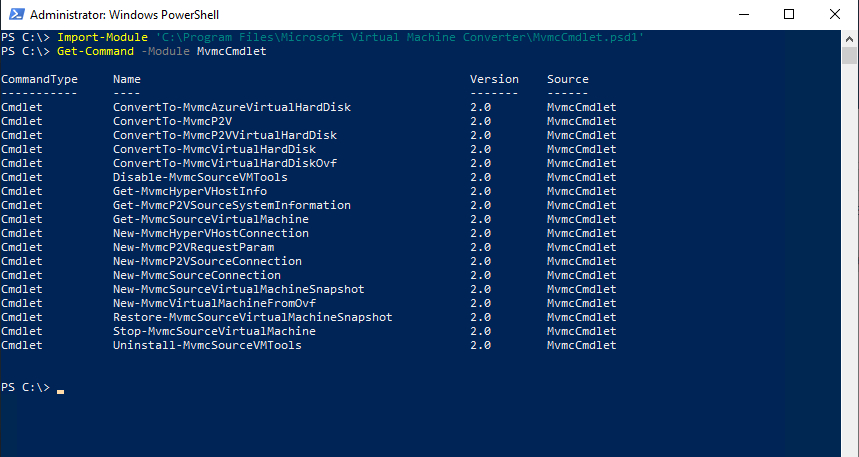
When you import a module, the absence of an error message usually means that the module was imported successfully. If you want to know for sure, you can tell PowerShell to display the cmdlets that are included in the module. To do so, enter this command:
Get-Command -Module MvmcCmdlet
As you can see in the image below, there are severla cmdlets that are included in the Virtual Machine Converter module. The good news, however, is that only one of these cmdlets is necessary for performing a virtual hard disk conversion. That cmdlet is ConvertTo-MvmcVirtualHardDisk.
Here is the syntax that you will need to use to convert a virtual machine:
ConvertTo-MvmcVirtualHardDisk -SourceLiteralPath “<source VM path>” -DestinationLiteralPath “<destination VM path>” -VhdType FixedHardDisk -VhdFormat Vhdx
To show you how this works, I created a VMDK file named Sample VM.vmdk and placed it in a folder named C:\Temp. For the sake of demonstration, I will convert this VMDK file into a VHDX file named Hyper-V VM.vhdx. Here is the command that I am using to do the conversion:
ConvertTo-MvmcVirtualHardDisk -SourceLiteralPath “C:\Temp\Sample VM.vmdk” -DestinationLiteralPath “C:\Temp\Hyper-V VM.vhdx” -VHDType FixedHardDisk -VhdFormat Vhdx
You can see what the conversion process looks like in the screenshot below. Depending on how large your VMDK file is, how the VMDK is configured, and how well your hardware performs, it can take a long time to perform the conversion. The VMDK that you saw in the screen captures was a little over 6GB in size, which is pretty small for a VM, and yet the conversion process took several hours to complete.


One last thing that I need to mention about the conversion process is that the resulting VHDX file can be significantly larger than the VMDK file that you started with. As previously mentioned, my original VMDK file was about 6GB in size, but the resulting VHDX file was just over 100GB in size.

Last piece of the puzzle
Hopefully, you were able to use the technique that I described in this article to convert your VMDK file into a VHD or VHDX file. Unfortunately, the conversion process does not always go as smoothly as we might like. It is fairly common for the conversion process to fail as a result of an incompatible descriptor within the VMDK file. Thankfully, there is a way to modify this descriptor so that you can get the conversion process to work. A separate article I wrote here at TechGenix details how to fix problems with the file descriptor so that you can perform the necessary conversion.
If modifying the descriptor isn’t a good option for you, then your best bet may be to perform a guest-level backup of the VMware virtual machine and then restore the backup to a Hyper-V VM.
Featured image: Shutterstock


Hi Brien, can you share this tool Virtual Machine Converter, please, good post.