One of the reasons why I have always liked using PowerShell as a tool for managing Hyper-V is that PowerShell allows you to perform management actions in bulk. Sometimes, though, the selectivity of the task can make conventional PowerShell management techniques impractical. Imagine for a moment that you want to perform some management function on 150 virtual machines, but want to leave all of the organization’s other VMs untouched. Just to make things interesting, let’s also pretend that all of these virtual machines have vastly different names from one another, so filtering VMs by name is not an option.
There are a few different ways that you could accomplish this type of task in PowerShell. One of the more common techniques is to create a text file or a CSV file containing the names of the VMs that you want to manage. You could then write a script that performs the management activity on every VM that is listed in the file.
While this is certainly a viable approach, it may sometimes be more convenient to create virtual machine groups instead. Hyper-V has had the ability to group virtual machines together for several years now. Even so, the feature often goes unused, presumably because it is not exposed through the Hyper-V Manager.
Groups are useful for creating collections of VMs that have similar management needs. For instance, you might group all of your domain controllers together.
Creating virtual machine groups
Creating a group of virtual machines is a simple process. All you have to do is assign the group a name, and then tell Windows that the group represents a collection of virtual machines.
For the sake of demonstration, I have created five virtual machines named VM1 through VM5. These virtual machines do not actually do anything special, but let’s pretend that they all have something in common with one another and that I want to be able to collectively manage them. To do so, I am going to create a group named MyVMs, and then I will add the five virtual machines to the group.
As previously noted, creating a virtual machine simply requires you to provide a name (in this case it will be MyVMs) and to designate the group type as a collection of Hyper-V virtual machines. Here is what the command looks like:
New-VMGroup -Name MyVMs -GroupType VMCollectionType
You can see what the group creation process looks like in the screenshot below.

The next step in the process is to add virtual machines to the group. The cmdlet that is used for this purpose is Add-VMGroupMember. As you would probably expect, this cmdlet requires you to provide the name of the virtual machine group and the name of the VM that you want to add to the group. However, there is one caveat that you need to be aware of.
When you add a virtual machine to a group, you have to add it as a virtual machine object. This means that you can’t just supply the name of the VM. Personally, I think that the easiest way to deal with this requirement is to use the Get-VM cmdlet. Here is how I might add the virtual machine named VM1 to the group:
Add-VMGroupMember -Name MyVMs -VM (Get-VM VM1)
I have also seen people map the VM name to a variable and then add it to the group. Here is an example of what that technique looks like:
$VM = Get-VM VM2
Add-VMGroupMember -Name MyVMs -VM $VM
Regardless of which technique you use, it tends to be inefficient to add virtual machines individually. Fortunately, you can supply the Add-VMGroupMember cmdlet with multiple virtual machine names. Here is how it works:
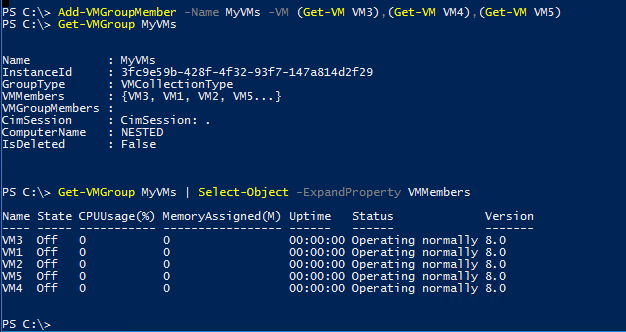
Add-VMGroupMember -Name MyVMs -VM (Get-VM VM3),(Get-VM VM4),(Get-VM VM5)
You can see all three techniques demonstrated in the screenshot below.

As you look at the screenshot above, you will notice that Windows does not provide any confirmation that you have successfully added the VMs to a group. It is therefore helpful to be able to validate the group’s membership. You can do this by using the Get-VMGroup cmdlet.
If you simply type the Get-VMGroup cmdlet followed by the name of the group, you will see an abbreviated version of the group’s membership. If you want to see the full membership list, you will need to use a command like this one:
Get-VMGroup MyVMs | Select-Object -ExpandProperty VMMembers
You can see what both of these commands do in the screenshot below.
Bulk management actions
The one thing that I hardly ever hear anyone talk about with regard to virtual machine groups is how to perform bulk management actions against the group members. As with almost anything in PowerShell, there are multiple ways of getting the job done. I like to map the group membership to a variable and then reference the variable. Here is an example of how you might map the group’s membership to a variable:
$VMs = (Get-VMGroup MyVMs).VMMembers
You can verify the variable’s contents by entering the variable name into PowerShell.

Now that I have created a variable, I can reference the variable from any virtual machine related cmdlet. If for example, I wanted to start all of the VMs in my virtual machine group, I could simply type:
Start-VM $VMs
Virtual machine groups: The benefits are obvious
Virtual machine groups can make it easier to bulk manage your Hyper-V virtual machines. However, these groups are not exposed through the Hyper-V Manager, so they tend to be the most useful to those who use PowerShell to manage their Hyper-V environments. Although similar functionality can be achieved by using a file containing virtual machine names, using virtual machine groups keeps you from having to script a looping function.
Featured image: Shutterstock


