If you would like to be notified of when David Davis releases the next part in this article series please sign up to our VirtualizationAdmin.com Real Time Article update Newsletter.
If you would like to read the next article in this article series please go to VMware Data Recovery – Overview (Part 1).
Introduction
In my previous article (VMware Data Recovery Overview), I covered the latest features of VMware’s new backup and recovery application for VMware. You learned what it has to offer and how it can help you.
In this article, I will put VMware Data Recovery (or VDR) to the test by demonstrating how it can be used to backup and restore a guest VM inside the vSphere client and on an ESX 4 server.
Creating Backup Jobs in VMware Data Recovery
Creating a backup job in VMware Data Recovery is easy. In fact, when you first connect to VDR, the Getting Started Wizard will ask you if you want to create a backup job.
Note:
If you choose that option, or if you choose to create a backup job later, both will look the same. In fact, you can have multiple backup jobs configured to backup whatever VM guests you want, during whatever timeframe you want and have them sent to whatever backup destination you choose. Each backup job is independent.
Here is where the process of creating a backup job starts, with the VDR Backup Wizard (in Figure 1), below.

Figure 1: Backup Wizard
In the first step of the Backup Wizard, you choose which Folder, Data Center, ESX host, or VM guest you want to backup with this backup job. The great thing about this is that you could choose to backup your entire virtual infrastructure with the click of a mouse. This could be done by selecting the topmost folder.
In my case, I selected a single Windows Server 2008 guest VM and clicked Next.
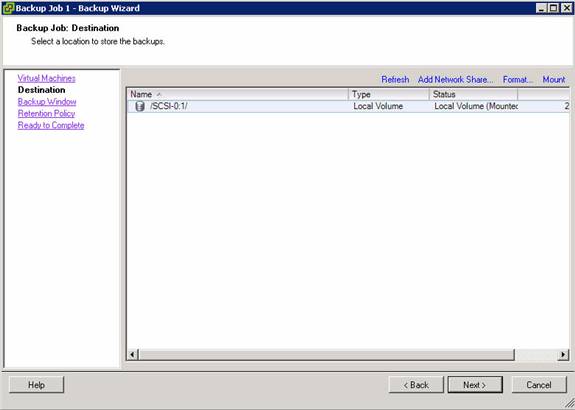
Figure 2: Selecting the Backup Destination
In the second step of the Backup Wizard, you then select the backup destination. This could be a local volume or a network share.
In my case, I had created a local SCSI / VMDK volume ahead of time (as it was faster than a network share) so I selected that and clicked Next.

Figure 3: Selecting a Backup Window
The third step in the Backup Wizard is to select your backup window. This will be the timeframe that your new backup job will be allowed to run in. The default backup window is shown (all times except Monday-Friday from 7am to 5pm are valid).
Note:
The blue blocks show the timeframe that the backup job is allowed to run in. The grey blocks show the timeframe that the backup job is not allowed to run in.
After having a look at the default backup window, I clicked Next.

Figure 4: Setting the Retention Policy for the Backup
At this point, I had to set the retention policy for this backup job. The retention policy is what tells VDR how long you want to keep the data that you back up.
I think that VMware have a novel take on the retention policy actually. I like how you can set the policy to retain “few, more, or many” copies of your backup data. That is language that anyone can understand.
When you change the retention policy, the policy details below change with it. You can also create a custom retention policy by choosing Custom, then setting the policy details manually.
Like all the other screens, when done, I clicked Next.

Figure 5: Ready to Complete
The final step in creating a backup job is the Ready to Complete page, where you are given a summary of what you are about to do. All you need to do is to review it and click Finish.
At this point, the backup job is added to the Backup tab. If the current time is within the backup window, the backup job will start.
Monitoring your Backup Job
There are a few different places to monitor your backup job. In the Backup tab, it will have a Start Time and Last Execution for the job. Still, I like to monitor the jobs over in the Reports tab.
You can monitor jobs (and many other things) in the Reports tab under Events and Running Tasks. The Events section will show when a backup job has completed and the Running Tasks will show the status of a backup job that is currently running. Here is what the Reports tab looks like with a completed job under events:

Figure 6: Backup job completed successfully in the VDR Reports tab
There are a couple of other places to go to look at the status of backup jobs. You can go to the Configuration tab and look at the Log section and also in the Restore tab. Here you can look at what data is available to be restored for that VM guest. Here is what they would look like:

Figure 7: Viewing Backup status in the VDR Log
How do I restore my VMware ESX VM with Data Recovery?
Restoring a VM guest with VDR is really the opposite of backing it up. The Restore Wizard is really just a two step process with a confirmation. The restore is really as simple as choosing the source and destination.
You can choose to start a restore in multiple places. I went into the Restore tab to see every backup performed for a particular VM guest. From there, I chose the specific dated backup that I wanted to restore.

Figure 8: Choosing the VM guest that you want to restore
This brought me to the Restore Wizard where I was able to select the destination for the restore.

Figure 9: Selecting the restore destination
To verify my selections before actually carrying out the restore, I double checked my steps so far in the Ready to Complete restore window, below.

Figure 10: Ready to Complete the Restore
A few minutes later, the restore of the Windows Server guest VM was complete!
Where can I get more resources about VMware Data Recovery?
Here is a list of resources to learn more…
Keep on the lookout for upcoming articles about VMware Data Recovery by subscribing to the VirtualizationAdmin.com newsletter!
If you would like to be notified of when David Davis releases the next part in this article series please sign up to our VirtualizationAdmin.com Real Time Article update Newsletter.
If you would like to read the next article in this article series please go to VMware Data Recovery – Overview (Part 1).


