Introduction
This article discusses Windows 2003 Server Emergency Management Services. Since all Exchange administrators are Server admins, too, I hope you will find it interesting, especially since the Exchange 2007 Management Shell extends high-level administration tasks to the OS command prompt.
Emergency Management Services (EMS) is a feature of Windows 2003 Server that allows remote administration via the serial port. Normally, the best solution for remote server administration is Terminal Services (or a similar third-party add-in), but this kind of remote access requires effective network connectivity. EMS is a solution for those occasions where server operations are so severely disrupted that network connectivity is no longer available. It can even be used for direct console access when the local keyboard and display are no longer functioning. Since it provides only terminal access, however, there is no GUI, and functionality is limited to a set of built-in console commands, as well as those tasks that can be performed using a Windows command prompt. Since the interface is very basic, it is by no means recommended for routine administration tasks, but in an emergency it may allow you to continue to perform certain tasks, and delay a reboot until a more suitable time. It can even be used to administer the server by modem.
Enabling EMS
In essence, all that is required to use EMS is to enable it, reboot, and then connect another computer to the server via the serial port.
EMS is activated by an entry in the server’s BOOT.INI file. This file can be edited in Notepad, but it is much safer to use the BOOTCFG.EXE utility. To use BOOTCFG, open a command prompt window from the Start Menu, and type in BOOTCFG , followed by a set of parameters. BOOTCFG can take several parameters, but the ones of interest here are /EMS (followed by ON or OFF), which enables or disables EMS; /PORT (followed by a hardware port name), which allows you to set the port used by EMS; /BAUD , which allows you to set the communication baud rate; and /ID, which allows you to set which OS entry (perhaps in a multi-boot system) to configure – normally, this will be 1. Here is a typical set of parameters which enable EMS on COM1, with a baud rate of 19200, for the default server OS entry:
BOOTCFG /EMS ON /PORT COM1 /BAUD 19200 /ID 1

Figure 1: Enabling Emergency Administration Services
Here, in figure 2, is the BOOT.INI file with the changes made by BOOTCFG.EXE. Note that there is no need to look at your BOOT.INI file in this way – this information is shown here for illustration only. BOOT.INI is a system-critical file that you really should avoid opening in an editor, unless you know exactly what you are doing.

Figure 2: Changes made to the BOOT.INI file by BOOTCFG.EXE
Now that the BOOT.INI file has been configured by BOOTCFG.EXE, EMS’s Special Administration Console (SAC) will be available following the next server reboot. It will always be running in the background, as it were, and all you need to do to activate it is to connect a second computer, running terminal emulation software, to the server’s serial port via a null modem cable. I found that HyperTerminal (as supplied with current versions of Windows) is suitable for this purpose. Create a connection that uses a free COM port on the client end, with a baud rate of 19200. Configure it to use VT100 (or VT-UTF8, if available) terminal emulation. The SAC can be activated by pressing Enter once the connection is established. If you have the terminal emulator already connected when the server is rebooting, you will see the output shown in figure 3. Please note that it is not necessary to have the terminal connected at reboot time. It is only shown here for illustration purposes.

Figure 3: The Windows Startup screen in the terminal emulator
Next, you will see the SAC banner and prompt (figure 4), followed shortly by an event notification when the SAC CMD command (discussed later) is available.

Figure 4: The SAC banner and prompt
However, it is unlikely that your terminal emulator will actually be connected to the server at reboot time. Normally, you will need to connect to it as circumstances require, by connecting the cable, starting the terminal emulator and pressing Enter.
To see what commands are available from the SAC prompt, enter a question mark. The list of available commands is shown in figure 5 and includes restart and shutdown. Note that you have not been asked to log in yet. For this reason, it is not a good idea to leave an open SAC session on an EMS-enabled server unattended. Note also that the SAC shutdown and restart will shutdown the server very quickly, without cleanly stopping any running services. In an emergency, though, it is still better than simply pressing the reset button, since you are much less likely to lose data.
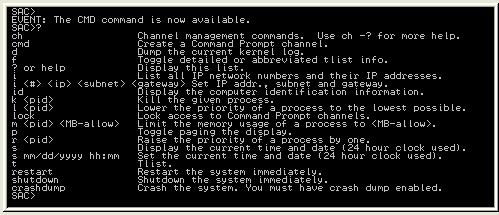
Figure 5: The list of SAC commands
The built-in SAC commands are quite limited in scope. The CMD command allows you to open a Windows Command Prompt session within the SAC. You connect to the newly-created Command Prompt using the command ch –si 1 , as shown in figure 6.

Figure 6: Creating a new Command Prompt session
Unlike the SAC session, a Command Prompt session does require you to login (figures 7 and 8). This is because the CMD prompt allows full access to the Windows DOS-style commands and the file system.

Figure 7: Opening the Command Prompt channel
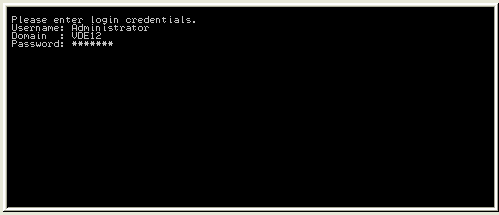
Figure 8: Logging on to the Command Prompt channel
Now that the Command Prompt session has been successfully activated and logged on to, you can use it to perform simple administration tasks, using commands like NET START or NET STOP (to start and stop services), NETSH, NSLOOKUP, IPCONFIG, PING, TRACERT (to test network connectivity), and all the DOS file system commands like CD, COPY, DEL, MOVE, etc. Nearly all commands have a help display that can be invoked with /? , for example, ipconfig /? . Note that such commands (like most things in the MS world) are not case-sensitive.
There isn’t the space here to discuss the full range of commands and utilities available from the command prompt, but here are a few examples of the kind of thing you may need to do:
The NET command can be used to stop the Exchange Information Store Service from the command prompt:
NET STOP MSEXCHANGEIS
And to start it again;
NET START MSEXCHANGEIS
The following sequence of typed commands will perform a clean reboot of the server, including shutting down the Exchange Services first:
net stop MSExchangeES
net stop MSExchangeIS
net stop MSExchangeMTA
net stop MSExchangeSA
net stop WinHttpAutoProxySvc
shutdown –r –t 00
Naturally, the GUI-based utilities like Exchange System Manager are not available, but Exchange 2007’s Management Shell will allow you to do just about anything that ESM can do. Here, in figure 9, is a quick look at the Exchange 2007 Management Shell running in a SAC Command Prompt session:

Figure 9: The Exchange 2007 Management Shell in a SAC CMD session
To perform high-level Exchange administration like this in Exchange 2003, you would need to create scripts, and run them from the command prompt.
To close an active Command Prompt session, enter exit, to return to the SAC. There is no need to close the SAC session – simply disconnect the terminal software by removing the cable. To reconnect, just plug in the cable again and reconnect the terminal emulator – remember, the SAC is always running in the background.
Conclusion
This was a brief introduction to the Windows 2003 Server Emergency Management Services, and the Special Administration Console. Here is some suggested further reading if you are interested in any of the topics mentioned:
Microsoft – Emergency Management Services
Microsoft – Windows Server 2003 Command-line reference
MSExchange.org – Exchange 12: The Monad-based Exchange Management Shell