Every device that connects to a network is assigned a unique number called the IP address to recognize that device and communicate with it. So theoretically, no two devices will have the same IP address. But in the practical world, glitches are always possible. Two or more devices may end up having the same IP address because of router malfunctions, PC settings, or even because of issues with your ISP. When this happens, the Windows operating system tries to tell you that more than one device has the same IP address, and this could lead to communication problems. That’s why you get the “Windows has detected an IP address conflict” error. This is a critical error as it prevents a device from connecting and communicating to the network, so you must fix it right away.
Well, the good news is that the “Windows has detected an IP address conflict” is a common error and the not-so-good news is that there are many ways to fix it. What this essentially means is that you may have to keep trying different fixes until you find the one that works best for you.
So, let’s start with the obvious and move on to the more complicated solutions for this “Windows has detected an IP address conflict” error.

Restart or reboot the router
Many times, a simple router restart or reboot will do the trick for you as some malfunction in the router can cause an IP address conflict.
There are two ways to restart the router.
- Simply unplug the router from the electrical socket, wait for 30 seconds, and plug it back in again. Alternately, turn off the router’s power switch and turn it back on again.
- Type your IP address in the browser window and log into the console. Go to Management -> Reboot.
After your router restarts, check if you’re still getting the same error.
Disable your network adapter
A network adapter is a piece of hardware that connects your computer to the network. Your device can have a wireless adapter if you have WiFi enabled in your system. Some devices use a USB-based or wired network adapter to connect to a network through Ethernet.
Prolonged use or malfunctions can lead to problems in the network adapter. Disable and enable this adapter to see if it resolves the issue.
To do this:
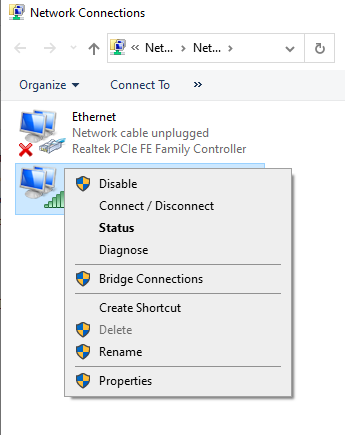
- Press Windows key + R to open the Run utility.
- Type ncpa.cpl to open the Network Connections. Alternatively, go to the Control Panel and navigate to Network devices to get to the same window.
- Locate the adapter that connects to the WiFi or the network.
- Right-click on this adapter and click the “Disable” option.
- Wait for a few minutes, right-click the adapter, and choose the “Enable” option.
- Close the window and check if this resolves the error.
If it doesn’t resolve, restart the computer, and check again.
Reset your IP configuration
If the problem persists, the fault could be with your DHCP server. So, let’s force it to give your device a new IP address.
- Press Windows key + R to open the Run utility. Type cmd to open the command prompt. This works if your account has administrative access. Else, press Windows key + X, and then press “A” to open the command prompt with administrative privilege.
- In the command prompt, type ipconfig /release followed by ipconfig /renew. These two commands force the DHCP server to release the existing IP and assign a new one to your device.
Reboot your computer now, and check if the error is fixed.
Disable the static IP
Some people prefer to use static IP addresses as it helps them to identify or find specific devices quickly on the network. However, these static IP addresses can cause IP conflicts because the available pool of IP addresses reduces, and devices may find it hard to switch between IP addresses quickly enough to avoid problems.
For these reasons, static IP addresses are not preferred, and if you face these IP conflict issues, do away with them.
To do this:
- Press the Windows key + R to open the Run utility. Type ncpa.cpl to open the network connections window. You can also navigate to it through the control panel.
- Choose your network adapter, right-click, and choose properties. This will bring up the properties of your Wi-Fi or Ethernet.
- Look through the properties and find the TCP/IPv4 option. Double-click on it to open the TCP/IPv4 dialog box.
- In the general tab, look for the “Obtain an IP address automatically” option and select it.
- Also, select the “Obtain DNS server address automatically” option.
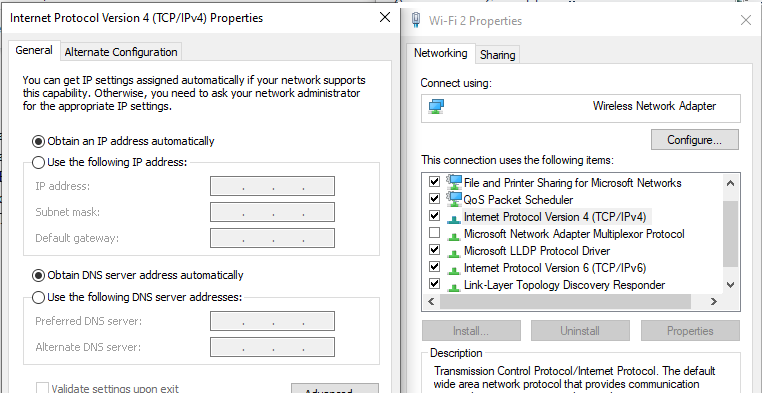
Click OK and exit the control panel. Restart the PC and check if the issue is resolved.
Note that if both the options are already enabled, it means your device is already using only dynamic IP addresses, and not static ones. So, this solution is obviously not for you.
Flush the DNS
Sometimes, it helps to just flush the cache, so the computer can find new DNS information.
Just to give you a brief background, Domain Name System (DNS) maps the websites with IP addresses, so it is easy for you to remember. For example, www.google.com is easier to remember than 192.1.255.200. But that’s the computer’s unique address and networks only understand these numbers. To bridge this gap, DNS does the mapping in the background.
Of course, it caches a lot of these mappings to avoid constant lookups, and this could be the source of the conflict. So, flush the cache, and allow the DNS to redo its job.
To flush the DNS, go to the command prompt and type “ipconfig /flushdns”. You’ll get a message if the flush was successful. Close the command prompt and restart your PC.
Reset Winsock
Windows sockets, or Winsock for short, manages connection requests. It defines the standard interface to access all the network services, especially TCP/IP.
To reset this Winsock, go to the command prompt and type “netsh Winsock reset”. Wait for a confirmation message, close the command prompt, and restart the PC. Note that you’ll need administrative privileges to run this command.
Disable IPv6
IPv6 is a relatively new technology that can cause the “Windows has detected an IP address conflict.” To find if this is the cause of the problem, disable IPv6, and check if it fixes the error.
To disable IPv6, navigate to the network connection window and your network adapter. Right-click on it, choose properties, and remove the check against TCP/IPv6. This will disable IPv6 on your device.

Restart your PC and check if it fixes the error.
To conclude, run through these options, and one of these will fix the “Windows has detected an IP address conflict” error. Let us know which of these worked for you.
Featured image: Shutterstock


Horrible advice. DO NOT DISABLE IPv6. It is NOT causing IP address conflicts.