Using containers, we are able to package and isolate an application, and all the requirements of that given application are within its container. That gives your company a lot of flexibility because we can move the application/container easily and create new containers in just a matter of seconds. When I say move, I mean we can move virtually anywhere including a laptop, server, and cloud. If you are not familiar with container technologies, I wrote an introductory article here at TechGenix about containers for IT pros. Although container technology was born in Linux, Microsoft embraced it and nowadays it is native in Windows Server 2016, Windows 10, and also in several offerings in Microsoft Azure. Docker, which is the name that is associated with containers because of its contributions and innovation in this area, is natively supported on Windows Server and takes advantage of all features available on Microsoft operating systems. As a matter of fact, all of Windows Server 2016 has access to Docker Enterprise Edition (EE) basic as part of that integration. Microsoft offers two types of containers: Windows Server Containers and Hyper-V Isolation (Containers).
Using Windows Server Containers, we use the shared kernel from the host, and any container running on this model requires the same kernel of the host, and the main reason is the shared kernel. The Hyper-V Isolation (Container) is an extra layer of security, where each container has its own environment and its own kernel. Because they have their own environment, we can afford different kernels on containers within the same host.
In this article, we will explore the Docker installation process on Windows Server 2016 and how to download (in Docker world it is called “pull”) the first image and spin up our Windows Server containers.
Getting Docker
The first step in running our Windows Server containers is to download Docker for Windows Server, and the best way to get that is using the Docker Store. To download, we need an account. The same account can be used to log on to Docker Hub, which allows managing images.
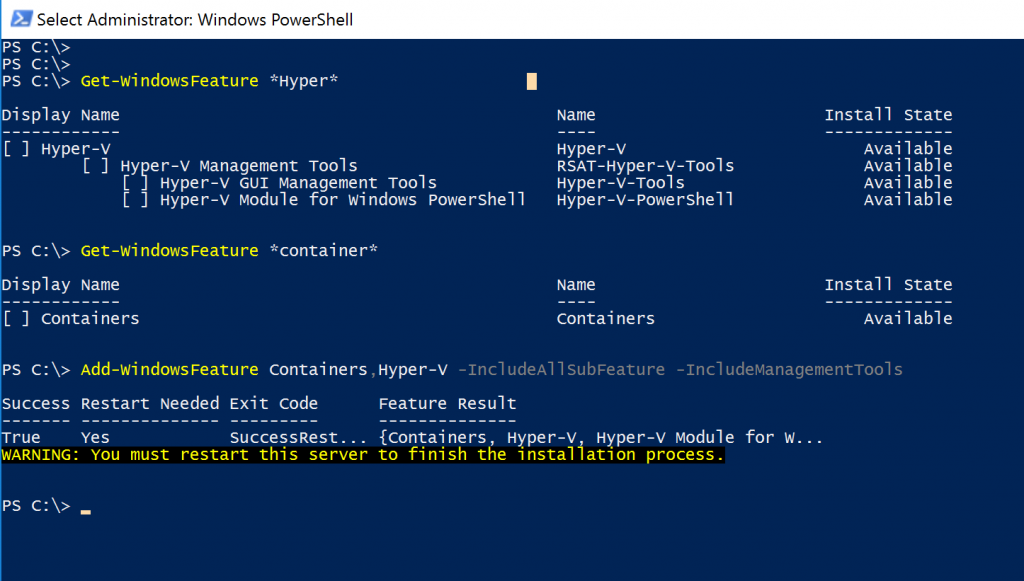
We can download Docker (we will get there in a little bit), but it will require additional steps to be performed and at least one additional restart of the server. If you want to save time, the following PowerShell cmdlets can be executed to install all prerequisites to support Docker on Windows Server 2016 (the cmdlets are shown in the image below).
Get-WindowsFeature *Hyper*
Get-WindowsFeature *container*
Add-WindowsFeature Containers,Hyper-V -IncludeAllSubFeature -IncludeManagementTools
Restart-Computer
The next step is to log on to Docker Store. If you don’t have an account, this is a great time to create one. The name that you choose will be used when using the repository. In order to download, click on Docker CE (where CE is for Community Edition and EE is for Enterprise Edition) located in the gray bar, right below the search field.
Select Docker Community Edition for Windows from the list, and on the new page click on Get Docker. Execute the installer that was downloaded, and click on the first page and select both options, which are Add shortcut to the desktop and Use Windows containers instead of Linux containers and click on OK, and wait for the completion of the process. Yes! It is that easy! Click on Close and log out.

After logging back in the Windows Server, you will notice two changes. First, we have two new services: Docker Engine and Docker for Windows Service. And there is also a Docker icon in your tray area.
When you run Docker for the first time, you have the option to sign in with your Docker ID. If you cancel or lost that window, no worries, we can always use the icon in the tray to sign back in.

When we right-click on the Docker icon, we have several options. A nice one is the ability to Sign in with our Docker ID, which gives us direct access do Docker Hub. Besides that useful option, we can define advanced settings on the Docker daemon, reset settings, access repositories and Docker Store, access documentation, get Docker information, restart, and switch container standards. Take your time to explore the options available.

Using Docker client
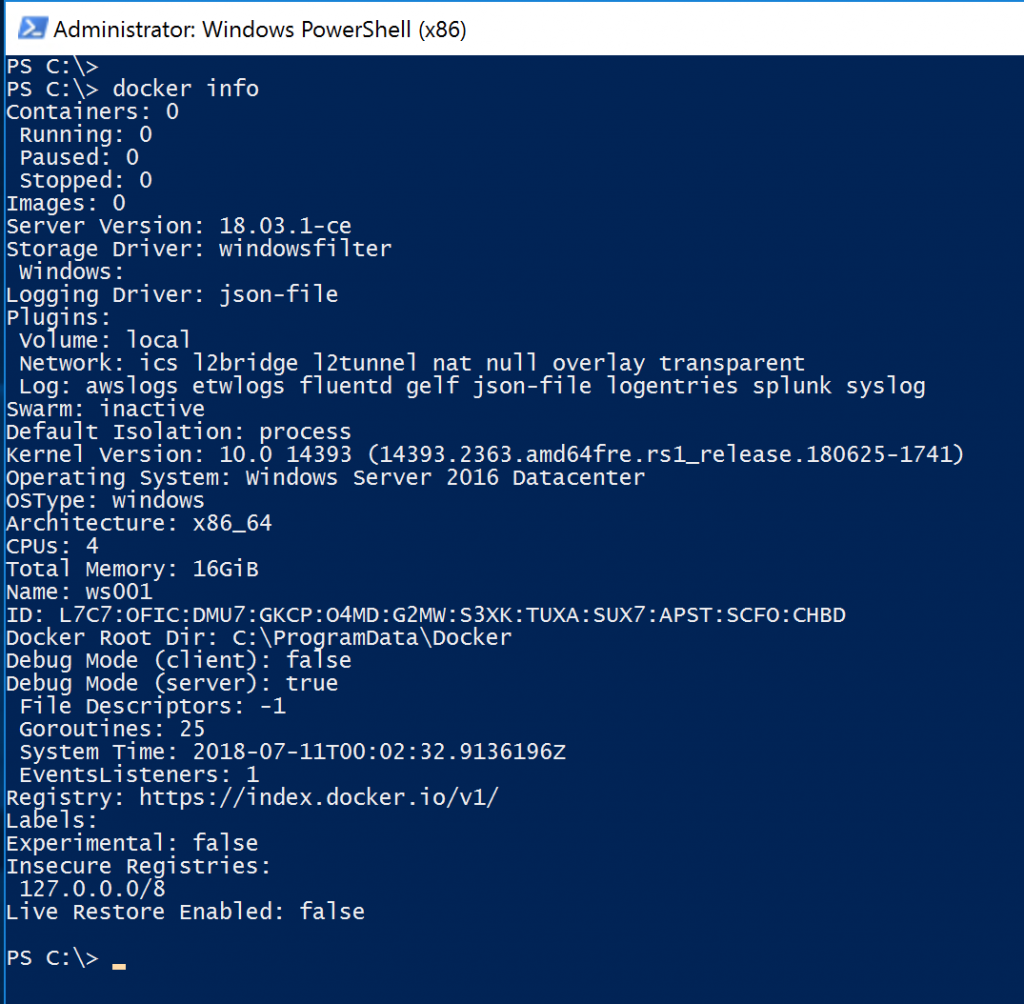
Until now our focus was on Docker daemon where we installed the Docker engine on our Windows Server 2016. From now on, we are going to use Docker client to interact with Docker daemon using RestAPI behind the curtains to manage Docker objects.
In order to manage Docker, open a PowerShell session and type docker info, and keep in mind that all Docker client interactions will start with docker <something>. The Docker info will provide really useful information, such as the number of containers (summarized and totals based on their status which could be any of these states: running, paused, or stopped), and additional information about the server that will explore in more detail as we advance our knowledge on Docker.
One attribute that we need to pay attention to is the Architecture and OSType because that will define what type of images we can pull (download) from the registry. Luckily for us, we are using Windows and we can go back and forth between containers based on Linux or Windows using Docker!
Deploying your first Windows Server containers
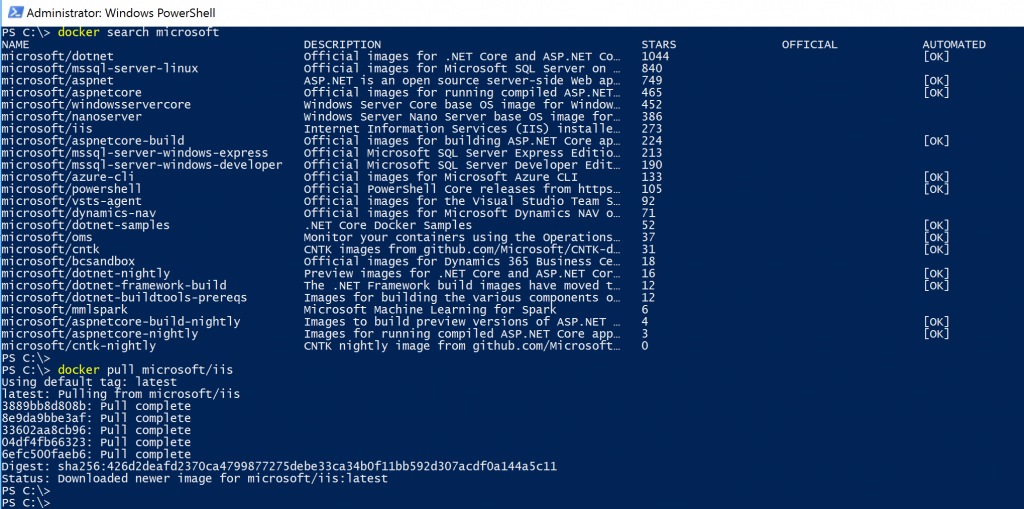
We can search the Docker Hub registry (we are already logged on using the Docker icon located in the taskbar area), but we are going to use the Docker client for that running the following commands, where on the first one we will query the current registry for images containing Microsoft, and from the list provided we are going to download a common image to be executed as the first container, which is our old friend IIS.
docker search microsoft
docker pull microsoft/iis
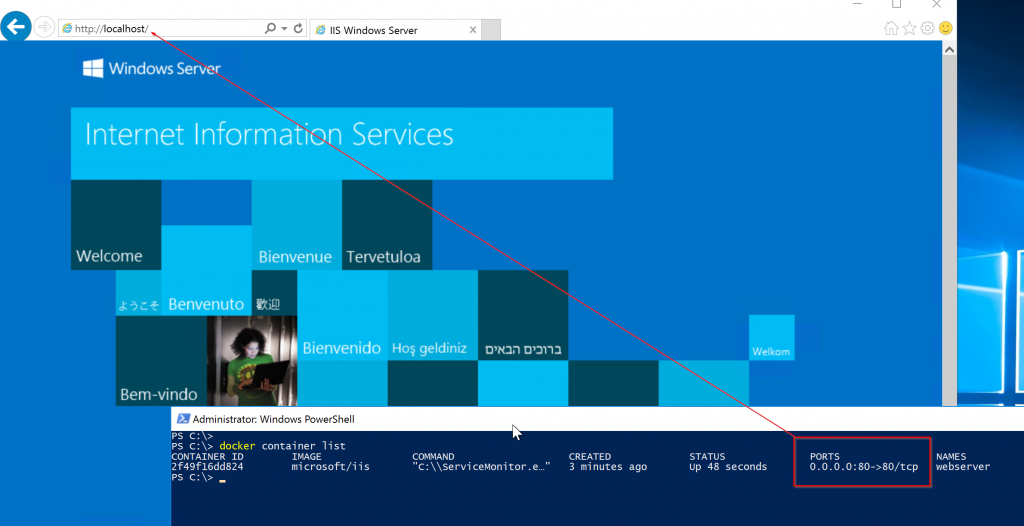
Now that we have our first image in the local store, we can execute the command docker image list, which will list all existent images. After that we can create our first container based on the image that we have just pulled from the registry. We can run the following command to create the container, where the -d means running in the background and the output will be the container ID, and–name is the label that we define for that container. We are also specifying the host 80 port to be mapped to that specific container on the same port 80 when using the -p 80:80
docker container run -d –name webserver -p 80:80 microsoft/iis
After getting the container up and running, we can list the current containers using docker container list and it will give a brief description of all existent containers, ports being used, names, service (command), image, container ID, and for how long that given container is running.

At this point, we have a container running and since we know that is an IIS application, the logical test is to open a browser and test it. Since we have configured all the pipework to use the port 80 from the host to the container port when we defined the -p 80:80, so basically we just need to open a browser from the host and type http://localhost.
Wrapping up
We have just scratched the surface of Windows Server containers. While the goal of this article is to introduce containers in Microsoft Windows Server, keep in mind that Docker can be installed on Windows, Linux, Apple, but in my humble opinion, the key place to run your container is the cloud, and Microsoft Azure is a perfect fit for that with all their offerings around containers, registry, and orchestration.
Keep in mind that we just downloaded a preexistent image from a public registry and executed a web server in a matter of seconds, but there is a lot more to help an organization to speed up and improve their applications. Using containers, we can have strong DevOps integration and that facilitates the process to deploy software to your environment and the upgrade process, especially when we start leveraging the orchestration technologies on top of Windows Server containers.
Featured image: Shutterstock


