Windows 2000 Software Management Automatic Installation Options for Firewall Clients
Thomas W Shinder M.D.
The Firewall client is probably the most well-known “best kept secret” in ISA Server 2000. Why? Because the Firewall client configuration gives you the widest range of options and allows the client to use more protocols, and gives you more control over those protocols, than any other client type. Its no wonder that the Firewall client remains that favorite of hardened ISA Server admins.

The thing that keeps the Firewall client from being more popular is the fact that you have to install the Firewall client software. First, not all operating systems support installing the Firewall client, and second, who wants to deal with the task of installing a small piece of software on a large number of machines?
For example, who wants to install the Firewall client manually on 25,000 computers? Not me! You might be able to carry out the installation using a log on script, but this doesn’t provide automatic application management. A better solution is to take advantage of the Active Directory Software Deployment and Management feature. To make this work, you need an Active Directory domain and the computers and users need to be members of the Active Directory domain.
You can Assign or Publish an application to users and/or computers using the software deployment tools included with Windows 2000 Group Policy. Assigning and Publishing Software works slightly differently:
You’ll typically have an Organization Unit (OU) or a set of OUs to which you will want to make the software available when you use the software deployment tools in the Windows 2000 Group Policy Objects.
Note:
I recommend you assign the Firewall Client software to users, rather than computers. The reason for this is that if you assign the Firewall Client software to a computer, the installation begins before the log on dialog box appears. There may be a significant delay before the log on dialog appears. This delay may be so long that users will call the Help Desk complaining of the problem.
If you wish to assign the Firewall Client software to computers, you should do it over the weekend and restart all the computers so that the software has time to install before anyone tries to log on. One way to insure that the delay is minimized is to confirm that your DNS/WINS configuration is very solid and that allow clients are able to easily resolve the name of the internal interface of the ISA Server and that this name matches your settings in the ISA Management console.
Let’s go over the steps for Assigning and Publishing Software. We’ll start with Assigning software to computers.
Assigning Software to Computers
Assigning the Firewall client software to computers is fairly easy. Make sure you have your Active Directory infrastructure up and running, and the ISA Server and your network clients that need the Firewall client installed are members of that Active Directory domain. Then perform the following steps to assign the Firewall client to computers:

- The Open dialog box appears. Drill down to the network location where the shared Firewall Client installation files are located. Note that you can copy these files to another server on your network if you wish to avoid the traffic on the internal interface of your ISA Server. However, if you do use this option, you’ll need to first configure the LAT and the mspclnt.ini file on the ISA Server using the ISA Managment console or configure these file manually. Once you get to the shared folder, select the MS_FWC.MSI file and click the Open button.
- The Deploy Software dialog box appears. Select the Assigned option button and click OK.

- The package appears in the right pane of the GPO and will be applied to all computers within the OU without user intervention.

Publishing Software to Users
You can use the Windows 2000 Group Policy Software Management feature to publish the Firewall client installation files to users. This option doesn’t install the Firewall client, it just makes the software available to users. The users can access the installation files in the Add/Remove Programs applet.
WARNING:
Publishing Software is a good option when users have a appropriate permissions. There’s just one problem with publishing the Firewall client software to users: the user must be an administrator to install the Firewall client! Ouch!!! From what I understand, Microsoft is aware of this problem and recognize that it is a problem. They recommend that you assign the software to computers, rather than publishing or assigning to users.
If in spite of the limitations noted above, you still want the option to publish the Firewall client to users, then check this out:
- Open the Active Directory Users and Computers console. Right click on the OU to which you wish to publish the software. Right click on that OU and click Properties.
- Click on the Group Policy tab, then click on the topmost GPO and click the Edit button.
- Expand the User Configuration node in the left pane, and then expand the Software installation node and right click on it. Click the New command and then click the Package.
- Drill down to the location of the installation files in the same way you did in the last walkthrough. Click on the MS_FWC.MSI file and click Open. The Deploy Software dialog box appears.
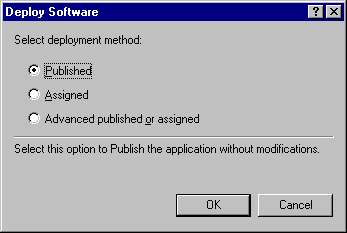
- In the Deploy Software dialog box, select the Published option button, then click OK.
- The Microsoft Firewall Client will now appear in the right pane of the GPO console.
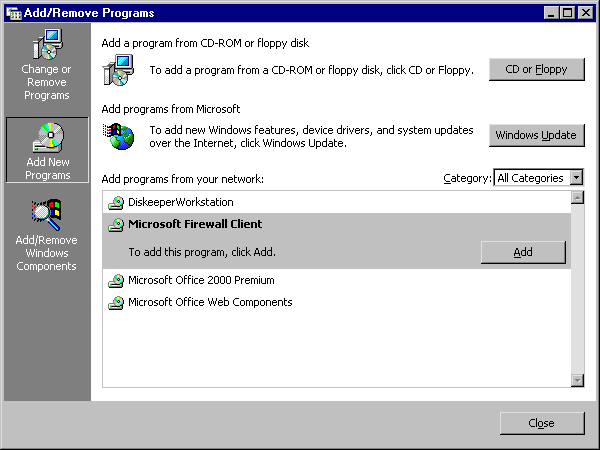
- After completing the Software installation steps, log on as a user in that OU, and open the Add/Remove Programs applet from the Control Panel. Click on the Add New Programs button in the left pane, and you should see the program advertised as seen below.
Not bad, as long as you’re an administrator. I can’t help but think there must be a solution to this problem. The Firewall client .msi file should allow us to install the client without administrative privileges, or it should be able to manage the installation environment so that it can temporarily elevate it privileges during installation. I believe Internet Explorer is able to do this, so why not the Firewall client?
Summary
In this article we reviewed some of the installation options you have when using the Windows 2000 Software Management feature, which is part of Windows 2000 Group Policies. Software Management is a very cool feature if you’re running a Windows 2000/XP environment and you’re using Windows 2000 domains. If you’re using downlevel (9x/NT) you won’t be able to use Group Policy to publish or assign the Firewall client software.


