If you would like to read the other parts in this article series please go to:
- Working With Terminal Services Remote Applications (Part 1)
- Working With Terminal Services Remote Applications (Part 2)
- Working With Terminal Services Remote Applications (Part 4)
- Working With Terminal Services Remote Applications (Part 5)
Introduction
In the previous part of this article series, I walked you through the process of hosting the Windows Calculator as a remote application. While that was a neat trick, I did things the quick and dirty way, in an effort to quickly show you what was possible with Terminal Service RemoteApp. In this article, I want to take a step back and show you some of the settings that I did not really get to discuss in the previous article.
The RemoteApp Wizard
Now that I have demonstrated the Terminal Service RemoteApp feature, I want to work through the RemoteApp Wizard one more time, and take more time to explain things as I go. You can launch the RemoteApp Wizard by opening the TS RemoteApp Manager, and clicking on the Add RemoteApp Programs link found in the Actions pane.
When the RemoteApp Wizard opens, click Next to bypass the wizard’s Welcome screen. At this point, you should see a list of the applications that are available for remote hosting, as shown in Figure A. You can select the check box next to any application that you want to host, or you can use the Browse button to locate the executable file for any application that is not on the list.

Figure A: Select the applications that you want to host remotely
One thing that I want to mention quickly is that by default, this list will only show you applications that have been installed for use with the Terminal Services. You can host any application on the server, but unless an application has been installed specifically for use with the Terminal Services, there is no guarantee that the application will run correctly.
If you look at the figure above, you will notice that this particular dialog box contains a Properties button. If you select an application and click this button, you will see a dialog box that tells you the application’s name and its local path. That way, you can verify that you are hosting the correct application. You can see what this dialog box looks like in Figure B.
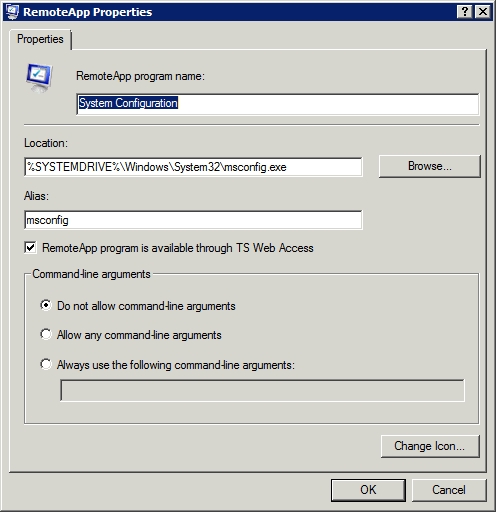
Figure B: The application’s properties sheet provides you with detailed information about the application that you have selected
What is more important though, is that sometimes an application will be configured to use various command line switches. Clicking the Properties button gives you the chance to verify that no switches are being used in conjunction with the application when it is run locally. If any switches are being used, and you need to keep using the switch when you run the application locally on the server, then you can use the Properties dialog box to prevent command line switches from being used by those who are running the application remotely. Conversely, you can also require command line switches to be used when remote users execute the application.
After you have selected the applications that you want to host, and you have verified any existing command line arguments, click Next. When you do, Windows will show you a summary of the applications that you are about to remotely host. Click Finish, and the application will be added to the list of RemoteApp programs.
Exporting RemoteApp Settings
At this point, we could generate an RDP file for the application if we wanted to, but I wanted to take a moment and show you the export and import features for remote applications. Hosting remote applications does not tend to be quite as resource intensive for a terminal server as hosting a full blown Windows desktop, but applications still consume server resources. This is especially true if you have multiple users who are all using multiple remotely hosted applications.
Depending on the workload that the users place on the terminal server, one terminal server may not able to handle the user’s demand on its own. You may end up having to deploy multiple terminal servers in the name of scalability and fault tolerance.
If you do end up having to deploy multiple terminal servers, then you will be happy to know that you do not have to configure your remote applications separately on each server. You do have to install the remote applications on each individual server; there is no getting around that requirement. However, you do not have to manually specify which applications are being remotely hosted.
Once you have one RemoteApp server configured, you can click the Export RemoteApp Settings link that is located in the TS RemoteApp Manager’s Actions pane. When you do, Windows will display the dialog box that is shown in Figure C.

Figure C: The TS RemoteApp Manager allows you to export remote application settings to other servers
As you can see in the figure, you have the option of either specifying the name of a terminal server that you want to export the settings to, or you can export the settings to a file. If you choose to export the settings directly to another terminal server, then any RemoteApp settings that are presently configured on that server will be overwritten.
If you decide to export the RemoteApp settings to a file, then you can use the Import RemoteApp Settings link, found in the TS RemoteApp Manager’s Actions pane to import the settings into the new terminal server. Like the direct export method though, importing a settings file will cause any existing remote application settings to be overwritten.
Creating an RDP File
I showed you how to create an RDP file for a remote application in my previous article. However, I wanted to wrap things up by revisiting some of the settings that I didn’t get to talk about in the previous article.
You can create an RDP file by selecting an application from the RemoteApp Program list, and clicking the Create RDP File link, found in the System Configuration section. This will cause Windows to launch the RemoteApp Wizard.
Click next to bypass the wizard’s Welcome screen, and you will be taken to the screen that is shown in Figure D. If you look at the figure, you can see that the first option that this dialog box gives you is the location to which you want to save the RDP files that you generate. By default, RDP files are placed in the C:\Program Files\Packaged Programs folder, but the location is customizable.

Figure D: There are a lot of options that you can configure when generating an RDP file
The next section lists the terminal server that is hosting the remote application, the port number that should be used by the RDP session, and whether or not the server requires authentication. The default settings will typically work fine, but you do have the option of clicking the Change button to change these settings.
One particular situation that would require you to make a change would be if the remote applications were being hosted by a terminal server farm instead of by an individual server. In such a case, you would need to provide the farm’s fully qualified domain name.
The next section down is the Terminal Service Gateway Settings section. You would not normally have to do anything here, because gateway settings are detected automatically. Microsoft does provide you with a Change button that you can use in case the gateway settings are detected incorrectly though.
The last section is the Certificate Settings section. You would use this section if you normally use a certificate to sign the applications that you publish.
Once you have entered the desired settings, click Next, followed by Finish, and the RDP file will be generated.
Conclusion
If you have followed along and performed the steps that I have outlined in this article series, then you might have noticed that the TS RemoteApp Manager contains options for using remote applications with Terminal Service Web Access. I will show you how this works in the next part of this article series.
If you would like to read the other parts in this article series please go to:
