If you would like to read the other part in this article series please go to Installing Exchange Server 2010 (Beta) (Part 2).
Introduction
Welcome to Exchange Server 2010! First things first, Exchange Server 2010 is a beta product and must not be installed in a production environment, and must be tested in your lab. Because it Is a beta product, we are not going to go into the details and requirements for Active Directory, hardware and client OS to manage Exchange Server 2010. Here are some points that you should keep in mind before creating your lab environment:
-
Exchange Server 2010 Beta is a x64 bits only
-
Exchange Server 2010 runs on Windows Server 2008
-
Exchange Server 2010 does not run on Windows Server 2003
-
Exchange Server 2010 Management Tools can be installed on either Windows Vista x64 or Windows 2008 x64
-
Make sure that Global Catalogs and Domain Controllers are running the latest Service Pack and they are up-to-date disappointing
Exchange Server 2010 Setup Improvements
Exchange Server 2010 has tons of new features. In this article we are going to go over a couple of the new features introduced in the setup process. In the following sections we are going over the new changes, and afterwards, we are going to prepare Windows Server 2008 to the new Exchange Server 2010.
Language Files Support
Exchange Server 2010 setup process added some improvements to install Exchange in different languages through the Language Files Location page. The second page of the installation process requests if the installation will continue using the default language which is English or if the administrator wants to specify a language file in the file system or get it from the internet.
The first change is that we have a bunch of localization folders in the Exchange Server 2010 installation source files, you will notice folders with 2 letters and each one of them represents a language (pt Portuguese, it Italy and so forth). When we run setup.exe the setup will identify the current language of the OS and the initial splash screen and the Introduction page will use the current language of the user. After that we have a choice to download a Language file, or use English, which is the default language file.
As a Canadian I am going to use a local example to demonstrate the new Language files feature. Let us say that we have a server located in Quebec which is a French province in Canada, and the operation system has the French language configured and the Administrator is using French as well, as shown in Figure 1.
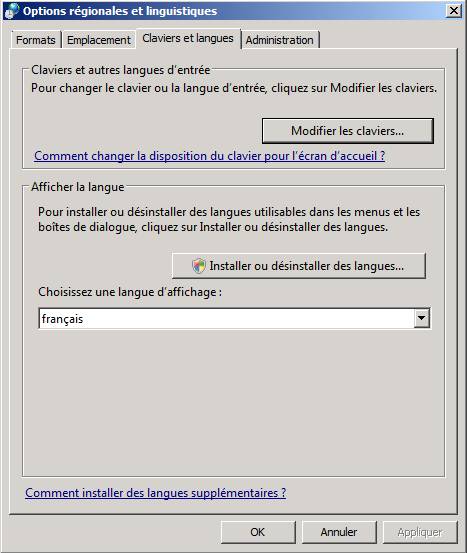
Figure 1
As we saw before, after the Introduction page, the setup will ask if we want to continue with the default language (English) or if we want to use a local Language file or download it from the Internet. Let us select the first option (Internet) and click on Suivante (Next), as shown in Figure 2.
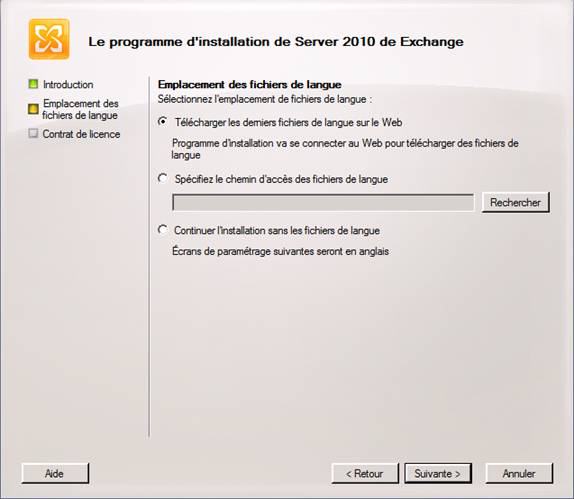
Figure 2
The next page will be a simple confirmation that we want to download the Language File package, click on Next. On the Acquiring Languages page we will be able to process to download and extract the language files pack, click on Next. (Figure 3).
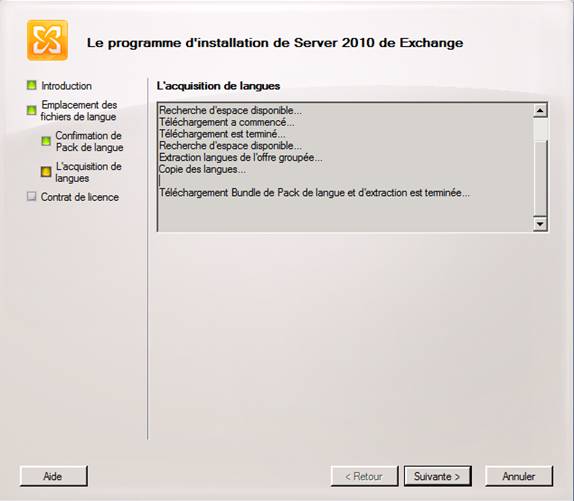
Figure 3
Now that the Language file pack was downloaded and copied over, we can click on Suivante (Next) and from now on all following setup pages will be based on the French language.
Exchange Server roles
Exchange Server 2010 introduces the concept of DAG (Database Availability Groups) that is a combination of CCR (Cluster Continuous Replication) and SCR (Standby Continuous Replication) and this new feature will integrate better the Exchange Server high availability solution and the operating system cluster component. Another change is that now the mailbox server role can be highly available and shared with other roles such as CAS and Hub Transport. Because of these reasons we do not have more Active Clustered Mailbox role and Passive Clustered Mailbox Role options to choose during the Server Role Selection, as shown in Figure 4.
By the way, SCC (Single Copy Cluster) and LCR (Local Continuous Replication) no longer exist in Exchange Server 2010.
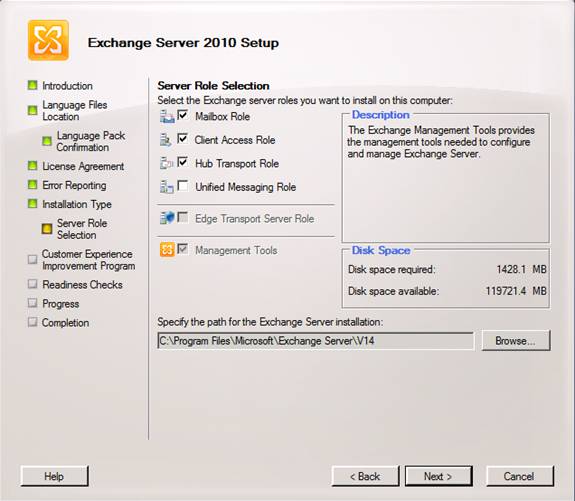
Figure 4
CEIP (Customer Experience Improvement Program)
By joining this program, you will be allowing Microsoft to collect information about your Exchange Server usage to help the product team to improve the product. You can also select your company industry as well, as shown in Figure 5.
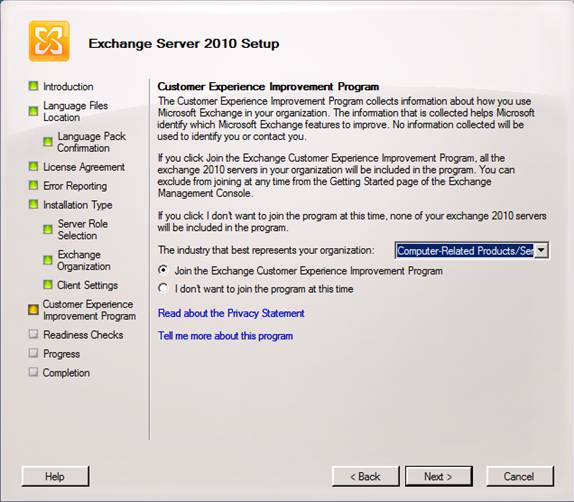
Figure 5
To disable this feature afterwards, you can open Exchange Management Console, click on Microsoft Exchange On-Premises item, click on Community and Feedback tab, expand Customer Feedback Options, and click on Customer Experience Improvement Program link.
Installation log file is accessible from the Setup Wizard
During the Exchange Server 2010 installation process all the steps performed by the setup process are stored in a file called ExchangeSetup.log and it can be used for troubleshooting purposes. The setup log file can be found at C:\ExchangeSetupLogs folder, but using the new Exchange version we do not need to remember the location because on the last page of the setup wizard we have the option View Setup Log, as shown in Figure 6, and when clicking on that link the ExchangeSetup.log file will be displayed automatically (Figure 7).
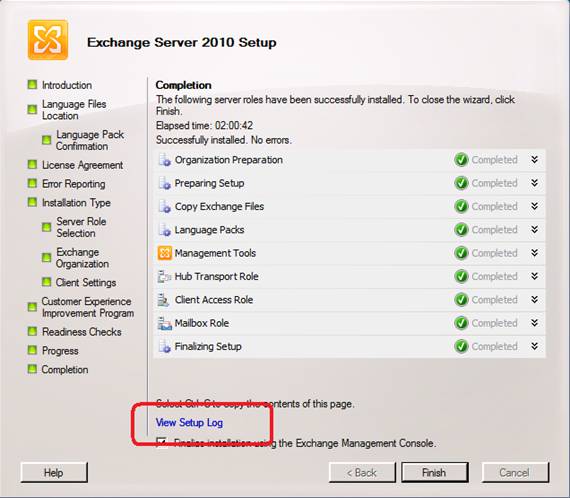
Figure 6
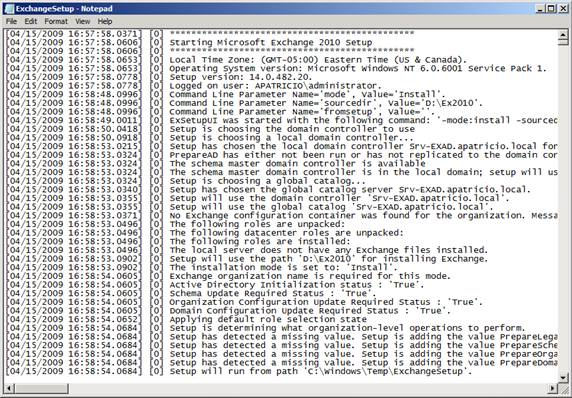
Figure 7
Installing Pre-Requisites
Exchange Server 2010 requires some pre-requisites that are shared by all server roles. The installation process of these pre-requisites is pretty straight forward, just install them using the default settings, you will have a link in the first page of Exchange Server setup.exe however we can save a lot of time downloading those components and installing them to meet the basic pre-requisites of installing Exchange Server 2010, here they are:
If the Mailbox Server role is going to be installed, then the 2007 Office System Converter: Microsoft Filter Pack is required, and it can be found here.
Installing Windows Server 2008 Components
Exchange Server 2010 has the same roles of the previous version (Hub, CAS, Mailbox, UM and Edge) in the following matrix we listed the Operating System components required for each Exchange Server role, as follows:
|
Role Services/Role |
Mailbox |
Client Access Server |
Hub |
Unified Messaging |
Typical
CAS, HU B and Mailbox |
Edge |
|
RSAT-ADDS |
X |
X |
X |
X |
||
|
RSAT-ADLDS |
X |
|||||
|
Web-Server |
X |
X |
X |
X |
||
|
Web-Metabase |
X |
X |
X |
X |
||
|
Web-Lgcy-Mgmt-Console |
X |
X |
X |
X |
||
|
Web-ISAPI-Ext |
X |
|||||
|
Net-http-Activation |
X |
|||||
|
Web-Basic-Auth |
X |
X |
X |
X |
||
|
Web-Digest-Auth |
X |
|||||
|
Web-Windows-Auth |
X |
X |
X |
X |
||
|
Web-Dyn-Compression |
X |
|||||
|
RPC-over-HTTP-proxy * |
X |
|||||
|
Web-net-ext |
X |
X |
X |
X |
||
|
Desktop-Experience |
X |
* This option is required when Outlook Anywhere will be configured on the CAS Server
** This option is required when the Mailbox Server will be clustered otherwise is not required.
Okay, now that we know the Windows Server Components for each server role, we can install them in different ways, and some ways to accomplish the OS components are described below.
The first option is using Server Manager Console, and installing the role and its components using GUI. We can also use ServerManagerCMD command line utility to install each component individually using the following syntax:
ServerManagerCmd –i <role>, for example ServerManagerCMD –i RSAT-ADDS
We can use a single line to install all roles and components in a single line, using more than one component, this syntax can be used:
ServerManagerCMD –i <component-1> <component-2> .. <component-N>, for example: ServerManagerCMD –i RSAT-ADDS Web-Server
All previous steps can be performed to install the Windows Server 2008 components. We can however also use XML files to facilitate the Exchange Server 2010 deployment. Basically, we can use ServerManagerCMD and those XML files to install all OS components, without specifying one by one, which makes our installation process way easier. The following are the XML files available and their usage:
-
Exchange-all.xml – this xml file has all components for all Exchange Server roles, it should be used when you are installing CAS/HUB/MBX and UM on the same box.
-
Exchange-base.xml – this xml contains only the information to install the RSAT-ADDS which is a base component for all roles.
-
Exchange-cas.xml, Exchange-edge.xml, exchange-hub.xml, exchange-mbx.xml and exchange-um.xml files – Each file is for a specific role, if you want to use a single role, for example CAS you should use only Exchange-cas.xml. If you want to use a server as CAS and HUB you can apply Exchange-cas.xml and Exchange-hub.xml.
-
Exchange-typical.xml – Install all components required in a typical installation (CAS, Hub
In order to use the XML files, we can use the following syntax in a command prompt:
ServerManagerCMD –ip <XML file Name>, for example ServerManagerCMD –ip Exchange-typical.xml (it will install all OS components for a CAS/HUB and Mailbox installation)
Note:
In the current Beta we have two files (Exchange-mbx.xml and Exchange-Typical.xml) that include Failover-Clustering feature and that feature should not be there because when DAG is deployed it validates if the feature is installed and in case it has not been installed yet it will be installed automatically.
Conclusion
In this first article we went through some of the new features and improvements during the Exchange Server 2010 installation process and also its pre-requisites. In the next article, we are going to cover the windows hotfixes that must be installed and the process to install Exchange Server 2010.
Again, please do not forget this is a beta version of the product and must not be used in your production environment.
If you would like to read the other part in this article series please go to Installing Exchange Server 2010 (Beta) (Part 2).


