This article will demonstrate how to script a registry cleanup or modification for all user profiles on a given computer – for instance to do a virus sweep. We will also see how this approach can be used together with a computer startup script within a computer Group Policy Object to modify all user profiles in the domain, site or OU. Yes, we can actually modify user registry settings by using a computer startup script…
In some cases you can be required to delete, add or modify some part of the registry – for all users on a computer at once. In most cases we would prefer to use a Group Policy Object (GPO) on the users to add or modify a given value, but when it comes to removing values we sometimes have to use scripts (unfortunately, you might say). Also, sometimes we want to perform a cleanup task in a single process without having to wait for all users to log on. This article will show how to do this in a fairly easy way.
We will see how it is possible to do the registry modification by using a very efficient registry script – and to combine this with a GPO on the machine level (startup or shutdown), instead of using a GPO on the user object (logon or logoff).
Why would I want to do this?
So, why is that a smart approach? Well, maybe you want to do the “cleanup” during the night, you might want to make sure that a certain value is modified (deleted, added or changed) by the next morning – typically the ‘Run’ or ‘RunOnce’ keys in the user part of the registry after a virus attack – so combined with a Wake-On-Lan (WOL) procedure you can be ready to go home in no time!
In other cases the user might not have the required privileges to perform the cleanup or modification task. The registry key you want to change might be protected by a security permission, making it impossible to use a user GPO (as it will run in the user context). The great thing is that computer startup scripts execute in the context of the System account – that can be very useful to keep in mind in many situations!
Warning!
The code presented in this article is produced for testing purpose only – use in production is at your own risk. The included code is simplified a bit to be easier to understand and read. Please be sure you confirm the script functionality in your test environment before implementing this in production. You can include additional error handling, logging and additional functionality – modify as you want!
I am not saying the code does not work, just making sure you understand that execution is at your own risk.
The background
Before we take too deep a dive into the code, a few things about the registry must be perfectly clear.
It is very common that people think the HKEY_USERS part of the registry is a place where you can see all local profiles on a given computer. However, this is not the case. The HKEY_USERS lists profiles that are currently loaded on the machine, so to speak the profiles that are active in memory. As soon as a user logs on to a computer, an entry will be visible in this part of the registry.

Figure 1
As shown in Figure 1 you will normally be able to see a few profiles loaded – even though only one user is logged on to the console. When a user logs off, the Registry Hive is unloaded and is no longer visible under HKEY_USERS. Here is a short explanation on the loaded hives:
“.DEFAULT” is the default user profile – NOT something that all users will see (like a Public or All Users profile) and NOT a registry profile that is copied to all new users on the computer (these are common misunderstandings). This is however the standard profile in use, even when nobody is logged on – hence the startup profile (loaded before you even reach the desktop). By setting values in this profile you can change options such as desktop background during the logon screen (Ctrl+Alt+Delete), the initial Num/Caps Lock settings etc.
“S-1-5-18” is the “System” Security Identifier (SID)
“S-1-5-19” is the “LocalService” SID
“S-1-5-20” is the “NetworkService” SID
A profile or SID starting with “S-1-5-21-” and ending with “-500” is the SID of the built-in Administrator account. The ‘real’ and active user profiles are all other entries in the HKEY_USERS part of the registry. In the script examples included in this article the above specified profiles are NOT touched – only ‘regular’ users are touched – you could change that easily by deleting a few lines in the code.
Load My Hive…
So, what if I want to modify a profile of a user that is not currently logged on? Well, we have at least two options:
1 – to manually load the hive in Regedit
2 – to create a script that loads the hive dynamically.
Let us look at the first option first. If you open Regedit (Start > Run > Regedit) and browse to the HKEY_USERS entry (you have to click or mark it), then go to the File menu, you should now be able to choose “Load Hive…” (see Figure 2)

Figure 2
At this point we are prompted to enter a path to an NTUSER.DAT file (see Figure 3).
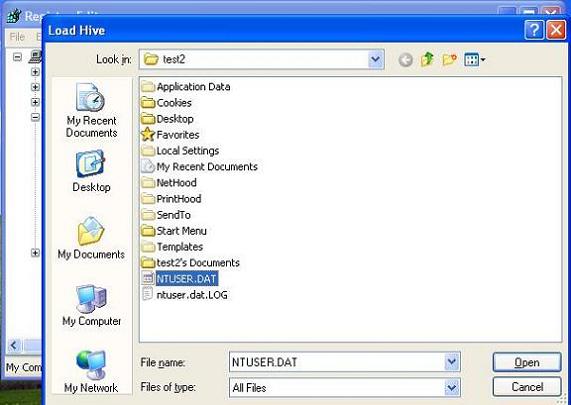
Figure 3
The NTUSER.DAT file is located in the user profile folder. Above, we can see the NTUSER.DAT file of the user ‘test2’. That file is located right below the “C:\Documents and Settings\test2\” folder – on Windows Vista, user profiles are typically stored below the “C:\Users\” folder.
If you cannot see the NTUSER.DAT file as we can in Figure 3, you should go to Tools > Folder options and select “Show hidden files and folders“.
When loading a hive temporarily we need to give it a name – make your own choice. In Figure 4 and the script examples we are using the name: ‘TmpLoadHive‘.

Figure 4
Click OK and the hive hierarchy should be visible, and expandable, as shown in Figure 5.

Figure 5
In Figure 5 ‘TmpLoadHive’ has been expanded to show the structure of a loaded user hive – it should look exactly like any other user registry. It is identical to what the user will have in his or her HKEY_CURRENT_USER (HKCU) when logged on to the machine.
When done, remember to unload the user hive again by marking the ‘TmpLoadHive’ hive and going to the File menu > “Unload Hive…” as in Figure 6.
Important!
If you do not unload the hives, you cannot load that hive again until after a reboot, because you cannot load an already loaded hive (this also goes for logged on users – including Fast User switching users). This will also make the script ‘fail’ loading the hive.

Figure 6
That procedure would be very annoying if you had to do it for all user profiles on all computers in your domain, right? Luckily we have another method by using our good old friend REG.EXE.
An old friend to the rescue
The REG.EXE command has two very useful parameters: LOAD and UNLOAD. They do exactly the same stuff as we did manually above. We just have to specify the temporary hive name and a full path to the NTUSER.DAT file we want to load into memory.
You want a script example? Ok, to set the background for the Default User profile we could run the following code:
REG.EXE LOAD HKU\DefU “C:\Documents and Settings\Default User\ntuser.dat”
REG.EXE ADD “HKU\DefU\Control Panel\Desktop” /v Wallpaper /d “C:\Windows\Wallpaper.bmp” /f
REG.EXE UNLOAD HKU\DefU
The above code will first LOAD the hive for the Default User profile into a temporary hive called “DefU” in the “HKEY_USERS” part of the registry database. Then it will set a registry value for the desktop background for the Default User profile, which is the profile that is copied automatically when new users are created (the first time they log on). Finally, it will UNLOAD the temporary hive.
So how can I find the Ntuser.dat files in a script?
When we want to load hive for all users on a given machine we would want to find all user profiles on that machine as safely and easily as possible. We could of course just “browse” through the folders below “Documents and Settings” – or “Users” on Vista/Windows Server 2008 in the code – but we have a better approach that is more accurate.
In the following registry value:
“HKLM\Software\Microsoft\Windows NT\CurrentVersion\ProfileList\XXX\ProfileImagePath”
you will find the correct profile folder path for all local users. XXX is the SID of the user, so by going through all of these keys we will have the full paths for all local NTUSER.DAT files.
I have written a VB Script function that lists the user profile folders on a given computer (in a single string separated by pipe “|” characters) – it being local or remote. The functions exclude profiles of the Systemprofile, LocalService, NetworkService and the Local Administrator account – in most cases these are not required in a cleanup, but the ElseIf statements can easily be excluded if required. The function is called “GetUserProfileDirsFromRegistry” and can be found right here.
And what about Roaming profiles you might ask? Well, the NTUSER.DAT files are all we need, so if you want to modify the roaming user profiles instead just go ahead and write a script that ‘browses’ through that roaming profile network location you have…
Delete this value or key…
Well, now we know how to load (or ‘mount’) a user hive within a script, now we just need to change something within that hive. You could probably come up with hundreds of cool things to do, but I have only chosen to use two functions – both of them are for deleting stuff within the loaded registry hive. Here is an explanation:
After a virus attack you might have to do a cleanup of the ‘Run’ key:
“HKEY_CURRENT_USER\Software\Microsoft\Windows\CurrentVersion\Run” for all local users. Maybe some piece of malware created an entry that you need to get rid of – for that purpose I created the DeleteSingleValueFromTmpLoadHive sub routine. This routine can delete a single value in the registry.
You might also want to delete an entire registry key, including subkeys and values, eg. “HKEY_CURRENT_USER \Software\Windowsecurity.com”, for that purpose I included the DeleteKeyAndSubsFromTmpLoadHive sub routine.
The golden combination
When combining what we have learned here, and performing some good old VBS scripting, we have a script that performs the following tasks:
- Find all profile folders on the local computer by reading the registry values mentioned above
- Ignore built-in OS related profiles, including the local administrator account
- Load the registry hive from NTUSER.DAT files within the located profile folders
- Delete a registry key, including all sub-keys, values etc. for each ‘mounted’ user profile *
- Delete a single registry value for each ‘mounted’ user profile **
* “<USER HIVE>\Software\Windowsecurity.com” (and all sub keys/values)
** “<USER HIVE>\Software\Microsoft\Windows\CurrentVersion\Run\VirusExecutable”
The script does NOT prompt to confirm when it is completed and any errors will be suppressed (by using ‘On Error Resume Next’ handling). This behavior can of course be modified to fit your needs. As this is not really a scripting article I cannot dive too much into the code, but if you are a bit familiar with scripting you should be able to get a pretty good idea of what it is doing.
The complete code example can be viewed and downloaded here! It has been tested on Microsoft Windows XP, Microsoft Windows Server 2003 and Microsoft Windows Vista.
SYSTEM is here!
At this point we can “hit” a single machine, the local computer from which we execute the script – or to be more accurate: all user hives on it. There is a major limitation though: users in general (hopefully) are NOT local administrators, and so they won’t be able to modify the registry for other users! This means we would want to either run the script as a local admin manually for all machines in the domain – or do something extremely effective: use a Group Policy on the machine level and configure a computer startup script. To learn more about computer startup script see the External Links section.
The beautiful thing about a computer startup script is that first of all it runs in the context of Local System, a very powerful account (so you can do almost anything), and second of all, it can be set to execute on thousands of computers within a few minutes by placing the GPO on the Active Directory domain, site or Organizational Unit (OU) level!
Please be aware, that the first load of the new computer GPO can ‘fail’, in this case you will have to restart the computer (and maybe perform a GPUPDATE /FORCE command just to be sure). Also, please give the script time to execute before logging on – both of these mentioned ‘issues’ can occur due to the way these policies are loaded during system boot. I am not going to address these Group Policy ‘features’ any further in this article.
If you have Wake-On-LAN (WOL) functionality on the network you can boot the computers during night time to do some “cleaning” and shut down the computers afterwards. So by combining scripting, WOL and Group Policy we can perform a very efficient cleanup job within short time – or some other job we might want performed without doing too much work: Imagination is the only limit!
Conclusion
We have seen how to combine scripting and computer startup scripts in Group Policy to perform a cleanup job in a very efficient way. We can now update user profiles even though they are not currently loaded into memory – without even logging on to the system(s).
This approach can be further developed to change other parts of the profiles, maybe files and folders, for all users on a given computer. Feel free to send me any feedback and ideas you might have on this.
External links
How To Run a Logon Script One Time When a New User Logs On in Windows Server 2003
Assign computer startup scripts