Introduction
The HAB (Hierarchical Address Book) is a feature introduced in Exchange Server 2010 Service Pack 1 and basically allows an Outlook client to see the regular Global Address List in a hierarchy format. The HAB is supported in Outlook 2010 clients and the down side is that there is no support for Outlook Web App at this moment.
In order to understand how HAB works, let’s create a scenario where an organization wants to use their departmental structure also in the Global Address List, as shown in figure 01. In this article we will go over the entire process and see how we can use a simple script to speed up the process to create such design. Bear in mind that in order to deploy HAB it is not required to change all groups that you have, we can create a new structure just for HAB. We can create a set of groups to support the infrastructure required and assign the existent users to these new groups.

Figure 01
The HAB management is totally done using Exchange Management Shell, and there is no option through the Exchange Management Console.
Before starting this article make sure that you update your Office and Windows using Windows Update and apply all service packs available.
Creating the infrastructure to support HAB
The first step that we will be doing is creating an Organization Unit just for that purpose, and in this tutorial the OU will be named as HAB, as shown in Figure 02.

Figure 02
After that we need to create the initial group that will be the root of our HAB, and usually you want to assign this group the name of your corporation. In this article we will be using AndersonPatricio.org. Let’s make sure that this group is created inside an Organization Unit (Figure 03). The group can be created using either Exchange management Shell or Exchange Management Console and it is a regular group nothing special about it.
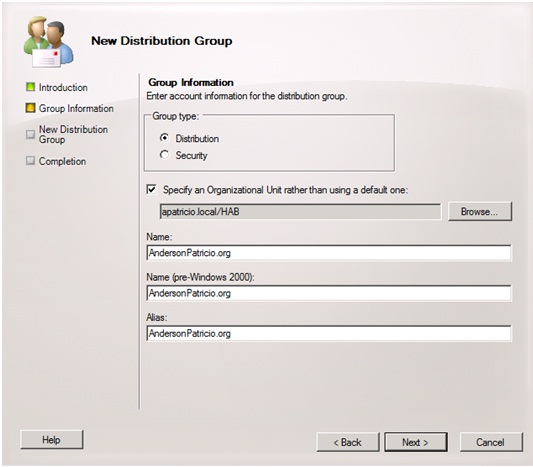
Figure 03
Let’s repeat the same process for the other groups that we want to display in the HAB, we will be creating IT, Finance, Marketing, Support and Help Desk groups the same way that we created the previous one.
Now, it’s time to keep the groups nested following our initial design, in order to do that the groups Marketing, IT and Finance must be part of the AndersonPatricio.org group (Figure 04) and the groups Consulting and Support must be members of the IT group, as shown in Figure 05.

Figure 04

Figure 05
Now, that we already have the groups in place, we need to set them up with different icons otherwise, they will show up just as regular items on the right hand side of the view in Outlook. In order to do that, the attribute IsHierarchicalGroup must be enabled in each Group. We can enable such attribute in all groups at the same time using the following cmdlet:
Get-Group –OrganizationUnit<OU-Path> | Set-Group –IsHierarchicalGroup $true, where <OU-Path> can be used in the following format apatricio.local/HAB
We can also enable group by group, using the following cmdlet:
Set-Group <Group-Name> -IsHierarchicalGroup $true
The cmdlet above will change the attribute msOrg-IsOrganizational to TRUE on the group object properties, as shown in the Figure 06.

Figure 06
Finally, we need to populate the group with their members, add the current users that you have as members of each department accordingly.
Managing Hierarchical Address Book at Organization Level
The next step after creating all groups and populating them with their respective members is to enable HAB by defining the root group at the organization level. We can do that using the following cmdlet:
Set-OrganizationConfig –HierarchicalAddressBookRoot “<Group-Name-of-your-root>”
Here it will be Set-OrganizationConfig –HierarchicalAddressBookRoot AndersonPatricio.org. This process will define the location of the Group defined as root in the msExchHABRootDepartmentLink at organization level in the Configuration partition, as shown in Figure 07.

Figure 07
After waiting a while (refresh of OAB and download on the client, you can force this process if you want to) the client should be able to see a new tab called Organization when the user tries to either access the Address List or composes a new message and clicks the respective field to find a new user in the Global Address List. (Figure 08). The user always can come back to the old style by clicking on Name list tab which is the first tab on the same window.

Figure 08
If you want to disable Hierarchical Address Book in your organization the process in a single cmdlet, just run this command:
Set-OrganizationConfig –HierarchicalAddressBookRoot $null
Managing Mailbox and contacts order in the HAB
It’s nice to have the Address Book list based on your business hierarchy and for some companies it will be easier to find stuff and co-workers using the departmental structure. We can have the same objects that we have been using for years in the new HAB, such as Mailboxes, Groups and Contacts.
We covered the left side of the display with the hierarchy of objects however, we can control the order how these are displayed. The process to define the order is based on three variables: first the SeniorityIndex attribute, if that one is empty than the PhoneticDisplayName is used and if that one is also empty then we are going to have the entries sorted by the DisplayName attribute.
As Administrators we don’t want to work with PhoneticDisplayName and DisplayName attributes because they are part of the user properties, so we can work on the SeniorityIndex and this is helpful especially in organizations where the first entry for a specify department has to be the head of that specific region/department.
All Groups, Contacts and Mailboxes have an attribute called SeniorityIndex. This attribute may contain values from 1 to 100 and based on that value you can change the priority how objects are displayed in the HAB where a 100 value is going to be the first entry and it’s also the highest value available.
Let’s say that our CIO wants to be the first entry in the IT area, we just need to configure its object to SeniorityIndex 100 and then we can make sure that he will be the first one on the list. This cmdlet can be used to configure the SeniorityIndex, as follows:
Get-Mailbox <UserName> -SeniorityIndex 100
Automating the process with a simple script…
We have seen so far how to create groups, change their attributes, and change their order of appearance. What if we can create a script to do that? In order to keep it simple, I created a script to do the initial hard work, the script is called hab.ps1 and it reads a file hab.csv and based on that file it will create all groups and configure HAB in your organization.
The script idea is pretty simple, basically we need to fill out the information on a file called HAB.CSV, and that file will have 4 columns: GroupName, Level, Parent and Seniority. The main rule here is to describe your HAB from top to bottom and the second parameter will be the level that you want your group to show up, bear in mind that we can have only one Level 1 entry, other than that just make sure that you keep the child objects underneath their parents, Figure 09 shows how to organize the file when you have several levels. Also, always keep the parent of that object one level up.

Figure 09
The script will create all groups, and will make sure that the members belong to their parents and so forth. In order to run the script you have to run ./hab.ps1 and make sure that hab.csv is located in the root of your C: drive, or change the script based on your requirements.
The script code is shown below, I used a simple array with 8 entries and you can change it or make it dynamic in case you have more levels on your organization.
I recommend you to comment the PrepareORG section of the script and play around with the script before enabling that section, this way you can test on your environment how the process will work.
Function CreateGroup ($tmpGroupName){
New-DistributionGroup -Name $tmpGroupName -DisplayName $tmpGroupName -Alias $tmpGroupName -OrganizationalUnit “apatricio.local/HAB” -SAMAccountName $tmpGroupName -Type Distribution
}
Function PrepareORG(){
Set-OrganizationConfig -HierarchicalAddressBookRoot $HABArray[1]
}
$HABArray = (0,1,2,3,4,5,6,7)
$File = Import-Csv C:\hab.csv
$file
$file | foreach {
write-host $_.GroupName
$HABArray[$_.Level] = $_.GroupName
CreateGroup ($_.GroupName)
If ($_.Seniority -ne 0) {
Set-Group $_.GroupName -SeniorityIndex $_.Seniority
}
If ($_.Level -ne “1”) {
$vLevel = $_.Level – 1
write-host $tmpLevel
Add-DistributionGroupMember -Identity $HABArray[$vLevel] -Member $_.GroupName
}
}
Write-host “Defining the Organization HAB root…”
PrepareOrg
Conclusion
In this article we demonstrated how to enable and manage Hierarchical Address Book feature in Exchange Server 2010 Service Pack 1. Also, we used a simple script to create the HAB structure including groups from a CSV file.


