If you would like to read the other parts in this article series please go to:
- Securing Printer Usage in Windows Server 2003 (Part 2)
- Securing Printer Usage in Windows Server 2003 (Part 3)
Over the last few years, printers have become so inexpensive that it’s easy to not even give them a second thought. Even so, there are situations when it is probably best for you to know who has been printing to printers on your network. For example, your company’s accounts payable department may have a printer that they use to print checks. You probably have this type of printer configured so that not just anyone with a domain user account can print to it. Even so, it is usually important to know if an unauthorized user tried to print to it and to track the checks that legitimate users have printed.
I have also seen companies restrict printers that use expensive supplies. For example, one of the companies that I used to work for had a photo printer that could print 36×24 inch photos. As you can imagine, poster sized photo paper isn’t cheap (or at least it wasn’t back then), and it took a lot of ink to print a photo that size. Consequently, only a couple of users were authorized to print to the printer. That being the case, the company decided to audit the use of this printer to ensure that expensive supplies were not being wasted on unnecessary print jobs.
It really doesn’t matter why a printer is restricted. If your company sees fit to restrict the use of a printer, then it is probably a good idea to audit the printer to make sure that it is not being used for unauthorized purposes. In this article, I will show you how to implement printer auditing, and explain what your various auditing options are.
It is easiest to restrict and audit printers when the print queue is hosted on a server that’s running Windows Server 2003. Keep in mind that this doesn’t mean that the printer has to be physically attached to the server. The server can simply host the print queue for a network printer. For example, in my own organization I have a printer that has its own network card. As such, it is possible to print to the printer without the printer having to be connected to a server. If users were allowed to print to such a printer directly, it would be impossible to track printer usage through conventional means.
If you are interested in restricting or auditing such a printer, then you are better off creating a print queue on one of your servers and treating the network printer as if it were connected to the server (even though it isn’t).
To see how this works, click the server’s Start button and select the Control Panel | Printers and Faxes | Add Printer options from the Start menu. When you do, Windows will launch the Add Printer wizard.
Click Next to bypass the wizard’s Welcome screen. You will now see a screen similar to the one that’s shown in Figure A. As you can see in the figure, this screen asks you if you want to use a printer that is locally attached to the server, or if you would prefer to use a network printer. This screen is somewhat misleading because although we are creating a print queue for a network printer, Windows doesn’t see it that way. If you were to choose the Network Printer option, Windows would assume that you were connecting to either a printer that is being hosted over the Internet or to a printer that is already being hosted by another Windows machine. This means that you would have to connect to the printer by entering either a URL, a UNC based share name, or by performing an Active Directory query. For the purposes of this article, I am assuming that we are trying to audit a standalone printer, so none of these options apply. That being the case, go ahead and choose the Local Printer option, even though the printer isn’t actually local.
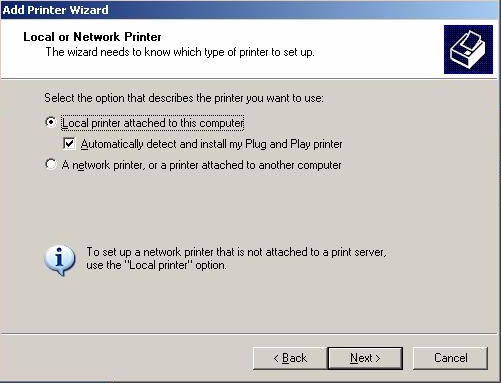
Figure A: Windows gives you a choice of connecting to a local printer or a network printer
You will now see a screen similar to the one that’s shown in Figure B. As you can see in the figure, Windows assumes that the printer is connected to the server through a parallel port (LPT1). You can’t use the LPT1 option since the printer is not connected directly to the server (most printers don’t even have a parallel port any more anyway). All of the other options on the Use the Following Port drop down list also refer to local ports. You will therefore have to select the Create a New Port option.
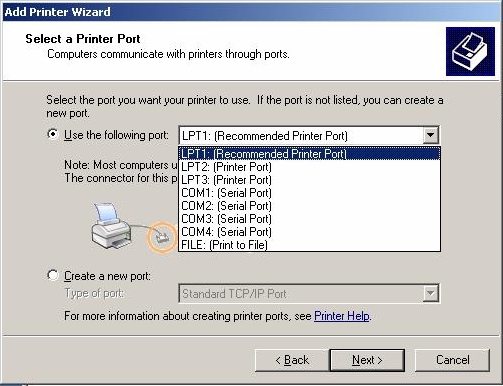
Figure B: The Add Printer Wizard tries to connect to a locally attached printer by default
The Create a New Port drop down list contains two options; Local Port and Standard TCP/IP port. Choose the Standard TCP/IP port option and click Next. When you do, Windows will launch the Add Standard TCP/IP Printer Port wizard. Click Next to bypass the wizard’s Welcome screen and you will see a screen similar to the one that’s shown in Figure C, asking you for a printer name or IP address and a port name.
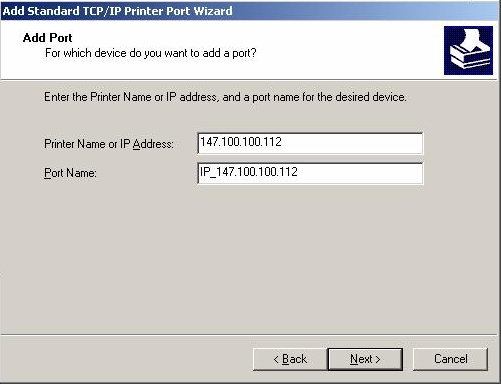
Figure C: You must enter the printer’s IP address and a port name
The printer should already have an IP address assigned to it, so just enter that address into the space provided. You can enter anything that you want for the port name, but keep in mind that the port name must be unique. By default, Windows will create a port name of IP_ followed by the printer’s IP address. You can use this port name, or create your own.
Click Next and you will see a summary screen displaying the options that you have entered, as shown in Figure D. Notice in the figure that the port that you are configuring is set to accept RAW print data over port 9100, and that Windows assumes that the printer uses an HP Jet Direct interface.
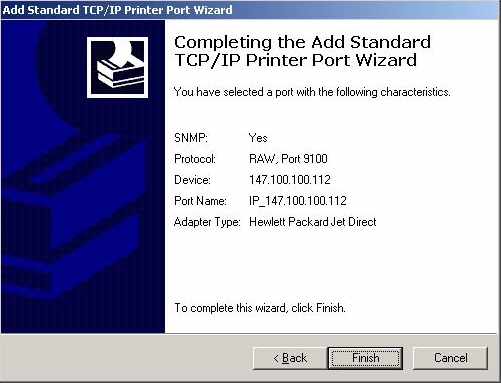
Figure D: Windows displays a summary of the options that you have chosen
Click Finish, and you will be returned to the Add Printer wizard. The next screen that you will see asks you what type of printer you are setting up. You can either select the correct printer type from the list, or use the Have Disk option to supply a print driver of your own.
Click Next and you will be taken to a screen asking you for a printer name and whether or not you want Windows to use this as the default printer. The answers to these questions are totally up to you. After making your selections, click Next.
You will now see a screen similar to the one shown in Figure E, asking you if you want to share the printer. Up to this point, Windows has assumed that you are only setting up the printer so that you can print to it from the server console. If your goal is to audit printer use, then you must share the printer.

Figure E: You must share the printer
Your goal is to direct all jobs that are destined for the printer through the server that you are currently configuring. By doing so, you will be able to restrict access to the printer (if necessary), and you will be able to audit the printer’s use.
I should also mention that it is important that you only set up one server to share this printer. Otherwise, it will be possible for multiple servers to spool jobs to the printer simultaneously, and the printer can get confused.
Click Next and you will be prompted to enter the printer’s location and an optional comment. This information is intended to help users to figure out which physical printer the print queue belongs to.
Click Next and you will be given the opportunity to print a test page. After doing so, click Next one more time, followed by Finish. The server is now set up to manage print jobs for the printer. Remember that you must redirect your workstations so that they print to the server’s UNC share name (\\server name\share name) rather than printing to the printer directly.
Conclusion
In this article, I have shown you how to configure a server to manage a network printer. In Part 2 of this series, I will continue the discussion by showing you how to secure and audit the print queue.
If you would like to read the other parts in this article series please go to:


