If you would like to read the next part in this article series please go to Active Directory Routing and Routing Logs (Part 2).
Introduction
I recently had a need to look at Exchange 2010 routing and consider the effects of blocking an address space so that it wasn’t visible by other Exchange 2010 servers. Those of you who are familiar with legacy versions of Exchange might remember the WinRoute tool that was used to examine the routing topology in those versions. Well, that tool and method doesn’t exist in Exchange 2010 and so other methods must be used.
Routing in Exchange 2010 is based on Active Directory rather than routing groups that were found in legacy versions of Exchange. The question of how to ‘see’ what Exchange 2010 makes of the routing topology can be answered by use of a tool called the Routing Log Viewer that you will find in the Toolbox of the Exchange Management Console. It’s one of those tools that you may have missed and so in this small two-part article I’ll be taking a look at this tool and how you can use it to examine your routing topology.
The Routing Log Viewer interrogates routing logs that Exchange 2010 produces. With that in mind, we’ll start the article by looking at these log files and how we can control them.
Routing Log Control
By default, the routing logs are stored in the Routing folder that is found under the \Exchange Server\V14\TransportRoles\Logs folder on the drive where you installed Exchange Server 2010. You can see an example of this folder and the routing logs that it contains in Figure 1-1.
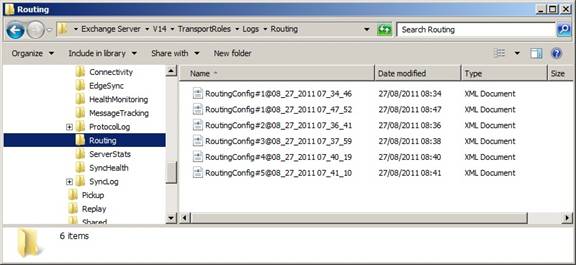
Figure 1-1: Routing Log Folder
We will be looking at how you can change the default location to store the routing logs later in this article. The logs in this folder are records of the routing table at the time the log file was created. There are multiple log files in the folder because new log files are created every 12 hours by default and also by other methods as we’ll see. Later in this article, we will be looking at how you can control various parameters of the routing log creation by using the Exchange Management Shell.
However, the parameter that controls how often routing logs are generated automatically isn’t found in the Exchange Management Shell but rather in the EdgeTransport.exe.config file found on each transport server. You will find the EdgeTransport.exe config file in the \Exchange Server\V14\bin folder on the drive where you installed Exchange Server 2010.
Figure 1-2 shows an example of the EdgeTransport.exe.config file. In Figure 1-2, you can see that the highlighted line shows the RoutingConfigReloadInterval parameter that controls the periodic creation of new routing log files; you can see that this is set to a value of 12:00:00 to represent 12 hours which is the default value noted from Exchange Server 2010 SP1.

Figure 1-2: EdgeTransport.exe.config File
Unless you have a complex environment that has many routing changes taking place, you may not need to alter the value of the RoutingConfigReloadInterval parameter. If you do make a change to this parameter, you’ll need to restart the Microsoft Exchange Transport service for the change to take effect.
Aside from the periodic updates that take place automatically, new routing log files are also generated when a routing configuration change has taken place. For example, if a new send connector is created this will naturally have an address space associated with it that the Exchange Server 2010 routing engine will need to take into consideration. Therefore, once the send connector has been created and a change to the routing topology has taken place, a new routing log file will be created to reflect the update in the routing topology.
Finally, new routing log files are also generated when the Microsoft Exchange Transport service is started on either a Hub Transport or an Edge Transport server.
Exchange Management Shell
We have just seen that we can control how often the routing logs are updated by modifying a configuration file. If you’ve been using Exchange 2007 or Exchange 2010 for a while, you may well know that it is possible to control many aspects of the various log files that are created, such as message tracking logs and protocol logs, via the Exchange Management Shell. Routing log files are no different in that regard.
Since routing log files are found on transport servers, it comes as no surprise to learn that we can use the Get-TransportServer and Set-TransportServer cmdlets to control the parameters associated with them. To see what parameters are available, you can use the Get-TransportServer cmdlet and filter for parameters that contain the string “routing” in them. For example, to obtain a list of routing parameters from the transport server called EXSITE2 we can use the following command:
Get-TransportServer EXSITE2 | fl *routing*
The result of running this command is shown in Figure 1-3.
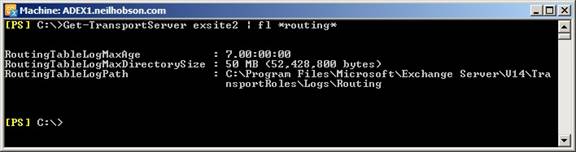
Figure 1-3: Routing Log Exchange Management Shell Parameters
It can be seen from Figure 1-3 that there are three parameters associated with routing logs. They are:
- RoutingTableLogMaxAge
- RoutingTableLogMaxDirectorySize
- RoutingTableLogPath
If you’ve ever examined the properties of message tracking or protocol logs within the Exchange Management Shell, you’ll realize that the routing log parameters are essentially the same as seen with other logs that Exchange creates. To control the location of the routing logs, we simply need to alter the RoutingTableLogPath parameter using the Set-TransportServer cmdlet. For example, to move the routing logs to C:\RoutingLogs for the server EXSITE2, we would use the following command:
Set-TransportServer EXSITE2 –RoutingTableLogPath C:\RoutingLogs
If the specified location does not exist, it will be created automatically and new log files will be created in this location. Note that any old routing log files will remain in the previous location, so remember this if you need to refer to them.
To control how long the routing log files are maintained, use the RoutingTableLogMaxAge parameter which is set to 7 days by default. The default number of days is likely to be sufficient when troubleshooting any issues that might have been caused by routing changes, but you may want to consider changing this limit if you need to have an audit trail that exceeds this timeframe.
Finally, you can control how large the overall directory that stores the routing log files becomes before older log files are deleted. This is achieved by the RoutingTableLogMaxDirectorySize parameter which has a 50MB default limit as you can see from Figure 1-3.
Using the Routing Log Viewer
Now that we’ve seen how we can control the various settings associated with routing log files, let’s turn our attention to the contents of these log files and how they can help us with our administrative duties. Each routing log file is an Extensible Markup Language (XML) file as you can see from Figure 1-4.
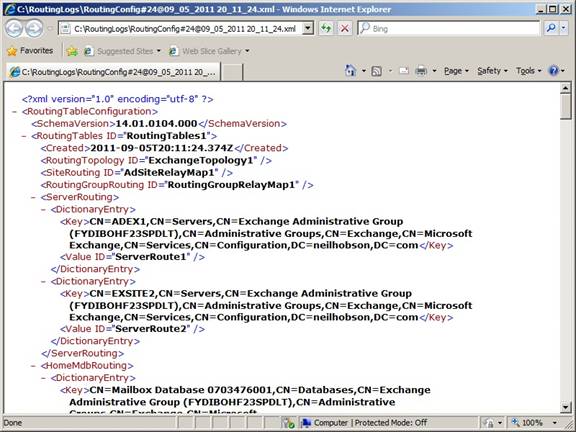
Figure 1-4: Contents of a Routing Log
To make more sense of these log files, you can use the Routing Log Viewer that you will find in the Toolbox area of the Exchange Management Console. Open the Routing Log Viewer by right-clicking the tool name in the Exchange Management Console and choosing Open Tool… from the context menu, or by choosing the same named option from the action pane.
By default, the Routing Log Viewer opens to a blank screen showing the File, Settings and Help menu options. Click File / Open Log File and you are presented with the Open Routing Table Log File window as you can see from Figure 1-5.

Figure 1-5: Opening a Routing Log
In the Open Routing Table Log File window, you can leave the Name of transport server field empty and simply click the Browse server files… button to allow you to choose which routing log file on the local server you wish to open. The subsequent window that opens up will take you straight to the folder that contains the routing logs as determined by the RoutingTableLogPath parameter that was set earlier. Or, if you wish to open the routing logs on a remote transport server, simply enter that server name into the Name of transport server field before clicking the Browse server files button. Once you have chosen your log file, the Routing Log Viewer will parse the file and then display the window that you can see in Figure 1-6. Here it can be seen that there are four tabs available, namely Active Directory Sites & Routing Groups, Servers, Send Connectors and Address Spaces. We’ll have a look at the contents of these four tabs in part two of this article.
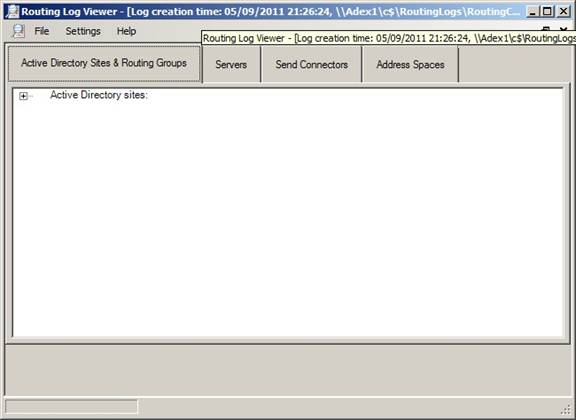
Figure 1-6: Routing Log Viewer
Summary
That completes part one of this article on the Routing Log Viewer, where we have covered the actual logs themselves and how to control them via the various parameters available in the Exchange Management Shell. In part two, we’ll see what the contents of the four tabs shown in Figure 1-6 reveal and move on to show how we can compare two routing log files to see what changes have been made.
If you would like to read the next part in this article series please go to Active Directory Routing and Routing Logs (Part 2).


