Introduction
Setting up SMTP on a single server is relatively easy. However things get more complicated in the real world where you’ve got mail relays to protect incoming mail and a few small branches, perhaps even in other countries.
This article presents a sample network, consisting of a company’s headquarters where they can afford to have a mail relay and a small overseas branch where they’ve just installed the one server and small business Firewall. Both locations connect using site-to-site VPN connections over the Internet. Since both branches relay heavily on Outlook use, both have their own Exchange server.

E-mail Domain Names
Some companies have a single e-mail suffix or domain name, especially global ones. However, this means that mail enters through one point, because unlike internal Exchange communication there is no mechanism for regular SMTP mail to determine where mail should go. All mail goes to the first MX address that is the registered IP address of the mail server for the domain. If this server does not answer, mail can go to another server.
What this means is that if you want to have only one e-mail domain such as mydomain.com, and you have two branches, one in New York, the other in London, all mail can be routed through only one point. This can put some load on mail server that have to process mail items twice, going in and going back out to the other branch. To overcome this you can decide to use more than one domain name. For example, you can use mydomain.com for HQ and mydomaneurope.com for one the branches. This solution is used in this article’s example organization.
For more information about MX records: http://www.rscott.org/dns/mx.html
Recipient Policies
To set up the e-mail addresses recipient policies were created. I find that the easiest filter is one that uses server storage. This way a user for which a mailbox is created on a specific server is automatically granted the right e-mail domain according to the geographical location.
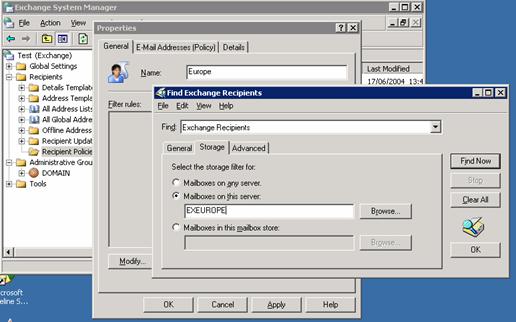

Naturally, on a large organizational where you would have more than two Exchange servers on one site you might consider other filters to identify location of users.
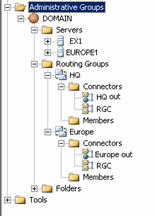
The above screenshots shows how connectors are set up. Each server is placed in a different routing group. Creating a routing group is pretty straightforward. Assigning a server to a routing group is one of the only actions in the Microsoft world that has no menu action for it. It can only be done by dragging and dropping a server from the default routing group into a new routing group. For more information use article http://support.microsoft.com/?kbid=266725
Routing groups are not automatically connected so you create a new Routing Group Connector.
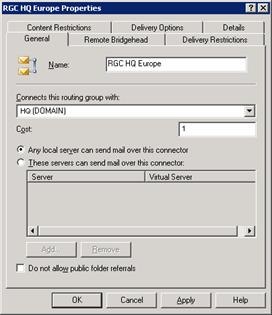
Please note that when setting up the SMTP connector to the Internet, the cost has to be higher then that of the RGCs, so that the server will first check the RGCs for appropriate routing and only then send e-mail to the Internet.
The Address Space on SMTP Connectors will look like this:
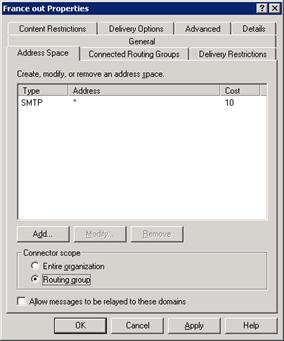
Also, as you can see I like to set up the connector scope for the Routing Group to avoid “routing blunders”. If you have a branch that is connected using a direct line rather that using VPN over the Internet, you might choose to leave the default setting “Entire Organization” to provide fault tolerance for mail in case of an Internet connection failure.
Summary
As you can see, Exchange provides a sophisticated and easy to use SMTP routing system. Knowledge of Internet SMTP routing and Exchange special routing configuration options can help you better route mail and save some bandwidth in the process.


