Introduction
Nowadays, it is normally considered good practice to secure your Outlook Web Access (usually shortened to OWA) installation with SSL (Secure Sockets Layer). This provides end-to-end encryption of the client/server traffic, and is especially important if your OWA Virtual Directory, or your browser, uses Basic Authentication, rather than Integrated Authentication. There are two sources for the certificate required to accomplish this; you can either buy one from a well-known Certificate Authority, or you can issue your own. If you have a customer-facing Web site, it makes sense to buy a certificate from someone that your customers know, and trust; but for an OWA site that will only be used by your fellow employees, issuing your own certificate can be a good option.
Issuing certificates has historically been a fairly complicated (and sometimes unreliable) process requiring the installation of Certificate Services if you wish to do this from a Windows server, but you can also do it using a less well-known utility from the IIS6 Resource Kit Tools known as SelfSSL.
Procedure
First, download the IIS6 Resource Kit Tools (a free download) from the Microsoft Web site. At the time of writing, it can be obtained from here:
http://www.microsoft.com/downloads/details.aspx?familyid=56FC92EE-A71A-4C73-B628-ADE629C89499
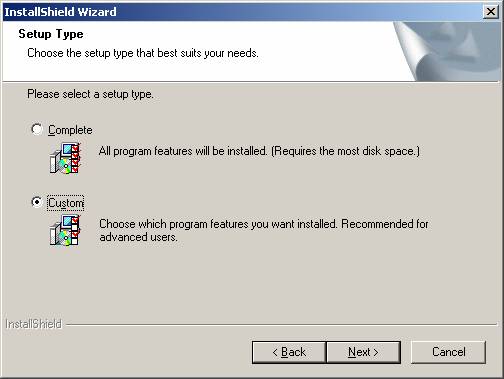
When you have downloaded it, run the installer on your OWA server. Click Next on the Welcome dialog, License Agreement dialog, and the Customer Information dialog. When you reach the Setup Type dialog (figure 1), you will need to decide which of the Resource Kit tools you wish to install. Since we are only discussing the SelfSSL tool here, I am going to select the Custom setup type. If you wish to install all of the Tools, then select the Complete setup type. Click Next when you have selected your desired setup type.
Fig 1: The Setup Type dialog
If you have selected the Custom setup type as suggested, you will see the Destination Location dialog (figure 2) and the Select Features dialog (figure 3).
Fig 2: The Destination Location dialog

Accept the default location, unless you wish to install the files somewhere else, and click Next.
Fig 3: The Select Features dialog
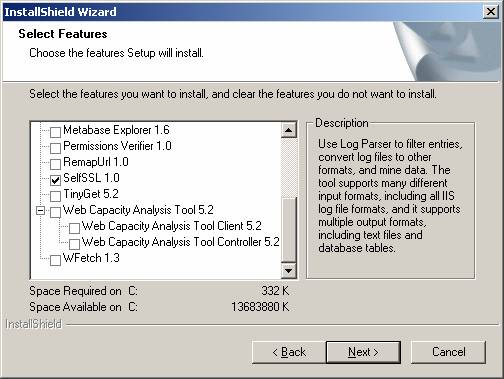
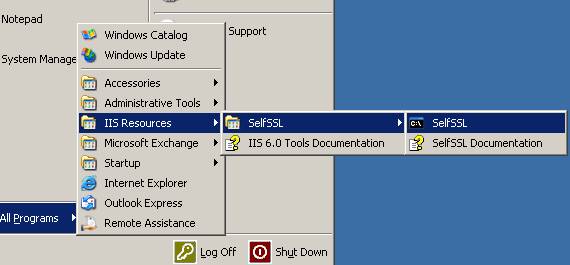
Decide which of the tools you wish to install. Here we are only interested in the SelfSSL tool, so I am going to de-select all the other tools, and click Next to proceed. The installer will then copy the required files to the server and then it is complete. After installation, shortcuts to the tools are added to your Start Menu as shown in figure 4.
Fig 4: The IIS6 Resource Kit Tools added to the Start Menu
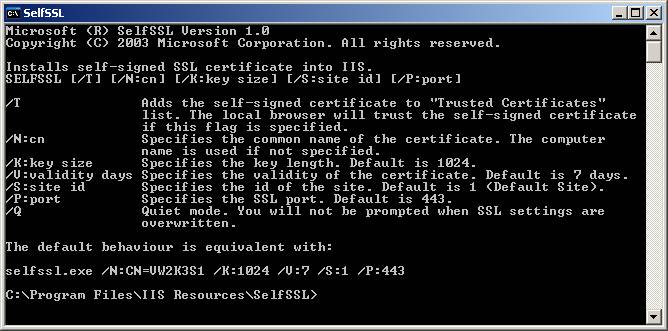
Click on the SelfSSL shortcut. You will see the SelfSSL help display shown in figure 5.
Fig 5: The SelfSSL help display
Now, we need to decide what the common name of the certificate is going to be, and how long (in days) we want the certificate to be valid for. The common name should the server name that your users type in to access your OWA installation. If they use a server name that is different to the certificate’s common name, they will always receive a browser warning that the two are different. I am going to use a common name of owa.mydomain.com, and a validity period of 365 days. I am also going to add the /T switch to add the certificate to the local browser’s Trusted Certificates list. This means that I will not get a certificate warning when I view OWA using the server’s browser; although it will not prevent your users from seeing a warning the first time they open the site in their own browsers. To create a certificate using these values, I need to type:
SELFSSL /N:CN=owa.mydomain.com /T /V:365
SelfSSL will then ask if you want to apply the certificate to your Web site. Unless you have made a typing mistake, accept the change by typing a y at the prompt.
Fig 6: Creating and applying the certificate with SelfSSL

You should now be able to assign the SSL certificate to your OWA Virtual Directory. Open Internet Services Manager from your server’s Start Menu, right-click your Exchange Virtual Directory, and then open its Properties pages.
Fig 7: The Exchange Virtual Directory in Internet Services Manager

Fig 8: The Exchange Virtual Directory property pages
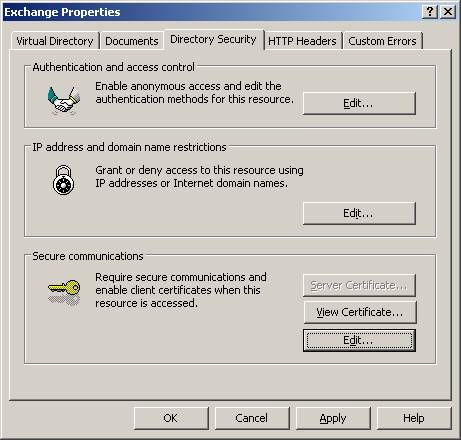
Activate the Directory Security tab, and click on the Edit button under Secure Communications to reveal the dialog shown in figure 9.
Fig 9: The Secure Communications dialog
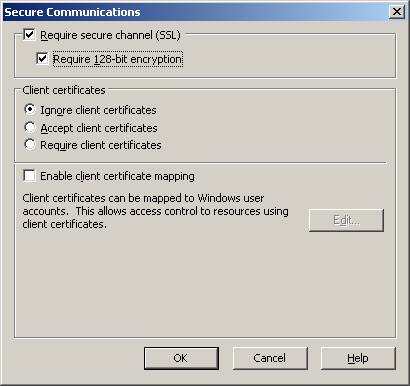
Select the Require secure channel (SSL) checkbox, and also the Require 128-bit encryption option if you want to enforce 128-bit encryption (this will make the client-server encryption more secure, but is not supported by some older browsers). Click OK to save your settings, and then OK on the Directory Security page to close the Virtual Directory property pages.
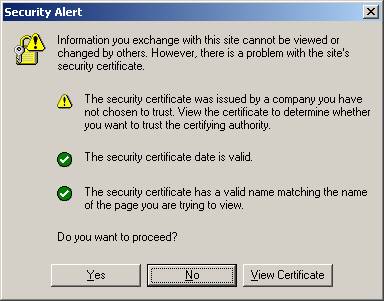
Now it is time to find out whether our SSL certificate is working as it should. Try to access your OWA installation using its normal URL, but remember to use https instead of http, like this: http://servername.domain/exchange. Also remember to use the common name you specified when using SelfSSL, otherwise you will get a warning that the server name does not match the certificate name. If you are accessing OWA using the server you just added the certificate to, then you should be logged straight into the application, but from another computer, you are more likely to see a warning that the certificate was issued “by a company you have not chosen to trust” as shown in figure 10.
Fig 10: A browser SSL Security Alert
This alert is displayed because your browser has not yet installed your certificate locally. If you do not want to have to acknowledge this dialog box every time you use OWA, you will need to install the certificate (this will also need to be done on every other computer that accesses your OWA installation). To install the certificate, first click the View Certificate button to reveal the Certificate Information property pages shown in figure 11.
Fig 11: Certificate Information as displayed by IE

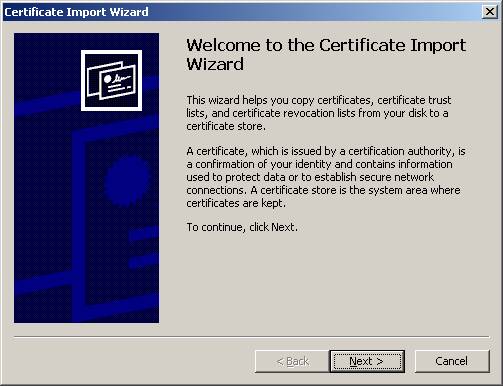
Now, click the Install Certificate button to activate the Certificate Import Wizard:
Fig 12: The Certificate Import Wizard
Click Next to reveal the Certificate Store dialog shown in figure 13:
Fig 13: Selecting the Certificate Store

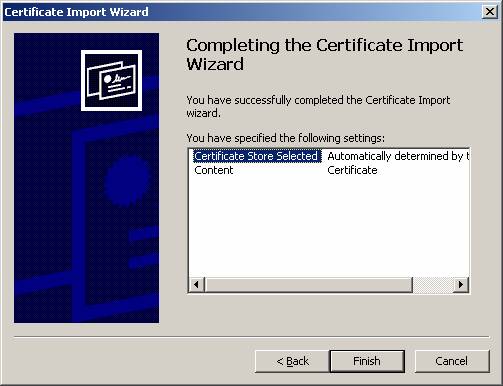
Accept the default selection (Automatically select the certificate store based on the type of certificate) by clicking Next, and the Completing The Certificate Import Wizard (figure 14) is displayed.
Fig 14: The Certificate Import Wizard has completed
Click Finish, and the process is complete. If everything has gone to plan, your browser will no longer need to ask you if you want to proceed with your https requests whenever you access your OWA installation in future.
Recommended Reading
The IIS 6.0 Resource Kit Tools:
http://support.microsoft.com/default.aspx?scid=kb;en-us;840671
