If you missed the first part in this article series please read Exchange 2007 Permissions and Roles (Part 1)
In part one of this article we introduced the Exchange 2007 administrator roles, namely the Exchange Organization Administrator, Exchange Recipient Administrator, Exchange View-Only Administrator and Exchange Server Administrator roles. One topic we did not cover in part one was how to add and remove users from these roles, both via the Exchange Management Console and the Exchange Management Shell. That is what we will cover in part two, along with two common permission-related administrative tasks that are regularly performed in an Exchange deployment.
Adding an Administrator Role
Let’s look at the steps required to add a user or a group to one of the new administrator roles. Note that to perform this task you will need to make sure that the account you are using has been delegated the Exchange Organization Administrator role. Therefore, if this is the first extra account you are adding since you installed Exchange 2007, you will need to use the account that you installed Exchange 2007 with, since this is the first account that has been delegated Exchange Organization Administrator rights. First, we will use the traditional GUI route by using the Exchange Management Console (EMC).
- Run the EMC.
- Select the Organization Configuration node from the console tree.
- In the result pane, you will see the Exchange Administrators tab (the only tab) and below that a list of users/groups and their assigned permissions as shown in Figure 1.

Figure 1: Default Exchange Administrators
- Right-click the Organization Configuration node and select Add Exchange Administrator… from the context menu, or select the same option directly from the action pane.
- The Add Exchange Administrator wizard appears which consists of the screen that you see now, the Add Exchange Administrator screen, plus the Completion screen. The Add Exchange Administrator Screen is shown below in Figure 2.
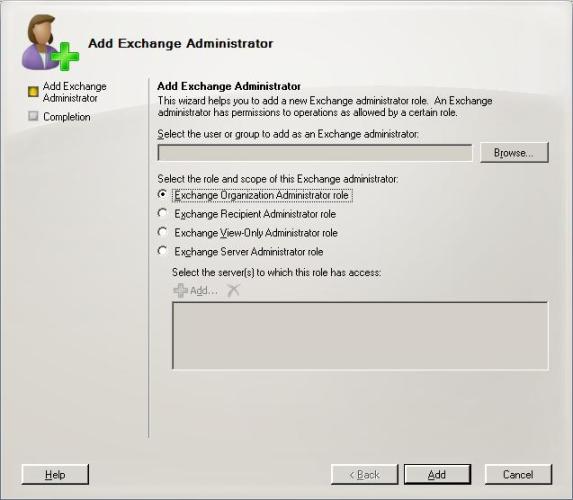
Figure 2: Add Exchange Administrator Wizard
- Click the Browse… button and in the resulting Select User or Group to Delegate window, locate the user or group to which you would like to assign permissions. Once you have located the user or group, click OK. Back at the Add Exchange Administrator wizard opening screen, you should now see the selected user or group visible in the first field.
- Next, select the relevant administrator role from the list presented. If you choose any of the first three presented, namely Exchange Organization Administrator, Exchange Recipient Administrator or Exchange View-Only Administrator, all you need to do is to click the Add button at the bottom of the screen which will then take you to the Completion screen. If, however, you choose the Exchange Server Administrator role, you will then need to click the Add… button immediately below this role to choose which servers the selected user or group will administer. Clicking this particular Add button presents you with the Select Exchange Server window that simply gives you a list of available Exchange servers to administer. Obviously Exchange 2000 and Exchange 2003 servers won’t be presented in the list and additionally if you have any Exchange 2007 clusters you will naturally see the name of the clustered mailbox server rather than the cluster node names. Select the relevant server(s) and then click OK. Once completed, you should see a screen similar to that shown in Figure 3.
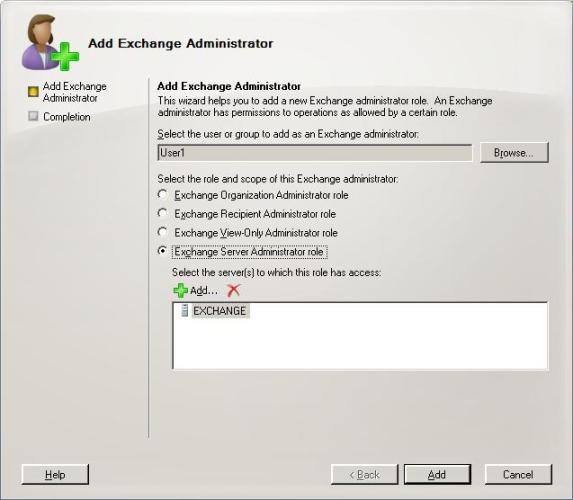
Figure 3: Add Exchange Administrator Wizard With Server Scope
- Once you click the bottom Add button on the Add Exchange Administrator wizard opening screen, the Completion screen is then presented showing you the outcome of the operation.
One extra permissions consideration is that if you assign anyone with the Exchange Server Administrator role, you also need to manually add that user to the local administrators group on the server(s) that the administrator is assigned to manage. Conversely, if you remove any users from the Exchange Server Administrator role, you must also manually remove these users from the relevant server’s local administrators group.
Of course, you should by now be aware that as with most GUI tasks that you complete, the corresponding EMS cmdlet is shown at the end of the wizard and the Add Exchange Administrator wizard is no different in this respect. Setting permissions and roles via EMS is very straightforward. The cmdlet to use is Add-ExchangeAdministrator. All you then need to do is to add the –Identity and –Role parameters. For example, to add User1 with the Exchange Organization Administrator role, the cmdlet will be as follows:
Add-ExchangeAdministrator –Identity User1 –Role OrgAdmin
You will notice from this cmdlet that the role was specified as OrgAdmin, which corresponds to the Exchange Organization Administrator role. The other role parameters that you use with EMS are as follows:
- RecipientAdmin for the Exchange Recipient Administrator role.
- ViewOnlyAdmin for the Exchange View-Only Administrator role.
- ServerAdmin for the Exchange Server Administrator role.
If you use the ServerAdmin role, you will also need to add the additional –Scope parameter to list the Exchange servers that this user is to administer. For example, to add User1 with the Exchange Server Administrator role against an Exchange 2007 server called EXCHANGE, the cmdlet will be:
Add-ExchangeAdministrator –Identity User1 –Role ServerAdmin –Scope EXCHANGE
The –Scope parameter only accepts a single server. To add a user with permissions across multiple servers you can either run the above cmdlet multiple times or use an array approach. I must thank Ben Winzenz of Microsoft and fellow Exchange MVP Devin Ganger for reminding me of the array approach. To add User1 with the Exchange Server Administrator role against three Exchange 2007 servers called EXSRV1, EXSRV2 and EXSRV3, your code would look like this:
$MyServers = “EXSRV1”,”EXSRV2”,”EXSRV3”
ForEach ($CurrentServer in $MyServers) {Add-ExchangeAdministrator –Identity User1 –Role ServerAdmin –Scope $CurrentServer}
This code takes each server name in turn from the array called $MyServers, and puts the server name into the $CurrentServer parameter that is passed as the input for the –Scope parameter.
Removing an Administrator Role
To remove a user from an administrator role, things really couldn’t be easier. From the EMC, all you need to do here is to right-click the user in the Exchange Administrators tab (as shown previously in Figure 1) and choose Remove from the context menu; it is that simple.
From the EMS, the cmdlet to use is Remove-ExchangeAdministrator. For example, to remove the account User1 that has the Exchange View-Only Administrator role set, the cmdlet would be:
Remove-ExchangeAdministrator –Identity User1 –Role ViewOnlyAdmin
You will need to include the Role parameter when using EMS to remove Exchange administrators.
Granting Mailbox Access
One common task that Exchange administrators have to perform is granting full access to a mailbox, such as the classic manager/secretary scenario. This can be easily achieved by using the EMS, specifically the Add-MailboxPermission cmdlet. For example, to give User2 full access to User1’s mailbox, our cmdlet is:
Add-MailboxPermission User1 –User User2 –AccessRights FullAccess
If all goes well, your output should look like that shown in Figure 4.

Figure 4: Full Mailbox Access via EMS
Removing this access via EMS is simply a case of using the Remove-MailboxPermission cmdlet with the same parameters.
Granting Send As Permission
Another common task that Exchange administrators have to perform is granting Send As permissions for a mailbox. This is used in scenarios where someone other than the normal mailbox user requires the ability to send messages as if they originated from the normal mailbox owner. Microsoft gives us two ways to implement the Send As permission, namely the GUI method via the Active Directory Users and Computers snap-in, or the command-line method via EMS. Since setting Send As permissions involves permissions changes, you will need to perform these tasks using an account that has been delegated the Exchange Organization Administrator role.
Let’s look at using EMS first. The Add-ADPermission cmdlet is used to add permissions to Active Directory objects, so that is what we need to use here. The key parameter to use with this cmdlet is the ExtendedRights parameter. For example, to give User2 Send As rights against User1’s mailbox, our cmdlet is:
Add-ADPermission User1 –User NGH\User2 –ExtendedRights “Send As”
To remove this right, you would use the same parameters with the Remove-ADPermission cmdlet.
If the Exchange administrator wishes to use the Active Directory Users and Computers snap-in, Microsoft shows us that we can achieve this via the following steps:
- Run the Active Directory Users and Computers snap-in.
- Make sure that the Advanced Features tab will be displayed by choosing the Advanced Features option from the View menu.
- Locate the user account that needs permissions set on it. In my example this is the User1 account. Once located, right-click the user account and choose Properties from the context menu.
- From the properties of the user account, select the Security tab.
- Click the Advanced button which will then bring you to the Advanced Security Settings window as shown in Figure 5. On this window, click the Add button.
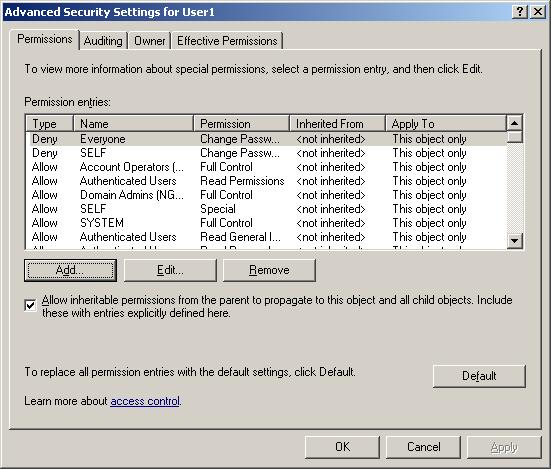
Figure 5: Advanced Security Settings
- Clicking the Add button will display the Select User, Computer, or Group window. Here you simply type the name of the user account that you would like to give Send As rights to. In my example, this is User2. Once typed, click the Check Names button, ensure that the user account is resolved successfully, then click OK.
- You should now be presented with the Permissions Entry window as shown in Figure 6. Click the Apply onto drop-down list and choose This object only from the list of available options.
- In the list of available permissions, find the Send As permission and then click the Allow check box next to it. This is shown in Figure 6.

Figure 6: Permission Entry Window
- You can now click OK on all outstanding windows to close them.
Summary
Hopefully across the two parts of this article I have given you a reasonable understanding of the Exchange 2007 administrator roles. I have also covered a couple of common permission tasks that you are likely to be asked to perform. For the last of these tasks, you will probably agree that there are quite a few steps to perform when using the GUI method. Personally I think the EMS method is the easier of the two but this is where having the choice of which method to use is really beneficial.
If you missed the first part in this article series please read Exchange 2007 Permissions and Roles (Part 1)


