If you would like to read the first part in this article series please go to Exchange Server 2010 SP1 New Outlook Web App Features (Part 1).
Themes and Outlook Web App parts
We have 27 themes available and they are really easy to use, just click on Options, and select which one you want to use and it will be applied right away. Since I’m located in Canada and the winter is coming why not change my theme for a polar bear, right? Here it goes, just by clicking on Options and then on the desired theme, the changes are done on the fly (Figure 01)
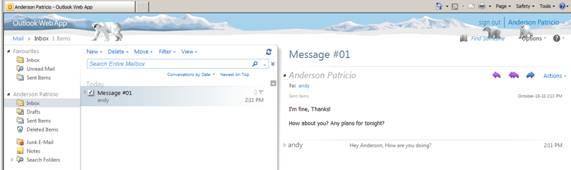
Figure 01
Another feature is that you can customize Themes for Outlook Web App and you can also build your own theme and associate it to your users. All themes are located in <Exchange Server Installation Folder> \V14\ClientAccess\Owa\14.1.218.13\themes\ and you can copy and paste an existent folder/theme to start your own theme. Here a few key points about theme customization:
- To change the Theme name and order that your theme will show up, edit the file ThemeInfo.XML and on the parameters displayname and sortoder you can define such options.
- After creating your folder, you can define it as standard for all new users by just using this cmdlet:
Set-OwaVirtualDirectory -Identity <Server\owa (Default Web Site)> -DefaultTheme:<Folder Name> - The file themepreview.png contains the image preview what will be displayed under Options section of Outlook Web App
- Both extensions: CSS and PNG of csssprites and scsssprites2 files are important because they have the logo and important icons used on the OWA environment.
- Always create a backup first and clean your Browser cache before doing tests to make sure that you are testing properly
- Test first in a lab environment, never in production 🙂
- Also a IISReset /noforce is your friend when you want to ensure that the new changes are applied immediately
If you want to change just the logon and logoff pages of Outlook Web App then you should work on the Resource folder in the same path. There you can configure the entry and exit pages. More information how to change them can be found here.
The last but not least is the ability to display web parts. The concept is pretty simple, basically you can use URL parameters to show which specific web part you want to be displayed in a browser or a SharePoint session.
In order to start using web parts, start by retrieving some information from the current logged on users. Here are a couple of URL parameters that will help you out:
- Cmd – This one is used to define what action OWA will have after defining the other parameters. Because it is always the first one, you should use ?cmd=contents when start playing with Web Parts
- Module – You can specify folders using their ID however, that value is a Base64-encoded of each folder using ID parameter. Module parameter can be used for the following standard folders: Inbox, Calendar, Contacts, Tasks and PublicFolders
- View – Allow to modify the default view of the ID or Module attribute. For example: calendar options to choose from are Daily, Weekly and Monthly. Message options can be defined by conversation topic, subject, sender, and so forth.
- Bear in mind that between parameters you have to use the &.
- You can specify another mailbox by typing in the SMTP address of the desired mailbox in /OWA/[email protected]/<URL Parameters>.
- If you don’t use SMTP on the URL the current logged on user will be used.
A good example to demonstrate the usage of web parts could be this one: http://<OWA-Address>/OWA/?cmd=contents&module=calendar but wait a minute this only shows the current day. Let’s take advantage of the View parameter and use Weekly (Figure 02). The URL would be something similar to this one: http://<OWA-Address>/OWA/?cmd=contents&module=calendar&view=weekly.
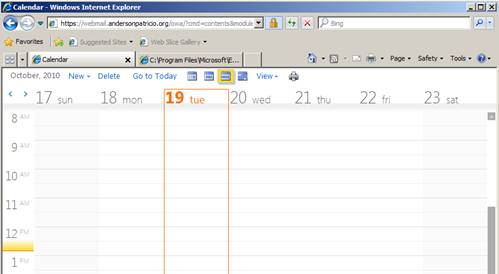
Figure 02
Enabling Expired Password changes through Outlook Web App
This feature was introduced in Exchange Server 2007 SP3. It allows any new user with the setting User must change password at next logon to use OWA to change an expired password.
- Log on to the Client Access Server
- Click on Start, Run and type in regedit and click on OK
- Expand HKEY_LOCAL_Machine
- Expand System
- Expand CurrentControlSet
- Expand Services
- Click on MSExchange OWA
- Right-click on the right hand side pane, click on New and then DWORD (32 bit) value
- Let’s name the key ChangeExpiredPasswordEnabled and its value will be 1, as shown in Figure 03
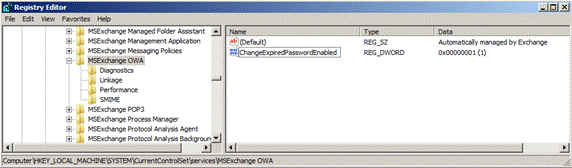
Figure 03
After the changes, restart IIS using IISReset /noforce and start using the new feature. In order to do the test let’s create a new user. Make sure that the attribute change password at next logon is set and try to logon using OWA (Figure 04).
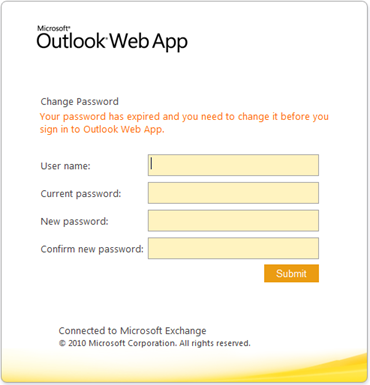
Figure 04
Type in the username, current password and new password, then Outlook Web App will inform you that the new password was set and your user is good to go (Figure 05). Just need to click OK and use the new credentials to get access to Outlook Web App.
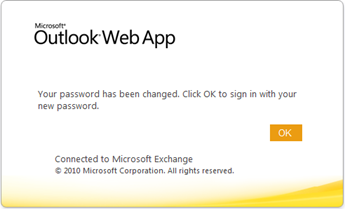
Figure 05
I wrote this script for an Exchange Server 2007 SP3 article, but it can be used in Exchange Server 2010 SP1 as well. Make sure that you save the content below in a file with an extension .ps1. Run it from a PowerShell session and the script will add the ChangeExpiredPasswordEnabled registry change and restarts your IIS.
Write-Host “Adding ChangeExpiredPasswordEnable key in the registry…”
New-ItemProperty “HKLM:\SYSTEM\CurrentControlSet\services\MSExchange OWA” -Name “ChangeExpiredPasswordEnabled” -Value 1 -PropertyType “DWord”
Write-Host “Restarting IIS using /noforce option..”
IISReset /noforce
Integrating OCS and Exchange Server 2010 SP1
In Service Pack 1 you don’t use web.config files but instead you use the configuration on the OWA Virtual Directory.
You still need to install all the components to get the integration work, the main steps are:
- Download the CWAOSASSPMain.msi and extract it to C:\Web Service Provider Installer Package
a. Install vcredist_x64.exe
b. Install UcmaRedist.msi
c. Install CWAOWASSP.msi - Install the UcmaRedist update
- Install the CWAOWASSP update
Now it’s the fun part of Exchange Server configuration! First, you need to find out which certificate is being used by Outlook Web App and copy its Thumbprint. A good way to find that out is using Get-ExchangeCertificate cmdlet and only one entry should have the W set on the column services, that is, the line that we are looking for. Let’s copy the ThumbPrint value of that line.

Figure 06
Afterwards you just need to configure the OWA Virtual directory using Set-OWAVirtualDirectory cmdlet. The following syntax can be used:
Set-OWAVirtualDirectory –Identity <Identity-of-OWA> -InstantMessagingType OCS –InstantMessageCertififcateThumbprint <ThumbPrint-copied-in-the-previous-step> -InstantMessagingServerName <OCS/Lync-Server-FQDN>
That’s it! Its way simpler than previous versions and you may want to run a IISREset /noforce just in case to refresh the OWA and start testing the OCS/Lync Integration. Before testing it make sure that you can configure the OCS/Lync portion of the integration.
If you need more details how to integrate OCS with Exchange Server, especially on the OCS side you can check the article Integrating OCS Instant Messaging into Outlook Web App.
Conclusion
In this final article about Outlook Web App Service Pack 1 we went over IM integration, Web Parts, Themes and Password Change feature.
More Information:
Using Outlook Web App Web Parts: TechNet
If you would like to read the first part in this article series please go to Exchange Server 2010 SP1 New Outlook Web App Features (Part 1).


