In Mark Fugatt’s article “Forwarding Mail to an External Recipient,” he covered how to take mail destined for an internal mailbox and forward it to an outside email address such as a Hotmail or AOL account. I want to give you an alternate scenario that involves sending mail to an external address:
Suppose your company has alphanumeric pagers or text messaging cell phones, each with a unique email address. Rather than give out the pager address, such as [email protected], you would rather use a more simple naming convention that involves your company’s domain name. If your regular email address was [email protected], perhaps you would like to have your pagers address be [email protected] or [email protected]. You can see that this would be an address that would be far easier (and more private) for others to remember than the pager number. Here’s how you do it:
If you are going to use a subdomain (pager.comsphere.com in the example above) you will need to let Exchange know that it is responsible for email being sent to that domain. If you are going to use the mailbox name to denote a pager or phone, skip to the next section.
- In ESM, expand Recipients, select Recipient Policies on the navigation pane, right-click the Default Policy and choose Properties, shown in Figure 1.

- On the E-Mail Addresses (Policy) tab, press the New button, choose SMTP Address and press OK.
- In the SMTP Address Properties dialog box, put in the name of the subdomain in the Address field (@pager.comsphere.com in my example). Be certain that the checkbox for This Exchange Organization Is Responsible For All Mail Delivery To This Address is selected, as shown in Figure 2. Press OK.

- Back in the Default Policy Properties, leave the checkbox for this new domain name deselected. Otherwise every mailbox this policy applies to will get the second domain name added. Out purpose here was to tell Exchange to support this namespace. Press OK and close ESM.
Next you need to create a Contact for the pager or phone, specify its’ external address and then give it an internal SMTP address.
- In ADU&C, navigate to the OU in which you want to create the Contact (I’d recommend a separate OU for Pagers and Phones). Right click the OU, point to New and choose Contact. Provide a descriptive name, shown in Figure 3, to denote both who owns the pager/phone and that it is a pager/phone. Press Next.

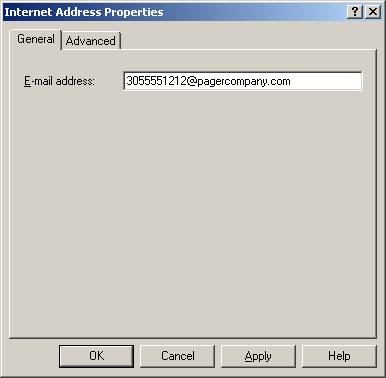
- Select the Create an Exchange E-Mail Address checkbox and press the Modify button. Select SMTP Address and press OK. In the Internet Address Properties dialog box (Figure 4), put in the external SMTP address for the pager/phone and press OK. Select the appropriate Administrative Group and press Next and Finish.
- Right-click the newly created Contact object and select Properties.
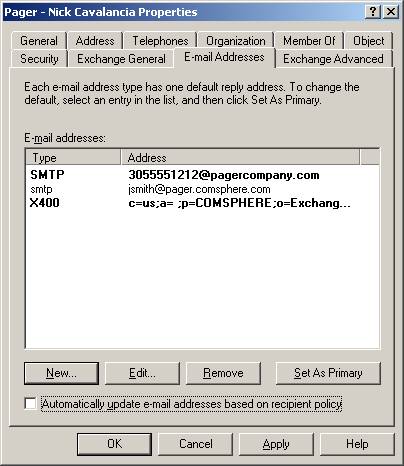
- On the E-Mail Addresses tab, deselect the Automatically Update E-mail Addresses Based On Recipient Policy checkbox. This will keep the Recipient Update Service from overwriting the changes you are about to make. Press New, choose SMTP Address, and press OK. In the Other Address Properties dialog box, type in the internal email address for the recipient ([email protected] or [email protected] in my examples above) and put SMTP as the E-mail Type. Press OK
- Your E-mail Address tab should look something like Figure 5:
- Press OK and test sending a message to the contact using the internal address. Default Exchange 2000 settings should allow this type of relaying. If it does not work, you may want to look at your relay restrictions.
This is how it works: A message is sent to [email protected]. Exchange receives the message and finds a match in AD (the contact we created). It also sees that the primary email address for the contact is an external SMTP address. Exchange automatically forwards the message to this primary address. No mailbox mess and automatic forwarding. This also works for those of you using Exchange 5.5. Make a Custom Recipient and use the same logic: external address for the primary address and an additional SMTP address with the internal namespace. | 


