Technical Editor: Henrik Walther
Introduction to Microsoft Forefront Server for Exchange
Microsoft Forefront Server for Exchange (FSE) is a tool that will help companies deal with the threats associated with e-mail service. Microsoft Exchange is used in a large number of businesses for e-mail services. Microsoft FSE was not always so widely used, but its integration with Active Directory (starting with Exchange 2000) made it a more viable product for companies to use. The number of threats written to compromise these systems has increased as more companies implement Microsoft FSE in their infrastructure.
The importance of e-mail to productivity in most companies is the reason that extra security mechanisms, like Microsoft FSE, need to be in place. Attachments and phishing scams pose serious threats to companies. The Microsoft FSE gives companies extra mechanisms to filter attachments and scan for viruses.
The Microsoft FSE server allows network administrators to centrally manage the security of the exchange servers. Administrators using FSE can conduct filtering, scanning, and job scheduling of e-mail-related attachments from a central management console. Reports can give the security professional using FSE indication of what the real problems are and help them to discern from where they are originating. Using FSE can help companies effectively deal with security issues related to e-mail.
Implementing Microsoft Forefront Server for Exchange
When you are implementing FSE you should ensure that you carefully plan your deployment to ensure that the additional load placed on your FSE servers does not negatively impact performance and that you do not inadvertently block legitimate messages.
Due to the filtering abilities of FSE, it is very easy to block legitimate messages. This causes inconvenience for the recipient of the message, but also creates more work for administrators who either have to provide an alternative method of sending files to people or retrieve the files from quarantine and forward them to the recipient. Depending on the amount of legitimately blocked attachments, you may have to dedicate significant resources to review and deliver quarantined attachments.
It is common within companies to block executable attachments from being sent and received. This is done to protect the company’s infrastructure from programs, which could potentially cause problems, and also prevent potentially dangerous attachments being sent to third parties. While this will help to protect your infrastructure, it can easily cause legitimate messages to be blocked causing inconvenience to the sender and the recipient.
Planning a FSE Deployment
The complexity of your FSE deployment will vary depending on the complexity of your FSE infrastructure and the types of message filtering you want to implement. In order to help with your planning it is recommended that you split this into two components, Antivirus (AV) scanning and message filtering.
When you are planning the deployment of FSE, it is important to understand the FSE infrastructure. It is assumed in the course of this chapter that an FSE 2007 infrastructure is being used.
In FSE 2007, the functionality has been split into five roles:
- Client Access Server: Allows clients to access FSE.
- Hub Transport Server: Transports messages between mailbox servers and to edge transport servers.
- FSE: Stores users mailboxes.
- FSE: Provides unified messaging capabilities.
- FSE: Allows messages to be sent and received from external sources.
The first four roles can all be installed on a single server for small deployments. The Edge Transport Server has to be installed on its own server as it usually resides in a perimeter network.
This chapter will refer to different roles when indicating where to install or how to configure FSE. It is assumed that these are installed on separate servers.
Antivirus Scanning
FSE allows you to virus scan messages as they enter and transit through your FSE infrastructure. When they are in the user’s mailbox, this is done by deploying FSE on your Edge and Hub Transport roles and on the Mailbox role.
It is recommended that you deploy AV scanning on all of your servers running the FSE. This ensures that messages are virus-scanned providing for a safe FSE infrastructure. You can use up to five AV engines to scan each message and then attempt to clean the message, remove the attachment, or log that a virus was detected, When messages are cleaned or removed, they can be quarantined allowing you to retrieve the files if required. You can specify different AV engines for each of the three Scan Job types—Transport, Real Time, and Manual—although it is recommended that you keep them the same.
On servers running the edge and hub roles, you can choose to scan internal, incoming, and outgoing messages. It is recommended that you choose to scan all three. This allows you to ensure that no virus-infected messages enter or leave your organization and that internal machines are not sending viruses to your own users. By default, FSE only virus scans a message once, which allows for the best use of resources across your FSE infrastructure. This means that if a message is scanned on an edge role, it will not be re-scanned on the hub role used to relay the message through your organization.
On servers running the mailbox role, you have more control over which messages are virus-scanned. You can perform real time scanning which allows for messages to be scanned as they are accessed. This will, by default, only scan messages that have not been scanned for viruses before. These are usually public folder posts, calendar appointments, and messages in folders like Sent Items, as these messages do not pass through the hub role. While there is an overhead to scanning messages as they are accessed in terms of both resources and a delay to the end user, the impact should be minimal due to the small amount of messages that will be scanned.
You can also configure messages to be background scanned. Background scanning allows you to re-scan messages that have been received or created within the last x days by re-scanning. It is likely that new AV definitions will have been released, meaning that any new viruses will be detected. This is the only AV scan that will, by default, re-scan messages that have been previously virus-scanned. Running this scan is a considerable overhead, so you should set it to run in off-peak hours.
The final option is to perform a manual scan, which can be scheduled to run at a specific time. This is most commonly used when you first install FSE, to allow you to scan and stamp all existing messages, ensuring that your infrastructure is virus free. AV stamping is used to indicate that a message has already been virus-scanned. This stamp is placed in the message header when it is being routed through the FSE infrastructure. Once the message have been accepted into a users mailbox, the AV stamp is converted into a MAPI property of the message.
For each of the Scan Jobs on the Mailbox Role, you can choose which mailboxes they scan. This can be useful if you have a large number of mailboxes and you want to use the Manual Scan Job to scan these in batches. For the Real Time Scan Job, it is recommended that you scan all mailboxes, which will ensure that your entire infrastructure is protected.
Once a message is detected as containing a virus, the recommended action is to delete the attachment. While you can opt to clean a message, this uses considerable resources and most attachments containing viruses are usually unsolicited. Therefore, there is no point in trying to clean them. Unsolicited messages are also known as spam. These messages usually have a commercial content where the recipient has not requested this information. It is common for these messages to contain misleading attachments that contain viruses.
When you are planning your AV protection, you should ensure that all of your messages are scanned at least once to ensure that they are free from viruses. You should do this not only for incoming messages, but also for outgoing and internal messages. By scanning these messages you are ensuring that you are not sending viruses to other companies and that your entire infrastructure remains virus free.
If you opt to quarantine detected viruses you should ensure that you clean out the quarantine area on a regular basis to prevent the quarantine database from being filled up and that disk space does not run out. You can opt to automatically purge this information after a number of days. It is recommended that you enable this and purge messages after 30 days. The purge setting will also affect messages quarantined due to messages filtering.
Message Filtering
Message Filtering in FSE allows you to filter messages based on attachments, message content, keywords, and who is sending the message. This filtering is in addition to filtering performed by the Exchange Edge role and is performed after the FSE filtering. Therefore, it is likely that a large amount of unsolicited e-mail will have been rejected by this stage.
FSE Message Filtering is a lot more flexible than the filtering offered in Exchange, and allows you to quarantine the messages you filter. This allows you to recover deleted messages and attachments if required, along with being able to create highly complex and customized filters to meet your company’s requirements.
It is vital that you plan your filtering correctly, otherwise you could end up filtering messages that you never intended to. The Transport Scan Job allows you to filter messages based on their attachments and the contents of the message body. You can specify senders that you always want to receive e-mails from; these are known as safe senders. If you enable filtering on Real Time and Manual Scan Jobs, you can filter messages based on their attachments and against the contents of the Subject and Senders Domain.
It is recommended that you restrict all file filtering to the Transport Scan Job. This way messages are only scanned once before they are submitted for delivery. The reason for this is that if you enable filtering for executable files in the real time scan and a user attempts to send a message with an executable file attached, the message will be modified while it sits in the Drafts folder. This will result in an error when the user tries to send the e-mail. These error messages can cause confusion for the sender and may result in an increased number of calls to your Helpdesk.
By moving the file filtering to the Transport Scan Job, users will be able to send e-mails, but they will be checked during transit. This allows for the message to be filtered and for a notification e-mail to be sent if configured. While this has the same end effect as the message being filtered, the end user has a better experience.
When you configure file filtering you can do this based on extension, type, and file size. This provides you with a large amount of flexibility when configuring the file filters. It is recommended that you filter by file type wherever possible, as this prevents people from changing a file extension to bypass the filter. An example of file filtering will be provided in the configuration section of this chapter.
Once you have planned your file filtering, you will need to plan any other filtering methods you plan to use. If you need to check the body of the message for certain phrases, this can be done using the Transport Scan Job. Also known as keyword filtering, this filter provides more control than the content filter in FSE.
When you create a keyword filter you can configure logical operators. Logical operators allow you to specify that multiple words have to be in the message body or that words have to appear multiple times. Using this technique allows you to create complex filters.
The final set of filters you can create are content filters. These are available in the Real Time and Manual Scan Jobs and allow you to specify sender domains. This allows you to filter messages from certain e-mail addresses or domains. While you can perform the same functionality using sender filtering on an FSE Edge server, this filter has the added ability to quarantine messages and can be used if you have not deployed an Edge server.
Using the content filter you can also filter messages based on their subject. This allows you to filter on common unsolicited e-mail subjects, which may be useful if you are not running an FSE Edge server.
When you start to plan you FSE filtering, you should ensure that you are not duplicating workload if you are using the anti-spam filters on an FSE Edge server. You should not duplicate their work in FSE, as this places an additional work load on your servers. You should ensure that you test your filters before deploying them to make sure they only filter e-mail you want to filter (e.g., if you are only filtering incoming executables and not ones sent between internal recipients).
You should be aware that the more filtering you add, the higher the load on your servers. If you are using real time filtering this will also affect the access time for users when accessing messages.
Designing & Planning…
Exchange Hosted Service
When you are planning the protection for your FSE Infrastructure, you should also review Exchange Hosted Services (EHS). EHS provides a similar service to FSE, but on a hosted basis and only for incoming and outgoing e-mail.
EHS provides the same features as FSE, but does not provide for the proactive scanning of mailboxes or for the scanning of internal-only messages. By using a hosted solution, you can remove a considerable processing overhead from your own infrastructure.
Many companies use the two systems together, using EHS to remove a large amount of messages with viruses and obvious unsolicited e-mail, and then using FSE to process the remainder of the e-mail which is more likely to be legitimate and also have the added advantage of being able to proactively scan internal e-mails.
Installing Forefront Server for Exchange
When you install FSE you can either install it locally on each machine or by performing a remote install. Remote installs are performed within the Forefront installer. When possible, it is recommended that local installations are performed. This section will take you through performing both a local and a remote installation along with how to install FSE on clustered mailbox servers.
When you install FSE you have the option to perform a full installation. This can be performed on Exchange servers running the Edge Transport, Hub Transport, and Mailbox roles or a Client Installation, which installation allows you to install the Forefront Server Administrator onto administration machines and can only be installed locally.
If you have clustered mailbox servers using either Single Copy Cluster (SCC) or Cluster Continuous Replication (CCR), the installation process will differ slightly to installing on other FSE servers. The process is different for both SCC and CCR clusters. If you are using Local Continuous Replication (LCR), the installation of Forefront Server for Exchange should be the same as a normal install.
If you are using Standby Continuous Replication (SCR), you should not install FSE unless this server becomes active. Once the server is made active, you will then need to configure it as required. Fortunately, to speed up the configuration, you can use configuration templates.
When performing a local installation you should be logged into the machine as a user that has administrative rights on the machine. As part of the installation, you may be required to restart some of the FSE services; therefore, it is recommended that installation is performed during off-peak hours.
To perform a local install:
- Run the FSE Installer.
- Click Next.
- Accept the License Agreement.
- Enter User Name and Company Name and click Next.
- Select Local Installation and click Next.
- For a full installation, select Full Installation and click Next.
- Select Secure Mode or Compatible Mode and click Next. When you select Secure Mode, AV scan and filter messages are forwarded from quarantine. When you select Compatible Mode, AV scan messages are forwarded from quarantine.
- Select up to four AV engines (see Figure 3.1) and click Next.
- Click Next.
- If you need to use a Proxy Server for updates, enter Address and Port and click Next. (If you need to use a username and password you can specify this under General Options once FSE is installed.)
- Choose the Installation Location and click Next.
- Choose the Programs Folder and click Next.
- Review the Installation Options and click Next.
- You may be asked if you want to restart Exchange Transport Service. If you want to restart this now click Next; if you want to restart this later click Skip.
- If you choose to restart the service, click Next once the service has restarted.
- You may be asked if you want to restart FSE Information Store. If you want to restart this now click Next; if you want to restart this later click Skip.
- If you choose to restart the service, click Next once the service has restarted.
- Click Finish.
- For a Client installation Select Client – Admin console only and click Next.
- Choose the Installation Location and click Next.
- Choose the Programs Folder and click Next.
- Review the Installation Options and click Next.
- Click Finish.
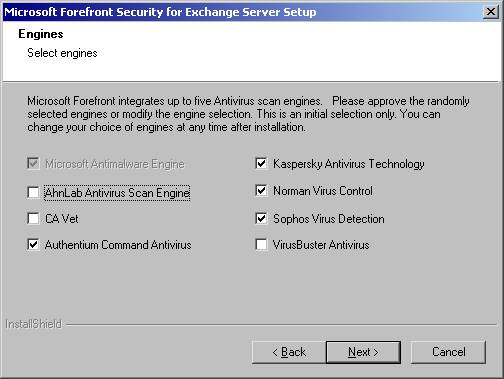
Figure 3.1: Selecting the AV Engines
When performing a remote installation, the destination machine and the machine that you are to perform the install from need to be in the same domain. You should be logged in as an administrator of the remote machine. File sharing also needs to be enabled on the remote machine in order to allow for installation files to be copied over. The installation may also require you to restart some of the FSE services; therefore it is recommended that the installation is performed during off-peak hours.
To perform a remote install:
- Run the FSE Installer.
- Click Next.
- Accept the License Agreement.
- Enter User Name and Company Name and click Next.
- Select Remote Installation and click Next.
- Enter the Server Name and Share Name (see Figure 3.2).
- Select Secure Mode or Compatible Mode and click Next. When you select Secure Mode, AV Scan and Filter messages are forwarded from quarantine. When you select Compatible Mode, AV Scan messages are forwarded from quarantine.
- Select up to four AV engines and click Next.
- Click Next.
- If you need to use a proxy server for updates, enter Address and Port and click Next. If you need to use a username and password you can specify this under General Options once FSE is installed.
- Enter the Installation Location into the Destination Directory field, enter the Programs Folder into the Folder Name filed, and click Next. This will start the installation.
- You may be asked if you want to restart Exchange Transport Service. If you want to restart this now click Next; if you want to restart this later click Skip.
- If you choose to restart the service, click Next once the service has restarted.
- You may be asked if you want to restart FSE Information Store. If you want to restart this now click Next; if you want to restart this later click Skip.
- If you choose to restart the service click Next once the service has restarted.
- Click Next to perform another remote installation or click Cancel to exit.
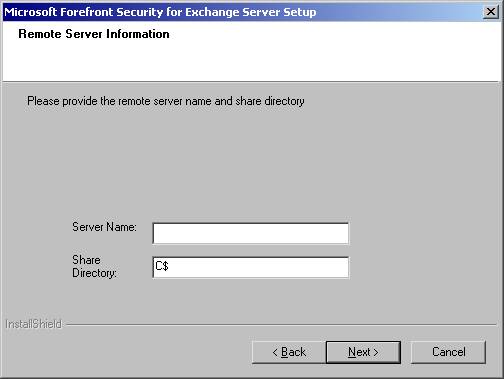
Figure 3.2: Specifying Remote Server and Path
To install FSE on a CCR mailbox cluster you will need to install the FSE on to the Active node first and then, once the installation is complete, you will need to install FSE on to the Passive node. Each installation should be done locally.
To install FSE on a CCR node:
- Run the FSE Installer.
- Click Next.
- Accept the License Agreement.
- Enter User Name and Company Name and click Next.
- Select Local Installation and click Next.
- Select Full Installation and click Next.
- Select Secure Mode or Compatible Mode and click Next. When you select Secure Mode, AV scan and filter messages are forwarded from quarantine. When you select Compatible Mode, AV scan messages are forwarded from quarantine.
- Select up to four AV engines and click Next.
- Click Next.
- If you need to use a proxy server for updates, enter Address and Port and click Next. If you need to use a username and password, you can specify this under General Options once FSE is installed.
- Choose the Installation Location and click Next.
- Choose the Programs Folder and click Next.
- Review the Installation Options and click Next.
- You will now be asked if you want to restart the Clustered Mailbox Server (CMS). If you want to restart this now click Next; if you want to restart this later click Skip
- If you choose to restart the CMS, click Next when the CMS has stopped, and click Next again when the CMS has started. Click Next.
- Click Finish.
You should now perform the same procedure on the passive node. You should ensure that the CMS has not failed over. Any configuration information you enter such as proxy server, details will be overwritten with the configuration from the Active node.
To install FSE on a SCC Mailbox cluster you will need to install the FSE on to the active node first, and then once the installation is complete you will need to install FSE on to the passive node. Each installation should be done locally.
To install FSE on a SCC node:
- Run the FSE Installer.
- Click Next.
- Accept the License Agreement.
- Enter User Name and Company Name and click Next.
- Select Local Installation and click Next.
- Select Full Installation and click Next.
- Select the Cluster Drive from the Shared Cluster Volume List, enter a Cluster Folder, and click Next.
- Select Secure Mode or Compatible Mode and click Next. When you select Secure Mode, AV scan and filter messages are forwarded from quarantine. When you select Compatible Mode, AV scan messages are forwarded from quarantine.
- Select up to four AV engines and click Next.
- Click Next.
- If you need to use a proxy server for updates, enter Address and Port and click Next. If you need to use a username and password, you can specify this under General Options once FSE is installed.
- Choose the Installation Location and click Next.
- Choose the Programs Folder and click Next.
- Review the Installation Options and click Next.
- You will now be asked if you want to restart the CMS. If you want to restart this now click Next; if you want to restart this later click Skip.
- If you choose to restart the CMS, click Next when the CMS has stopped and click Next when the CMS has started. Click Next.
- Click Finish.
Note:
When you are installing Forefront Server for Exchange on a SCC, you are required to select the Cluster Drive, which is the shared volume used by the Cluster Service. If the drive you require is not listed, you will need to exit the installer and re-run it specifying the following. It is assumed the drive letter is S:
forefront_setup_file.exe /c S:
You should now be able to select the drive from the Shared Cluster Volume List.
You should now perform a standard local installation on the passive node. You should also ensure that the CMS has not failed over. Any configuration information you enter during the passive installation such as proxy server details, will be overwritten with the configuration from the active node.
Configuring Microsoft Forefront Server for Exchange
Once you have installed FSE, you will need to configure the various settings to ensure that messages are processed as required for your business.
There are two ways to configure FSE. The first option is to use the Forefront Server Security Administrator (FSA), which allows you to configure each server running FSE on an individual basis using the tool locally or remotely. The other option is to use Forefront Server Security Management Console (FSSMC), which allows for Forefront servers to be centrally administered (The Management Console is an additional product and is not included with FSE.) For this reason, this section will focus on the FSA as the method used to configure FSE.
While the configuration information is stored in a number of different locations, the majority of the information is stored in a series of FDB files, which are located in the FSE installation directory. This information can also be stored in templates to allow for settings to be copied across servers. The remainder of the information is stored in the registry. This information is usually server specific, and the majority of the settings can be modified through the FSA.
When you are running clustered mailbox servers you should ensure you connect FSA to the Exchange Virtual Machine. The one exception to this is if you need to release quarantined files from a passive node. In that case, you should connect FSA directly to the passive node. All configuration information is replicated between the active and passive nodes ensuring that if a failover occurs the configuration information is available.
Settings
The Settings section allows you to configure the AV scanning options and server configuration for FSE along with the ability to create new configuration templates. Throughout this section there will be up to three available Scan Jobs for which you can modify settings. The Scan Jobs available are dependent on the Exchange Roles installed on the server.
If the server is running the Edge Transport or Hub Transport role, the Transport Scan Job will be available. If the server is running the Mailbox Role, the Real Time Scan Job and Manual Scan Job will be available. If you add roles to the server, you will need to re-run the FSE installer for the relevant Scan Jobs to be made available. Scan jobs are automatically removed if you install a role.
Scan Job
The Scan Job section allows you to configure which messages and mailboxes will be processed by the jobs (see Figure 3.3).
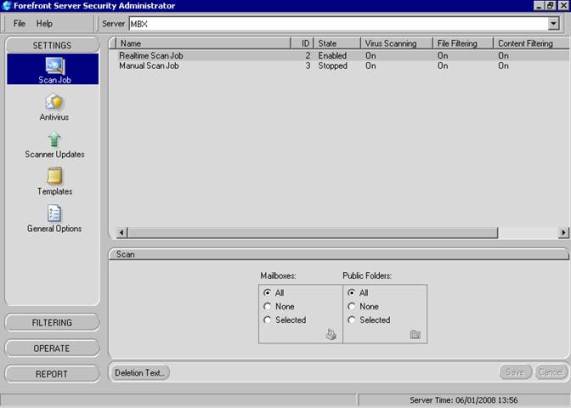
Figure 3.3: Scan Jobs
For each of the Scan Jobs, you can specify the deletion text that is used when an attachment is removed and replaced with a text file containing the specified text. To allow for e-mail-specific information to be entered, there are a number of keyword substitution macros available.
Keyword substitution macros can be inserted by right-clicking in the Edit Text field and selecting Paste Keyword, and then selecting the Macro to insert.
Transport Scan Job
The Transport Scan Job is used to process messages on servers running the Edge or Hub Transport Roles. This can be configured to process inbound, outbound and/or internal e-mail. The option to scan internal messages is available on servers running the Edge role, even though Internal mail should not reach the Edge.
The other configurable option is the tag text, which is used when keyword filtering is enabled for the Scan Job. Tag text allows for a subject line text and header tag text to be specified. These are applied to an e-mail when it triggers a keyword match, and the action is set to tag the message.
Real Time and Manual Scan Jobs
The Real Time and Manual Scan Jobs are used to process messages on the servers running the mailbox role. These will process messages that have not previously be scanned. This is particularly important for messages that do not use a hub transport server, including messages in sent items, public folder posts, and calendar messages.
The real time scan processes messages as they are accessed by a client; this is also known as an on access scan. By default, this will only process messages that have never been scanned before and are within a certain time range. This range in the first release of FSE is within the previous 24 hours but can be changed. If you are running FSE for Exchange 2007 Service Pack 1, this value is fixed to be every day since FSE was installed. Settings specified for the real time scan are also used for the background scans.
The manual scan can either be run on a manual basis or on a schedule. This is usually used to scan specific mailboxes or to clean up a mail server after a virus outbreak.
For both of these scans you can configure which mailboxes and public folders are scanned. There are three available options for each:
- All Scans all current and future mailboxes or public folders
- None Does not scan any mailboxes or public folders
- Selected Scans only the selected mailboxes or public folders
If you select Selected you will need to select which mailboxes or public folders to scan:
- Select Selected.
- Click on the Mailbox or Public Folder icon.
- Check the mailboxes or public folders you want to scan; you can select an entire store. If you select a store, then only current mailboxes will be included. Any new mailboxes will need to be added as required. (See Figure 3.4.)
- Click on the Back Arrow to exit the Selection List.
- Click OK to save the changes.
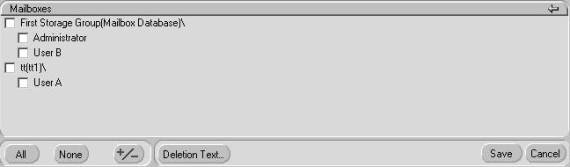
Figure 3.4: Selecting Mailboxes
It is recommended that you leave the real time scan set to “All” as this will ensure that messages that have not been scanned are scanned to ensure they do not contain viruses.
Antivirus
The AV section allows you to configure which AV engines are used when scanning messages, how many engines need to be used for each message, and the action to take if a virus is detected (see Figure 3.5).
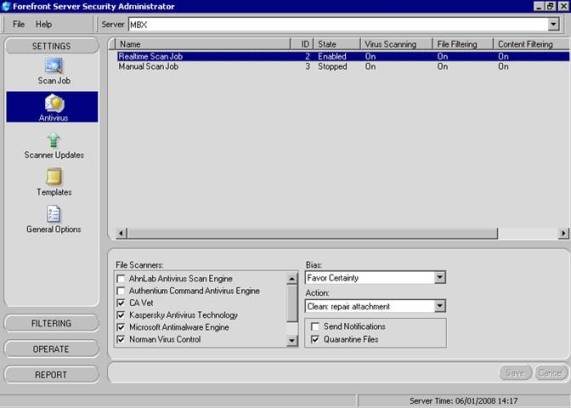
Figure 3.5: Antivirus Settings
For each Scan Job, you can specify up to five AV engines to use. However, one of these engines has to be the Microsoft Antimalware Engine. You can select any of the four other engines from the list. Each of these engines are licensed as part of the FSE licenses, so select the engines that you feel most comfortable using. It is advisable that you research each of these engines before choosing which ones to use.
Once you have selected which AV engines to use you can specify the bias, which is the number of engines that need to be used when scanning a message. The options are:
- Max Certainty Use all selected engines. If an engine is not available, queue e-mail until all the engines are available.
- Favor Certainty Use all selected engines. If an engine is not available, continue to process e-mail with available engines,
- Neutral Scan each e-mail with at least half of the selected engines,
- Favor Performance Scan each message with between one and one-half of the available engines.
- Max Performance Scan each message with one engine.
The choice you make depends on your environment and requirements, but it is recommended that Favor Certainty is chosen. Favor Certainty produces the best results in terms of virus detection and also keeps e-mail flowing if an engine becomes unavailable. Engines become unavailable when their virus definitions are updated. Since each engine can be updated several times a day, this could cause significant interruption to e-mail flow if you use Max Certainty.
You will need to select what action to take when a virus is detected. There are three possible options:
- Skip: Detect Only This option leaves the infected file in the e-mail and places an entry in the logs.
- Clean: Repair Attachment This option attempts to repair the attachment. If a repair is not possible, the attachment is removed and replaced with a text file containing the deletion text.
- Delete: Remove Infection This options removes the attachment and replaces it with a text file containing the deletion text.
There is an exception to the above if in General Settings the following options are set. The attachments will be deleted if they match the setting:
- Delete Corrupted Compressed Files
- Delete Corrupted Uuencoded Files
- Delete Encrypted Compressed Files
The final two options are to Send Notifications and to Quarantine Files. The Send Notifications option allows for notification e-mails to be sent if a virus is detected. These e-mails are configurable and will be covered later in this section. The Quarantine Files option allows you to specify if attachments are quarantined when a virus is detected; this will occur no matter what you set the Action to be.
Scanner Updates
The Scanner Updates section allows you to configure the update source for the AV engines and how often they are updated. By default, all of the engines are updated on an hourly basis at 5-minute intervals of each other; this includes engines that are currently not being used.
For each of the engines, you can specify a primary and secondary update location. This can either be left at the default (which is the Microsoft Update Web site) or can be changed to point to an internal distribution server. Any FSE server can be set to be a redistribution server (covered later in this section). Alternatively, FSSMC can be used to distribute updates.
The choice of where to download updates from depends on your requirements. If your servers are able to access the Internet either directly or through a proxy server, then you may wish to leave the update location to be the Microsoft Update Web site.
To configure a Proxy Server:
- Select Settings followed by General Options.
- Check Use Proxy Settings.
- Under Proxy Server Name/IP Address enter your Proxy Server Name or IP Address.
- Under Proxy Username enter an Account Username, if required.
- Under Proxy Password enter an Account Password, if required.
- Click OK to save the changes
If you choose to receive updates using a Redistribution Server you will need to enter the UNC path into the Network Update path. This will need to be done for each AV engine. If you have multiple redistribution servers you can enter a secondary Update Path by clicking on Secondary and entering the UNC path. Alternatively, the secondary Update Path could point to the Microsoft Update Site.
If you need to configure credentials in order to access the Update Path:
- Select Settings followed by General Options.
- Check Use UNC Credentials.
- Under UNC Username enter an Account Username.
- Under UNC Password enter an Account Password.
- Click OK to save the changes.
The update interval for the AV definitions can be configured on a per-engine basis and can be performed once, every x hours per day, daily, weekly, and monthly. The start time for the updates can also be specified. This should be staggered for each engine to ensure that updates do not occur at the same time. It is recommended that you update the definitions once per hour, which is the default setting. This helps to ensure that you are running the latest definitions. By not updating the definitions regularly, you run the risk of detectable viruses not being detected.
It is also possible to configure updates to occur when FSE is started. This is useful if you have specified a long update window. If you use the default setting of hourly updates, then this is usually not required.
This can be configured by:
- Select Settings followed by General Options.
- Check Perform Updates at Startup (see Figure 3.6) .
- Click OK to save the changes.
If you want to be notified of update actions such as Update Success, Failure, and No Updates Available, these updates can be sent to the Virus Administrator. The address of the Virus Administrator is configurable and is covered later in this section. To enable notification:
- Select Settings followed by General Options.
- Check Send Update Notifications.
- Click OK to save the changes.

Figure 3.6: Scanner Updates and General Settings
The remaining options are to force an update using the Update Now option and to disable updates for AV engines. This can be useful it you do not use some of the engines or do not want to keep up-to-date definitions for them. If you choose to change AV engines for Scan Jobs at a later time, you will need to ensure you enable updates.
WARNING!
If you are using a proxy server or redistribution server and usernames and/or passwords become invalid, updates will fail. As a result, you could become vulnerable to new viruses.
Redistribution Server
A Redistribution Server allows a Forefront Server for Exchange Server to redistribute AV definitions to other FSE servers. This allows for updates to only be downloaded once from the Internet. This means that other FSE servers do not need access to the Internet. To configure an FSE Server to be a Redistribution Server:
- Share the Engines folder located, by default, at C:\Program Files (x86)\Microsoft Forefront Security\Exchange Server\Data.
- In FSA, Select Settings followed by General Options.
- Check Redistribution Server (see Figure 3.6).
- Click OK to save the changes.
Templates
Templates are used to control settings across a number of FSE servers. A default template exists that controls the initial settings for each of the Scan Jobs along with the Antivirus, Scanner Updates, and Notification settings.
By default, templates are hidden from view. To view the templates, go to File ê Templates ê View Templates. This will allow you to view the templates under the Templates section and under other sections in FSA, allowing you to configure them.
In addition to the default template, you can also create new templates, known as named templates. By using named templates, you can create templates for different scenarios or for groups of different FSE servers.
These templates are stored in the template.fdb file along with the default templates, and can be applied to different Scan Jobs through the FSA. When you deploy the template.fdb file to other FSE servers, you can then apply these named templates to Scan Jobs on that FSE server.
When you need to create a new template there are four types of templates you can create. These are:
- Transport
- Real time
- Manual
- Filter Set
The first three templates are for each of the Scan Job types and the Filter Set template is used to create a set of filters. The Filter Set can then be applied to any of the Scan Job types, allowing for a single set of filters to be applied to both real time and manual Scan Jobs. For example:
To create a new named template, this can be seen in Figure 3.7:
- Go to File -> Templates -> New.
- Select the type.
- Enter a template name.
- Click OK.
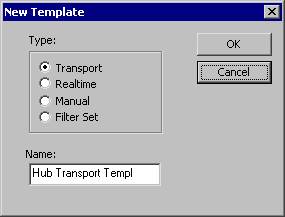
Figure 3.7: Creating Templates
You can also rename and delete the templates by going to File ê Template and choosing the appropriate option. If you are renaming the template, you will be asked to enter a new name. If you are deleting a template, you will be asked to confirm the deletion.
Once you have configured a template, you will need to apply it to a Scan Job. To apply a template in the Templates section, select the Scan Job, then select the template from the drop-down list under Templates. Once you have selected your template, click Load From Template. If you also need to apply a filter set, you can do this by selecting the Filter List from the drop-down list under Filter Sets (see Figure 3.8).

Figure 3.8: Applying Templates to Scan Jobs
If you have applied a filter set to a Scan Job, these settings will be used first, followed by settings for the Scan Job.
Once you have configured your templates you will need to copy them to the other FSE servers. This can be done by either using FSSMC or by using the command line FSCStarter.exe.
To apply the templates to another FSE server, you should first copy the template.fdb file to the FSE server. This file is located by default in C:\Program Files (x86)\Microsoft Forefront Security\Exchange Server\Data. Once you have copied this file, you should run the following at the command prompt:
“C:\Program Files (x86)\Microsoft Forefront Security\Exchange Server\FSCStarter” t
This command forces FSE to re-load the template file that you have just copied over. If you do not run this command, the templates will not be made available in FSE.
Tip
If you have configured all of your Scan Jobs outside of a template but want to copy the settings to another FSE server, you can re-create the default template based on the current configuration of your Scan Jobs.
This can be performed by deleting the Template.fdb file from C:\Program Files (x86)\Microsoft Forefront Security\Exchange Server\Data. Then, restart the FSC Controller service. This will re-create this file based on your current Scan Job settings. This will only re-create the default template. If you have any named templates, these will be lost.
General Options
The General Options section allows you to configure settings specific to the server. These settings are stored in the registry and include diagnostic and event logging along with additional configurations for scanning. (The Scanner Updates section was covered previously in this chapter).
Diagnostics
The diagnostic logging allows for additional logging information to be written to the programlog.txt file. The additional logging can be useful when trying to troubleshoot issues related to FSE. This logging should only be turned on when necessary, as it can generate large amounts of information and degrade performance (see Figure 3.9).
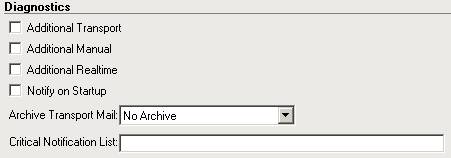
Figure 3.9: Diagnostic Logging
As part of diagnostic logging, you also have the option to archive messages. This option is only available on FSE servers with the Transport Scan Job. You have four options when configuring this:
- No Archive
- Archive Before Scan
- Archive After Scan
- Archive Before and After Scan
E-mails are archived into two folders—In and Out for inbound and outbound messages. By default, these folders are located at C:\Program Files (x86)\Microsoft Forefront Security\Exchange Server\Data\Archive. If you choose to archive messages before scanning, the messages may contain viruses. Be aware of the consequences to storing these e-mails. The archiving of e-mails can use up a significant amount of disk space and degrade performance. You should only enable this option when required.
You can opt to send notification to the Virus Administrator whenever the Internet Scanner starts. The Internet Scanner is used by the Transport Scan Job to process messages. It is recommended that this should only be enabled on servers running the Transport Scan Job if you wish to receive these notifications.
The final option is the Critical Notification List, which allows you to specify a list of addresses that Critical Notifications should be sent. A Critical Notification is defined as the failure of the FSE Services. Failure of these services would result in AV Scanning and Message Filtering failing. However, e-mail would continue to flow through FSE.
Logging
The Logging section allows you to choose which information is logged. It is recommended that these default settings be utilized, as this allows for basic logging of FSE activities along with Virus and Filter Notifications. The available settings are shown in Table 3.1. Settings marked with an * are dependent on which FSE Server Roles have been installed.
Table 3.1: Virus and Filter Notifications
Setting | Description |
Enable Event Log | FSE writes basic information to the Application Event Log, such as engine updates and Scan Jobs not running. These events can be monitored from systems like System Center Operations Manager |
Enable Performance Monitor and Statistics | Performance and statistics information can be made available to Performance Monitor; if these are not required this can be disabled. |
Enable Forefront Program Log | The Program log provides information on FSE starting along with AV engine updates; this provides basic troubleshooting information. This file is located in the Forefront Data folder and is called ProgramLog.txt. |
Enable Forefront Virus Log | The Virus log allows for the logging of detected virus Infections to a text file VirusLog.txt. It is recommended that this be left disabled. |
Enable Incidents Logging – Transport* | Incident logging allows for the actions taken on detecting viruses and filter matches to be logged into a database. This is covered later in this chapter. It is recommended that these options are not disabled. |
Enable Incidents Logging – Real Time* | |
Enable Incidents Logging – Manual* | |
Max Program Log Size | The Program Log file can grow to be large, especially if debugging is left turned on for any period of time. In order to ensure that it does not use up all the available disk space, a maximum size can be set the value is in KB with a minimum of 512. If you do not want to set a max size, enter a value of 0. |
Scanning
This section allows you to modify settings relating to the virus scanning of messages. For the majority of companies, these default settings can be used. Due to the large amount of settings, only the most common are covered, as seen in Table 3.2. The FSE Help File provides extensive details on all settings. Settings marked with an * are dependent on which Exchange Server Roles have been installed.
Table 3.2: Virus Scanning Settings
Setting | Description |
Body Scanning – Manual* | Enables the scanning of the message body instead of just the attachments. Transport scans always scan the body. |
Body Scanning – Real Time* | |
Delete Corrupted Compressed Files | If files are corrupt, virus scanning cannot always detect viruses. The safest option is to delete these files from the message. Since corrupted files are of no use to the recipient, there should be no issues with removing them. |
Delete Corrupted Uuencoded Files | |
Delete Encrypted Compressed Files | Encrypted compressed files cannot be virus scanned. Allowing these through poses a significant risk. These files will be quarantined so they can be manually retrieved if required. |
Scan Doc Files As Containers – Manual* | This setting is relevant to Office Documents up to the 2003 release. These documents can contain embedded files. Enabling this will ensure that these files will be virus scanned. |
Scan Doc Files As Containers – Transport* | |
Scan Doc Files as Containers – Real Time* | |
Optimize for Performance by Not Scanning Messages That Were Already Virus Scanned – Transport* | When messages are virus scanned, an AV Stamp is placed in the message header during transport, then stored in the MAPI Properties of the message. If this is detected, the message will not be re-scanned. If you disable this option, the message will be re-scanned. If this tag exists, this can add considerable load. It is recommended that this be left enabled. |
Scan on Scanner Update* | This setting indicates that messages should be re-scanned if newer AV definitions are available. This only effects the On-Access scanning on the Mailbox servers. If you run Outlook Clients in Cached Mode, an On-Access event will not be triggered when accessing cached items. If an update occurs when a background scan is running, this will be restarted. This could continue to restart if updates keep occurring. It is recommended that this setting is not enabled as it can add a considerable load to your servers. |
Enable Forefront Security for Exchange Scan | This gives you the option to enable only parts of FSE. You can Disable All, Enable Store Scanning, Enable Transport Scanning, and Enable All. By configuring this option, you can prevent the scanning process from being loaded allowing for resource saving. You need to restart FSE after modifying this setting. |
Transport Process Count* | You can specify how many processes are available to process messages. This setting can be between 1 and 10. It is recommended that you do not enable more than 2 for each processor core in the server. There is also a large memory overhead for each process. For most companies four processes will suffice. |
Real Time Process Count* | |
Quarantine Messages | When messages are quarantined due to content or file filters, they can be stored as an EML file, which keeps the attachment and message in a single file. Or, the attachment and message can be stored separately. If you store messages as an EML file you will need an application that is capable of viewing them. |
Deliver From Quarantine Security | This setting controls how messages are handled when they are delivered from quarantine. If this is set to Compatible, messages will be virus scanned. If this is set to Secure, messages will be virus scanned and filters will also be applied. |
Internal Address | In this field you should enter all of the domain names hosted on your FSE servers. This will be used to indicate who internal notifications should be sent to. You do not need to enter sub-domains. Domains should be separated by semicolons with no spaces. |
Transport External Hosts | You should enter the Internet Protocol (IP) address of each of your Edge Servers. Addresses should be separated by semicolons with no spaces. |
Background Scanning
Background Scanning is only available on servers running the Mailbox Role. This allows for messages to be re-scanned based on their age. This also allows for scanning with updated AV definitions, ensuring that new viruses are detected. This scan in enabled as a Scheduled Job and is covered later in this chapter (see Table 3.3).
Table 3.3: Scanning Enabled
Setting | Description |
Enabled Background Scan if ‘Scan On Scanner Updated Enabled’ | This setting is conditional on “Scan on Scanner Update” being enabled. |
Scan Only Messages With Attachments | By scanning only messages with attachments, you reduce the total number of messages to scan. |
Scan Only Unscanned Messages | Scan only un-tagged messages. This setting is not recommended as it prevents new viruses from being detected. |
Scan Messages Received Within The Last x Days | The available time intervals are Anytime, 4, 6, 8, 12, and 18 hours, and 1, 2, 3, 4, 5, 6, 7, and 30 Days. |
By default, the scan interval is set at 2 days. For most companies, this should be sufficient to ensure that the job completes within a number of hours. If you host a large amount of mailboxes on your Mailbox server and receive large amounts of messages daily, you should reduce the interval to a value appropriate for your company.
Filtering
The filtering section allows you to configure message filters for each of the Scan Jobs.
When you configure the filters, you are able to select the action to take if the filter matches. While the options vary depending on the filter type, there are four available:
- Skip: detect only This option leaves the attachment in the message and places an entry in the logs.
- Delete: remove contents This option removes the attachment and replaces it with a text file containing the deletion text.
- Purge: eliminate message Remove the entire message.
- Identify: tag message Place a tag in the subject and/or message header.
You will also be able to choose if the files or messages should be quarantined. If you enable this option, the file will be quarantined if you choose the Delete or Purge action. You will also be able to enable Notifications, which will allow you to send notifications to the sender and/or recipients.
Content
Content filters allow you to filter messages based on the Sender or the Subject Line. These filters can be used by the Real Time and Manual Scan Jobs. When setting up a Subject Line filter, it will only match against the entire subject unless you use wildcards. For example, if you specify make money as the subject line it will only match if “make money” is the subject. If you specify “*make money*,” it will match as long as “make money” appears somewhere in the subject. If “you can make money now” is the subject, it will be a match and that message will be filtered. Similar wildcards can be used for the Sender Domain, for example, [email protected] or *@fse.syngress.local.
When you create a Content filter, you can either enter the Sender Details or Subject Lines directly into the filter, or you can use a Filter List. It is recommended that you use Filter Lists because this allows you to put a meaningful name against the list. Using Filter Lists makes things easier when you are reviewing your settings at a later time.
To create a Content filter (not using a Filter List):
- Go to Settings ê Filtering ê Content. If this is grayed out, select the Scan Job or Template first.
- Select the Scan Job or Template.
- Select Sender-Domains or Subject Lines from Content Fields.
- Click Filters.
- Click Add.
- Enter the Subject Line or Sender E-mail Address or Sender Domain you want to match.
- Under Filter select Enabled.
- Select the required Action.
- Select if you want to Send Notifications or Quarantine Files.
To create a Content filter using a Filter List, you first need to create the Filter List. To do this, refer to the Filter List section. Once you have created the Filter List you can create the Content Filter (see Figure 3.10):
- Go to Settings ï Filtering ï Content. If this is grayed out, select the Scan Job or Template first.
- Select the Scan Job or Template.
- Click Lists.
- Select the Filter List.
- Under Filter select Enabled.
- Select the required Action.
- Select if you want to Send Notifications or Quarantine Files.
Each Content filter can be disabled by selecting Disabled from the Filter List. If you need to edit or delete a Sender-Domain or Subject Line, you can do this by selecting it and clicking Edit or Delete.
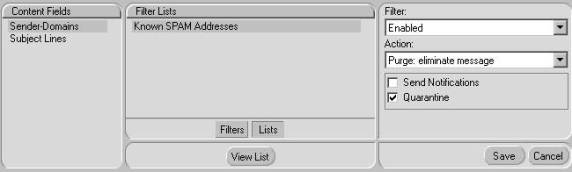
Figure 3.10: Configuring Content Filter
Keyword
Keyword filters are used by the Transport Scan Job to process the body of a message. If the message body matches the criteria of the filter, the defined action will be applied to the message.
When you create a Keyword filter you first need to create a Filter List. This Filter List can contain multiple items, and each item should be the word or sentence you want to match against.
This filter can contain logical operators that allow for more control over the matching. These are (there must be a space between the word and the underscore):
- word1_AND_word2 Logical AND operator, message must contain word1 and word2.
- word1_NOT_ word2 Logical NOT operator, message must contain word1 but not word2.
- word1_ANDNOT_word2 The same as _AND__NOT_.
- word1_WITHIN[#]OF_word2 word1 has to be within # words of word2, where # is a number.
- _HAS[#]OF_ word The body has to contain # of the word, where # is a number.
The filter will match if a single item in the list is matched. You can increase this by changing the minimum number of matches required.
To create a Keyword filter, you first need to create the Filter List. To do this, refer to the Filter List section. Once you have created the Filter List, you can create the Keyword filter (see Figure 3.11):
- Go to Settings ï Filtering ï Keyword. If this is grayed out, select the Scan Job or Template first.
- Select the Scan Job or Template.
- Select Message Body under Keyword Fields.
- Select the Filter List.
- Under Filter select Enabled.
- Select the required Action.
- If you set an Action of Tag, click on the Identify tab and check the Subj Line and/or Msg Hdr boxes.
- Select if you want to Send Notifications or Quarantine Files.
- Select which messages the filter should effect; Outbound, Inbound, or Internal.
- Specify the Minimum Unique Keyword Hits.
Each Keyword filter can be disabled by selecting Disabled from the Filter List.
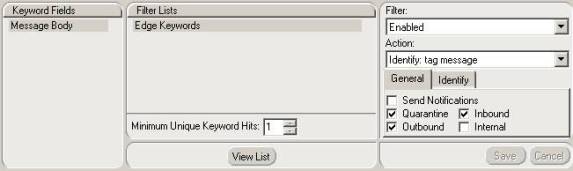
Figure 3.11: Configuring Keyword Filter
File
File filters are used to control the types of files sent through your FSE infrastructure. These filters can be applied on any of the Scan Jobs, but it is recommended that you do not use File filters on the Real Time Scan Jobs.
When you create a file filter, you can either enter file names directly into the filter or you can use a Filter List. It is recommended that you use Filter Lists, because this allows you to put a meaningful name against the list and when reviewing settings later, this can make things clearer.
For each of the entries, you need to specify an extension. Extensions can include wildcards, along with a file type and an action to take. You can also specify if the filter should be applied to inbound and outbound messages, and if it should only affect files of a certain size.
To limit the effect of a filter, it can be preceded by either <in> or <out>. This will limit the filter to either inbound or outbound messages. To limit the filter by size, you should place a comparison operator followed by the size. For example:
<in>*.exe>500KB
This will limit the filter to inbound files with an .exe extension that is over 500 Kilobytes in size.
To create a File filter (not using a Filter List):
- Go to Settings ï Filtering ï File.
- Select the Scan Job or Template.
- Click Names.
- Click Add.
- Enter the Extension along with any limitations.
- Under File Filter select Enabled.
- If you need to choose specific file types, uncheck All Types, accept the warning, and check the File Types required.
- Select the required Action.
- If you set an Action of Tag, click on the Identify tab and check the Subj Line and/or Msg Hdr.
- Select if you want to Send Notifications or Quarantine Files.
To create a File filter using a Filter List, you first need to create the Filter List. (To do this, refer to the Filter List section.) Once you have created the Filter List you can create the File filter (see Figure 3.12):
- Go to Settings ï Filtering ï File.
- Select the Scan Job or Template.
- Click Lists.
- Select the Filter List.
- Under File Filter select Enabled.
- If you need to choose specific File Types, uncheck All Types, accept the warning, and check the File Types required.
- Select the required Action.
- If you set an Action of Tag, click on the Identify tab and check the Subj Line and/or Msg Hdr.
- Select if you want to Send Notifications or Quarantine Files.
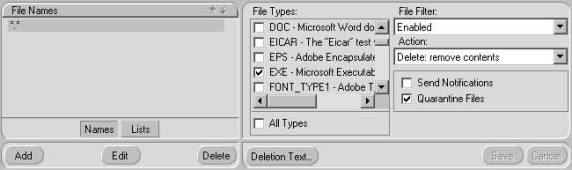
Figure 3.12: Configuring File Filtering
Each File filter can be disabled by selecting Disabled from the File Filter List. If you need to edit or delete an extension from the File Names List, you can do this by selecting the filename or extension and clicking Edit or Delete. If you need to modify the order that the Files Filters are evaluated, you can use the up and down arrows to change the order. Filters higher up the list are evaluated first. Once a match has been made, no other filters will be evaluated.
For example, if you wanted to disable the ability for users to receive incoming executables you would configure the following:
- Create a Filter List called Executables.
- Add an item to that filter as <in>*.* This will check all incoming attachments irrelevant of name or extension.
- Go to Settings ï Filtering ï File.
- Enable the Executables Filter List for the Transport Scan Job.
- Specify a File Type of EXE – Microsoft Executable File.
- Set an action of Delete: remove contents.
- Under the General tab select Quarantine Files.
By configuring the above, you have told FSE to scan all incoming attachments to see if it contains an executable file, and if it finds one to delete it from the e-mail and place it in quarantine. When the end user receives the e-mail, it will contain a text attachment explaining that the file had been removed. If you choose to modify the Deletion Text you could instruct them to contact the Helpdesk for their attachment.
Note:
This will also remove executable attachments in ZIP files. If you wanted to allow these, you would need to create another entry above the one to remove executables that has an action of Skip: detect only and has a File Type of ZIP – Compressed file created by PKZip.
Allowed Senders
The Allowed Senders tab allows you to specify that messages from specified senders should not be subject to Keyword, File, or Content filtering. This could be useful if you generally block Visual Studio source files, but you need to ensure you receive them from a development company.
Before you configure the Allowed Senders, you need to create a Filter List. To do this, refer to the Filter List section.
Now that you have created the Filter List, you can enable it for a Scan Job. You can also specify which filters should be skipped when messages are from the specified senders:
- Go to Settings ï Filtering ï Allowed Senders.
- Select the Scan Job or Template.
- Select the Sender Filter List from Sender Lists.
- Under List State select Enabled.
- Under Skip Scanning, select the Filters you want to skip.
If required, you can enable multiple Allowed Senders for each Scan Job, or they can be disabled by selecting Disabled from the List State.
Filter Lists
Filter Lists are used to create groups of settings for the filters. These lists allow for settings to be created under a meaningful name. This also means that the same list can be used by multiple Scan Jobs. Filter Lists are all created, edited, and deleted in the same manner as when you add items to a Filter List. There is no checking performed on the entries to ensure that they are valid; therefore, if you are creating an Allowed Sender List, you are able to enter invalid e-mail addresses, such as addresses missing the @ symbol. If you find that a filter is not acting as you would expect, you should ensure that you have not entered any information incorrectly.
To create a Filter List:
- Go to Settings ï Filtering ï Filter List.
- Select a List Type.
- Click Add.
- Enter the list name, which should be something meaningful.
Once the list has been created, you can delete it by selecting the list from List Names and clicking Delete. Adding items to a Filter List is done through editing the list.
To edit a Filter List:
- Select the List Type followed by the List Name.
- Click Edit.
- An Edit Filter List window should open.
- Under Include in Filter click Add.
- Enter the item text (e.g., an e-mail address or a file extension).
- To add multiple items click on Add again. If you need to Edit or Remove an item, select it from the list and click the appropriate button.
- Click OK.
Operate
The Operate section allows you to choose which Scan Jobs are enabled along with settings related to these jobs. You can also specify schedules for scans and initiate a quick scan.
Run Job
The Run Job section allows you to:
- Enable or disable Scan Jobs
- Specify if the Scan Job scans for viruses or filters messages
- View logs for each Scan Job
By default, each of the Scan Jobs are enabled. If you need to disable them for any reason, it can be done by selecting the Scan Job and selecting Bypass (see Figure 3.13). You can re-enable the job by selecting Enable.

Figure 3.13: Enabling Scan Jobs
For each of the Scan Jobs, you can also specify if the job carries out virus scanning and filtering. This is configured through a series of checkboxes. For Transport Scan Jobs, you can enable or disable File and Keyword filtering. For Real time or Manual Scan Jobs, you can enable or disable file and content filtering. These settings take effect immediately, and affect the job even if it is running.
You are also able to view the incidents for each Scan Job. This information is the same as the incident information shown in the Report section, but is specific to the selected Scan Job. You also have the option to export the incident information or to clear the log, or you can also delete individual log entries if required.
Schedule Job
Scheduled jobs are only available on servers running the Mailbox role. There are two jobs that can be scheduled. The first is the Manual Scan Job, which can be run on a one time, daily, weekly, or monthly basis. This can be useful if you want to scan mailboxes that are not covered by a real time scan or you want to use different settings or AV engines. This could also be useful to run after an outbreak to ensure that no mailboxes are infected and can be scheduled to run during off-peak hours.
The other Scheduled job is the Background Scan Job (see Figure 3.14). This Scan Job allows for recent messages to be re-scanned using newer AV definitions. This helps to ensure that new viruses are located and removed. While this can be configured to run one time, daily, weekly, or monthly, it is recommended that you run this daily during off-peak hours. (Background Scan Jobs are discussed in greater detail earlier in this chapter.) You also have the ability to enable, disable, and stop these Scan Jobs; these settings take effect immediately.

Figure 3.14: Scheduling the Background Scan
Quick Scan
A Quick Scan allows for the ad-hoc scanning of mailboxes and public folders, and is available only on servers running the Mailbox role. This is configured in the same manner as other Scan Jobs in terms of AV engines to use along with the bias and actions.
You can specify which mailboxes and public folders are scanned. This allows you to select mailboxes that you suspect have been infected. For example, a Quick Scan can only perform AV scanning and cannot be used to apply filters to messages. Depending on the number of messages within the selected mailboxes and public folders running, a Quick Scan could put a considerable load on the server. It would be wise to be careful to ensure that this does not adversely affect performance for day-to-day operations.
Report
The Report section allows you to view the Incident Logs and the Quarantined Messages. You can also configure E-mail Notifications.
Notification
The Notification section allows you to configure who receives e-mail notifications, along with the contents of the e-mails. Most of the e-mails have pre-defined recipients and contents, If needed, these notifications can also be enabled and disabled (see Figure 3.15).
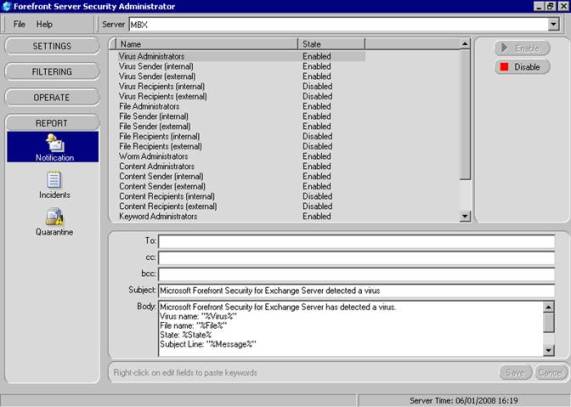
Figure 3.15: Enabling Notifications
The notifications you should modify are the Administrator e-mails, as these are used to notify you of issues. They are also used to notify you of viruses and filter matches if notifications for these have been enabled. You should specify whom these are sent to. This could be individual recipients or distribution lists (multiple addresses should be separated by semicolons).
The other available notifications are for alerting either the sender or recipient that there was an issue with a message. These notifications are further separated into external or internal parties. By default, only the sender is notified. Recipient e-mails are disabled but you may choose to enable or disable these depending on the requirements for your company. By allowing different messages for external and internal parties, you can tailor messages to the intended audience (e.g., an internal recipient may be instructed to contact the IT Helpdesk).
The final part to consider is the sender of the Notifications. By default, this is ForefrontServerSecurity@ServerName.com. It is recommended that this be changed to something more meaningful (e.g., the postmaster address for your company or the address for your IT Support desk).
These settings are configured through the registry:
- Go to Start ï Run, enter regedit, and click OK.
- Navigate to HKEY_LOCAL_MACHINE\SOFTWARE\Wow6432Node\Microsoft\Forefront Server Security\Exchange Server.
- Locate the ServerProfile key.
- Modify the key and enter an e-mail address.
- Close regedit.
Incidents
The Incidents section allows you to view the incidents that have occurred. Incident entries are created when a virus is detected or a filter is matched. The information displayed includes the recipients and sender along with the action taken. It is possible to perform the following actions:
- Delete individual incidents (using the Delete key)
- Clear the log
- Export the log
- Purge incidents after a number of days
- Apply filters to the log
- View statistics
- Clear statistics
The incident log is stored in an Access Database and has a file limit of 2 GB. If the Notification Log grows to more than 1.5 GB a notification will be sent daily to the Virus Administrator. To clear the log you can click the Clear Log button. This command will be queued and the messages will be cleared when the database is compacted which is at 02:00 daily.
An alternative to this is to automatically purge messages when they reach a certain age. For example, after 30 days the rate at which incidents are generated depends on how busy your e-mail servers are and how many viruses or filter actions are received. Configure this to match the requirements for your company.
Quarantine
The Quarantine section allows you to view the messages that have been quarantined. You can also choose to deliver these messages to the intended recipients. While this may not be of use for viruses, it can be useful for messages that have been quarantined due to matching a message filter. It is possible to perform the following actions:
- Delete individual messages (using the Delete key)
- Clear the log
- Export the log
- Save attachments to the file system
- Deliver messages to the intended recipient
- Purge messages after a number of days
- Apply filters to the log
If you choose to save attachments to the file system, this will allow infected files to be saved. Therefore, you should ensure that you have a current virus scanner running on the machine and that you understand the consequences of doing this.
If you want an attachment to be delivered to either the intended recipient or to another address, this can be done using the Deliver option. When you select this option, you will be given the option to send to the original recipients and/or to new recipients (see Figure 3.16). If you have selected a virus to be delivered, you will be warned that the file is infected but you will still be able to submit the message for delivery. This message will be treated the same as any other new message and will be subject to the same AV scanning as any other new message. This may result in the message being quarantined again.

Figure 3.16: Delivering a Quarantined Message
If you choose to deliver a message that was quarantined due to a filter match, this will be handled in one of two ways depending on the Deliver from Quarantine security setting. If this is set to Secure Mode, messages will be processed against the message filters. If this setting is set to Compatible Mode, messages will not be checked against filters.
Note:
If you are often in a position where you need to deliver legitimate files that have been quarantined due to a filter match, you will either need to set the Deliver from Quarantine Security to Compatible Mode to deliver them through e-mail, or use an alternative method by saving them to the file system and then transporting them to the recipient.
The Quarantine database has the same limitations as the Incidents database, and only the log details are stored in the database. The actual messages are stored as individual files on the file system.
The Importance of Securing Outlook Web Access
More and more, users rely on e-mail in today’s busy world. Unfortunately for many administrators, users have turned e-mail into a critical file storage repository as well as a preferred method of communication. However, with an inability to function without e-mail, and with the ever increasingly mobile workforce, administrators have been forced to provide remote access to e-mail. Numerous protocols exist for providing this functionality including:
- Post Office Protocol 3 (POP3)
- Simple Mail Transfer Protocol (SMTP)
- Internet Message Access Protocol (IMAP)
- Hypertext Transfer Protocol (HTTP)
Traditionally, POP3 and IMAP have been the most widely used standard protocols for providing remote mailbox access. However, with the introduction of OWA in Exchange 5.5, OWA has been an appealing option. It is fairly simple to deploy, and for organizations already opening port 80 for other Web services, it does not require exposing new protocols to the public. Many organizations began using OWA as an easy way to fix the functionality issue, allowing users to access their e-mail over a service they already allow and monitor.
The Security Problem
As many of you know, Microsoft’s OWA has some serious security issues that hackers love to exploit. Exchange administrators worry daily over these possible security breaks. One of the security issues dealt with the fact that an OWA user’s cached credentials can easily be used to gain unauthorized access to an Exchange mailbox from the local Internet browser. Another problem was that because an OWA session does not time out if the user forgets to logout and close the browser window, an intruder can gain access to the Exchange mail system simply by browsing to the open OWA session. Finally, OWA user ID’s and passwords are stored in the browser cache for subsequent use, and remain in the cache as long as a browser session is active.
Most organizations know to use SSL to encrypt data transferred to and from the OWA client and the Exchange server, thus making it impossible to “sniff” the contents of a user’s e-mail. But what some organizations do not understand is that SSL will not prevent an intruder from gaining access to the Exchange server via an OWA session. If SSL is used in conjunction with other security products such as the IAG, this reduces the risks by introducing policies that are related to certain rules that are created by the corporate security practices.
Note:
Windows NT Challenge/Response (NTLM) is the authentication protocol utilizing the integrated single sign-on mechanism, also known as the Integrated Windows Authentication.
With the Integrated Windows Authentication, the user name and password (credentials) are hashed before being sent across the network. When you enable Integrated Windows Authentication, the client browser proves its knowledge of the password through a cryptographic exchange with your Web server, involving hashing. However, all of the information transmitted over HTTP is sent in the clear, and OWA is no exception.
The problem is that most information contained within an organization’s e-mail system is sensitive and confidential and should be encrypted. The username and password are just the tip of the iceberg.
Users simply do not understand that e-mail is a fundamentally insecure communication method. In my experience as a System Engineer, I have witnessed users sending sensitive information such as their credit card information and social security numbers over e-mail, and then argue with System Administrators when they tried to inform them that e-mail was not secure method for transmitting such information. This type of activity also exposes security concerns on a company-wide level that a diligent hacker could use to their advantage. Some of the consequences could include stealing great deals of sensitive proprietary company information, including information about employee salaries, disciplinary actions, terminations, and company intellectual property information. In this day and age, it is difficult to believe sensitive information would be transmitted in clear text.
While securing an OWA deployment certainly will not solve every security issue related to e-mail, it can address those related to providing remote access to e-mail. With any remote e-mail access solution, the organization should be primarily concerned with connections from public networks, especially those from public wireless access points. A few places that are inherently problematic to have users connecting from include coffee houses, Internet cafés, technical conferences (kiosks), and international airports, all breeding grounds for sniffers. The logon credentials and all e-mail messages transmitted in these environments can easily be sniffed and captured by malicious eavesdroppers.
Similarly, there are situations where some corporations do not maintain a local Exchange Mail system on site, choosing to lease e-mail systems from local Internet Service Providers (ISPs), but still use OWA or other remote access methods to access their e-mail when on the road. Some people prefer OWA over the regular Outlook clients.
Users may also use remote e-mail access from their homes. While this seems private enough, there are plenty of users who have turned on and deployed unencrypted wireless access points in their homes. Even those connecting over hard-wired connections may be susceptible to snooping, especially if they receive service from their cable company, and are on a shared connection with several of their neighbors.
The threats to remote e-mail access are numerous because of the vast amounts of organizational data e-mail presents.
Some of the following threats will likely consider e-mail a prime target for attack:
- Entities engaged in corporate and industrial espionage
- Entities engaged in extortion
- Curios hackers
- Phishing Scams
- Worst-case hackers using e-mail to crash servers, thus stifling the corporation’s communication
The Security Solution
In short, e-mail is potentially the most appealing target in your organization. Additionally, it is a requirement to provide remote access to the service; however, it provides an attack means for hackers, and there is no shortage of hackers who have the motivation, resources, and skills to penetrate the security of the network and e-mail system. Therefore, it is absolutely essential that when implementing OWA, the entire remote access session is encrypted.
Since OWA is a Web-based application, it makes sense to use SSL ,which is also referred to as Transport Layer Security (TLS), which came out with Windows 2003 Server to provide the confidentiality and security required.
Configuring & Implementing…
SSL/TLS
So what exactly is SSL/TLS? The Secure Sockets Layer (SSL) protocol v.3 and Transport Layer Security (TLS) protocol, v.2 are the same protocols with a new name. The protocol is based on public key cryptography. SSL/TLS is used to authenticate servers and clients and then encrypt messages between the authenticated parties. In the authentication process, a SSL/TLS client sends a message to a SSL/TLS server, thus responding with the information that the server needs to authenticate itself. The client and server perform an additional exchange of session keys, ending the authentication dialog. When authentication is completed, secured communication can begin between the server and the client using the symmetric encryption keys that are established during the authentication process.
Securing Your OWA Connection
- OWA sessions aren’t encrypted by default, and the communication between the Exchange server and the end-user browser is in clear text. Adding SSL to your OWA sessions ensures end-to-end encryption for the duration of the session.
- Use the SSL/TLS support that is built into most current Web-browsers. If the user has access to a Web browser and an Internet connection they can connect securely.
- Establish an SSL connection between the OWA client and the ISA server firewall.
- Establish an SSL connection between the ISA server firewall and the OWA server.
Publishing Outlook Web Access in the Internet Application Gateway
One day you are minding your own business at your desk and your IT director approaches you and asks you to clarify why the company should consider using the IAG and why should they choose it over ISA 2006?
Designing & Planning…
OWA Server Placement
Although the main goal in this chapter is to show you how to use the IAG feature in ISA Server 2006 to secure OWA, it is important to consider the other aspects of securing the deployment. You should make sure you put your OWA server in a demilitarized zone (DMZ) separate from your mail servers and other systems. As with any service or application you are making public, you want to provide separation from your internal systems. This can be an especially sensitive consideration for an application that provides Web-based access to your organization’s e-mail store.
Your comments should be easily explained by setting up a basic planning explanation. ISA server should be used when you need:
- Branch office gateway for site-to-site connectivity and security
- Data center Internet access control and Web caching
- Advanced security with inbound and outbound firewall
- Publishing, securing, and pre-authenticating access to specific Web services such as Microsoft Exchange server and Microsoft SharePoint server (when more advanced client options aren’t required)
- Full network connectivity for managed PCs (via Virtual Private Network [VPN])
- High-security client access via Windows 2000 or Windows XP that needs host checking and quarantine and Internet Protocol Security (IPSec) (or other) encryption and authentication
- To augment and enhance the ISA server, it recommended adding the Intelligent Application Gateway when you need to do the following in the corporate world.
- Browser-based clientless access with granular policy control of data and application components
- More advanced security and manageability control over the client when accessing Web- and non-Web-based resources
- Remote access to a broader range of third-party and line-of-business applications
- Access from unmanaged PCs or mobile devices on unknown networks
- Strong endpoint security verification
- No IPSec VPN clients available for the target host platform
- Extend policy-based access to partners and customers if warranted
Adding OWA to the IAG (Portal)
The first step before adding the OWA to the IAG is to verify that your portal Web site is up and operational. If not, you will not be able to proceed with the OWA installation. Creating the portal Web site is out of the scope of this chapter.
IAG 2007
Microsoft offers the Intelligent Application Gateway (IAG) 2007 as a high-performance application access and security appliance integrated with ISA Server 2006. IAG 2007 provides SSL VPN, a Web application firewall, and endpoint security management that enables access control, authorization, and content inspection for a wide variety of line-of-business applications. These technologies provide remote workers with easy and flexible secure access from a broad range of devices and locations including PCs and mobile devices. IAG also enables IT administrators to enforce compliance with application and information usage guidelines through a customized remote access policy based on device, user, application, or other business criteria. See Figure 3.17 for a basic idea of how the IAG could fit within your environment.
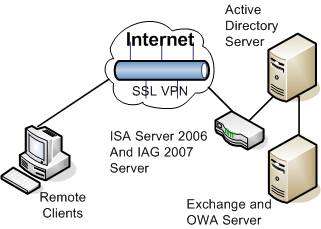
Figure 3.17: Infrastructure Cloud
The following configuration steps provide you with a step-by-step process to add the OWA to the IAG gateway, otherwise known as the IAG Portal.
Note:
Some assumptions need to be understood before the following steps can be implemented.
In adding to the following steps, it is understood that the IAG gateway is configured and running within your infrastructure. Only the following steps are needed to add the OWA.
Server Roles
Table 3.4 represents the server names and roles used as my examples for the successful install
Table 3.4: Table of Computer Names Used in Demonstration
Computer Name | Role |
“HQ” | Represents a Windows 2003 server R2 DC for the demo.com domain, and an exchange/OWA server |
“SRV1” | Represents a Windows 2003 server R2, IAG 2007 and ISA 2006 |
“Client” | Represents a client computer on the internet; note that a client authentication certificate is installed |
“Portal1” | Represents your company’s infrastructure portal name |
- On the SRV1 computer, in the IAG Configuration console, under HTTPS Connections, select Portal1 (see Figure 3.18).
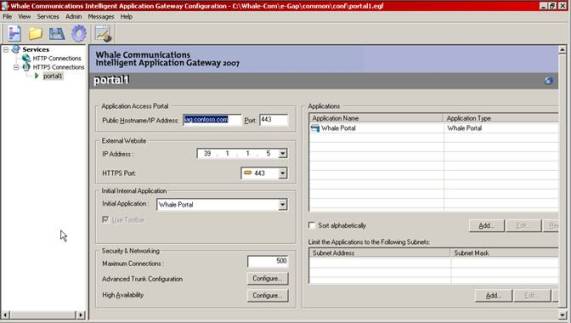
Figure 3.18: IAG Configuration Console
- In the right pane, in the Applications section, click the top Add button. Note that depending on the window size, you may have to scroll through the IAG configuration pane to see the Add button.
- On the Step 1-Select Application page in the Web Applications drop-down box, select Microsoft Outlook Web Access 2007 and then click Next (see Figure 3.19).
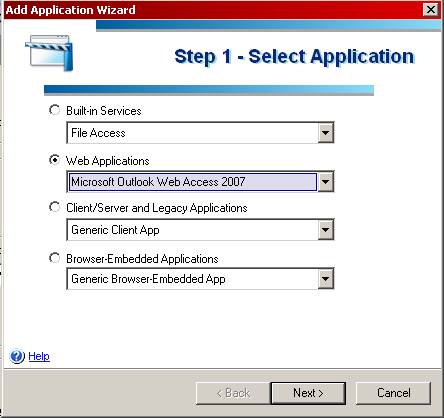
Figure 3.19: Add Application Wizard-Select Applicatio
- IAG contains application-specific settings for many well-known applications.
- On the Step 2-Application Setup page, in the Application Name text box, type OWA2007 and then click Next (see Figure 3.20).
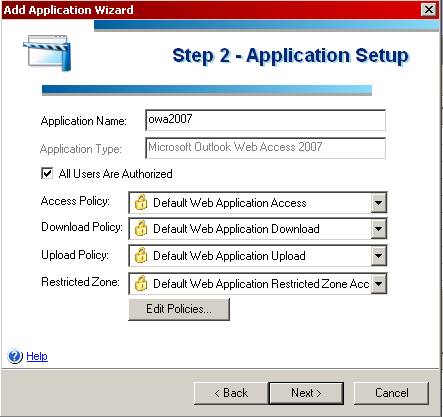
Figure 3.20: Add Application Wizard-application Setup
- On the Step 3-Web Servers page, notice that IAG has already preconfigured the paths that OWA 2007 uses (see Figure 3.21).
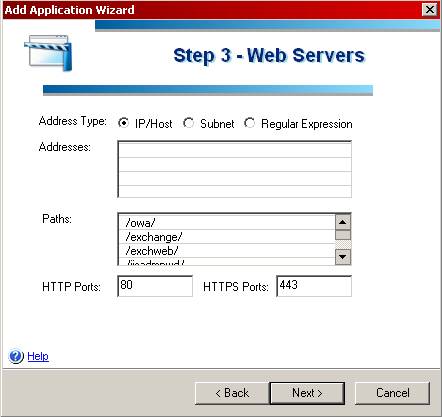
Figure 3.21: Add Application Wizard-Web Servers
- On the Step 3-Web Servers page, double-click the first row in the Addresses text box, and then in the new text box, type hq.demo.com, press Enter, and then click Next (see Figure 3.22).
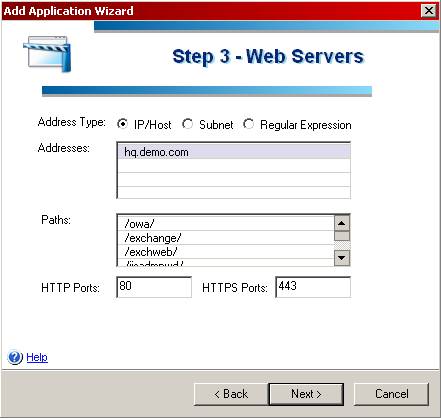
Figure 3.22: Add Application Wizard-Web Servers
- In the Step 4-Authentication page, click Add
- In the Authentication and User/Group Servers page, select AD, and then click Select
- IAG will authenticate requests for the OWA2007 application against the AD authentication server
- On the Step 4-Authentication page, click Next.
- On the Step 5-Portal Link page, in the Application URL text box, change the URL to use HTTPS instead of HTTP – https://hq.demo.com/owa/, and then click Finish (see Figure 3.23).

Figure 3.23: Add Application Wizard-Portal Link
The revised URL will appear under the Portal Link tab in the Application Properties (Microsoft Outlook Web Access 2007) page (see Figure 3.24).
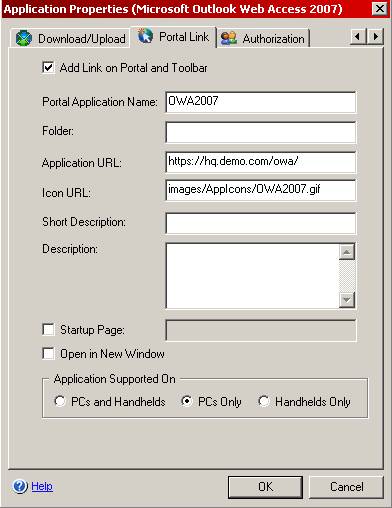
Figure 3.24: Application Properties (OWA 2007)
- Later in this exercise, you will create a Redirect Trunk, which will automatically forward non‑secured request to http://hq.demo.com and to https://hq.demo.com
- A window with an application-specific note for OWA 2007 appears.
- Close the Note window.
Activating the Configuration
- On the File menu, click Activate, or on the toolbar, click the gear icon.
- In the Passphrase dialog box, type password, and then click OK.
- On the Activate Configuration page, click Activate. (wait a few moments for the configuration activation to complete)
- On the Configuration Activation Completed page, click OK.
Client to Connect to the IAG
The following represents the steps on the client computer:
- Open Internet Explorer, and then on the Favorites menu, click IAG Portal.
- On the IAG logon Web page, complete the following information:
- User Name: Administrator
- Password: Password and then click Submit.
- You will see that the IAG Portal Web site now contains an entry for the OWA2007 application (see Figure 3.25).
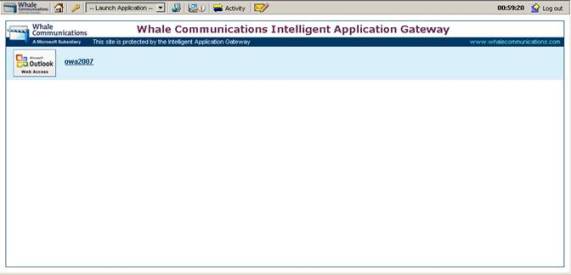
Figure 3.25: IAG Portal Web
- In the IAG Portal Web site, click OWA2007
At this point, you should notice that you do not have to authenticate again when connecting to the OWA Web site. IAG handles the single-sign-on authentication.
Note:
The first time any OWA Web site is opened, it may take a few seconds before the OWA screen appears and the OWA displays the inbox of Administrator.
- On the IAG toolbar, click the home icon to go back to the IAG Web portal. Close the IAG portal Web site.
IAG Portal Web
In the next tasks, you will configure the IAG portal Web site to automatically redirect HTTP requests to the HTTPS trunk. This allows users to use the address http://iag.demo.com, and still connect to the HTTPS portal Web site.
Now let’s attempt a connectivity test. In your Web browser connect to the IAG Portal Web site at http://iag.demo.com. (Remember do not use https.)
- Open Internet Explorer, and then in the Address text box, type http://iag.demo.com, and then press Enter. You should see the browser attempt to connect to the IAG portal Web site, without using HTTPS. After a few moments, the browser will display an error page as shown in Figure 3.26. (The page cannot be displayed).
Figure 3.26: HTTP Error Status Page
- Close Internet Explorer.
Redirect the Trunk on SRV1
On the SRV1 server, create a Redirect Trunk for Portal1.
- On the SRV1 Server, in the IAG Configuration console, right click HTTP Connections, and then click New Trunk.
- On the Step 1-Select Trunk Type page, select Redirect HTTP to HTTPS Trunk, and then click Next (see Figure 3.27).
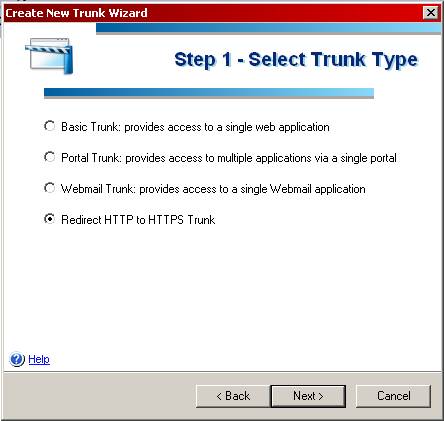
Figure 3.27: Create New Trunk Wizard – Select Trunk Type
- On the Step 2-Select HTTPS Trunk page, select Portal1, and then click Finish (see Figure 3.28). The new Redirect Trunk for Portal1 is created.
The following should activate the Changed configuration.
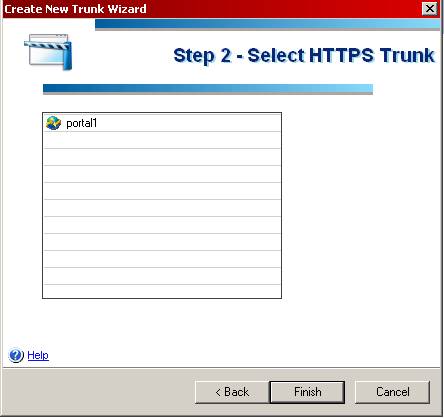
Figure 3.28: Create New Trunk Wizard- Select HTTPS Trunk
- On the File menu, click Activate, or on the toolbar, click the gear icon.
“Client” to Connect to the IAG
The following represents the steps on the client computer. Also, the first time a client PC attempts to connect to the IAG portal Web site, some client computers may require components to be installed. Don’t forget to click the Information Bar and then Click Install ActiveX Control and install when and if prompted.
- On the Client computer, connect to the IAG portal Web site at http://iag.demo.com (Remember do not use HTTPS.)
- On the Client computer, open Internet Explorer, and then in the Address text box, type http://iag.demo.com, and then press Enter.
- Internet Explorer connects to http://iag.demo.com. The IAG server responds with HTTP status code 302-Object moved, and informs Internet Explorer to reconnect to https://iag.demo.com.
- The IAG logon Web page opens, using an HTTPS connection. This result confirms that the Redirect Trunk successfully redirected the initial HTTP request to the HTTPS trunk (see Figure 3.29).
- Close the IAG logon Web page.

Figure 3.29: IAG Portal Web Logon Page
You have just successfully installed the OWA Web application.
Examining the Rules Added to the ISA Configuration
Any time the IAG has a configuration change and when the “activate the configuration” button is depressed, IAG will update the related ISA firewall rules.
In our demonstration for this chapter, both ISA 2006 and IAG 2007 are installed on the same server (SRV1). In the process of adding the OWA application and configuring the IAG, some 13 new rules are created on the ISA 2007 server. Also, additional “ALLOW RULES” are created when you update the portal trunk configuration.
ISA Rules
One newly created firewall rule on the ISA server called AUTH#001, allows network traffic from the IAG server to the domain controller. This new rule is for authentication purposes only.
The next rule, Trunk#001, allows network traffic from client computers to the IAG server on HTTPS port 443, which is the IAG portal Web site.
These rules and many more can be reviewed in the ISA Server Manager console.
Securing the Outlook Web Access Interface
Securing the OWA is straightforward with no hidden complicated procedures, and can be accomplished in approximately 5 minutes or less in most circumstances.
In this demonstration, you will define endpoint policies. “Endpoint policies” is another term for client computers. Endpoint policies allow you to specify required security configuration settings on the client computers. The IAG Client Components verify these client-side configuration settings when a user connects to the IAG portal Web site.
At this stage, you will define the criteria for your clients to be allowed to enter the portal Web site. Only if the client computer(s) meet certain configuration criteria will it be allowed access to the IAG portal Web site.
IAG Server
On the IAG server, session policies are needed to be configured to allow the corporate client PC’s to connect to the AIG portal.
- On the SRV1 server, in the IAG Configuration console, under HTTPS Connections, select Portal1.
- In the right pane, in the Security & Networking section, after Advanced Trunk Configuration, click Configure (see Figure 3.30).
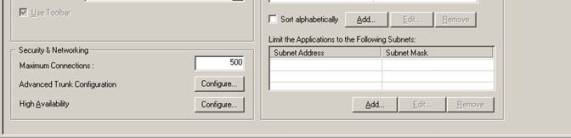
Figure 3.30: IAG Configuration Console – Security & Networking
- In the Advanced Trunk Configuration (Portal1) dialog box, on the Session tab, click Edit Policies (see Figure 3.31).
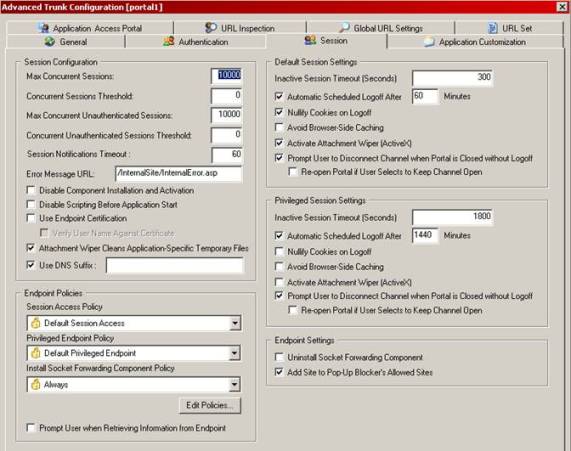
Figure 3.31: Advanced Trunk Configuration – Session Tab
- In the Policies dialog box, click Add.
For demonstration purposes, you will create a new policy definition to verify whether the Windows Firewall is enabled on the client computer. Instead of creating a new policy definition, you can also use any of the predefined policy definitions.
- In the Policy Editor dialog box, on the General Policy Settings page, complete the following information (see Figure 3.32):
- Policy Name: Firewall is enabled
- Category: Policies
- Explanatory Text: Windows Firewall must be enabled on network connection.
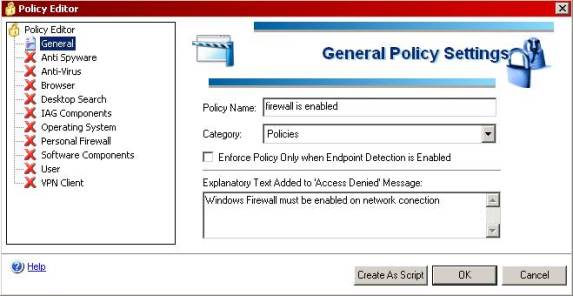
Figure 3.32: Advanced Trunk Configuration – General Policy Settings Editor
- On the left side, select Personal Firewall (see Figure 3.33).
- On the right side, on the Personal Firewall page, complete the following information:
- Enable Group: enable
- Windows XP SP2 Personal Firewall: enable
- Windows 2K3 SP1 Personal Firewall: enable and then click OK.
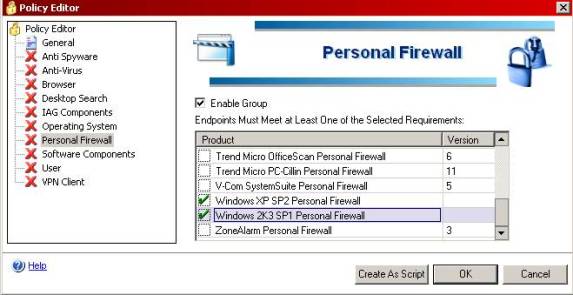
Figure 3.33: Advanced Trunk Configuration- General Policy Settings – Personal Firewall
You have just added a new policy definition named “Firewall,” which is enabled and is added to the end of the policies list.
- In the Policies dialog box, click Close.
- In the Advanced Trunk Configuration (Portal1) window, in the Endpoint Policies section, in the Session Access Policy drop-down list, select Firewall is enabled (see Figure 3.34).
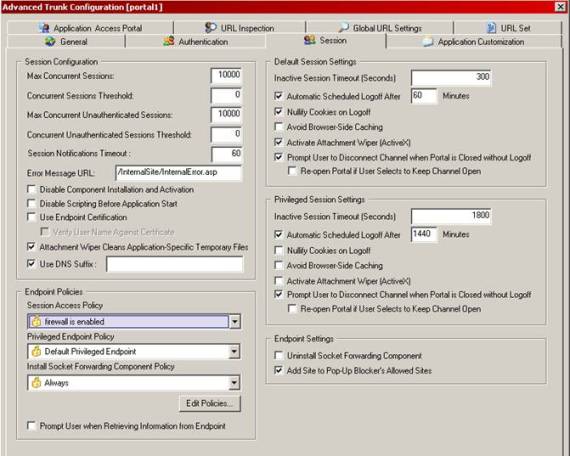
Figure 3.34: Advanced Trunk Configuration- Session Tab
- Click OK to close the Advanced Trunk Configuration (Portal1) dialog box.
- On the File menu, click Activate, or on the toolbar, click the gear icon.
- In the Passphrase dialog box, type password, and then click OK.
- On the Activate Configuration page, click Activate. This activation can take a few minutes to complete.
- On the Configuration Activation Completed page, click OK.
- On the “client” computer, open your browser., and then on the Favorites menu, click IAG Portal, or type https://iag.demo.com
At this point, IAG checks the client compliance with the access policies. Because Windows Firewall is not enabled on the client computer, the user cannot access the IAG portal Web site (see Figure 3.359).
Figure 3.35: IAG Portal Web Warning Page
- Close Internet Explorer.
Now to verify the connection with the firewall turned on, go the Start menu, click Control Panel, and then click Windows Firewall.
- In the Windows Firewall message box, click Yes to confirm that you want to start the Windows Firewall/ICS service.
- In the Windows Firewall dialog box, select On, and then click OK. Windows Firewall is enabled on the “Client.”
- Now having the Client firewall enabled, open Internet Explorer, and then on the Favorites menu, click IAG Portal.
Because Windows Firewall is enabled, the client computer meets the access policy, and IAG allows access to the portal Web site. Connection complete.
- Close the IAG logon Web page.
Summary
With the increasing number of viruses being circulated through e-mail, it is becoming more important to ensure that your FES infrastructure if fully protected against viruses and other threats that threaten your infrastructure.

FSE allows you to virus scan messages as they transit through you FSE infrastructure and when they are in the user’s mailbox, ensuring that your infrastructure remains virus free. In addition to virus scanning, you can also apply filters, which allow you to proactively protect against unwanted attachments, along with checking the contents of the messages
When you are considering deploying FSE, you should carefully plan your deployment to ensure that you do not adversely affect the performance of your Exchange servers and that you do not accidentally delete legitimate messages.
When you start to deploy FES, you should do this out of hours and start with the Edge Transport Servers first, followed by the Hub Transport Servers and then the Mailbox Servers. This helps to ensure that you do not introduce any new viruses to your infrastructure once you have started your deployment.
In order to effectively manage FES across your entire Exchange deployment, you should consider using FSSMC, which allows you to centrally manage the configuration and the quarantine databases.
When deploying security products, it is possible to over-engineer their design and deployment. This can often cause unforeseen issues and a level of complexity that is not always necessary. Your initial deployment should provide the basics for what you require. You should then add additional scanning and filtering as required while ensuring that you do not overload your infrastructure, and that the end user’s experience is not adversely affected.
We’ve also given you a better understanding of how to install the Microsoft Outlook Web Access mail program through the newly acquired IAG 2007 appliance, that was turned into a software form of a gateway by Microsoft within the past year. The IAG is a comprehensive and secure remote access gateway that augments an ISA 2006 security, providing a SSL protection with endpoint security to protect all Web-based applications such as Microsoft OWA.
