Before I Begin
Before I get started, I just need to mention that I am writing this article in February of 2006. Vista is not slated to be released for several more months. As such, everything that I will be showing you is from the Vista beta. Anything in this article could potentially change by the time that Vista ships, although I do not anticipate any significant changes related to the Network Center.
The Network
If you’ve been working with Windows for a long time, you probably remember the Network Neighborhood from Windows 95. The Network Neighborhood eventually evolved into My Network Places. Vista changes the name once again. The new name is simply Network. The Network option is available directly from Vista’s Start menu.
The interesting thing about the Network option is that it behaves a lot more like the old Windows 95 Network Neighborhood than Windows XP’s My Network Places. When you click on the Network option, Vista displays all of the computers within the current domain, as shown in Figure A. You can then double click on any one of the computers to access shared resources residing on it.
Figure A: The Network screen is a throwback to Windows 95’s Network Neighborhood

If you look at the figure above, you will notice that above the listings for the computers in the domain, there are two commands; Connect to a Network and Network Center. The Connect to a Network command is used for attaching Vista to a wireless network. That option is a little outside the scope of this article. What I wanted to show you though is the Network Center option.
If you click on the Network Center option, you will see the screen shown in Figure B. If you look at the figure, you will see that there are two main components to the Network Center; the network map and the network details.
Figure B: This is the main Network Center screen

The Network Map
If you look at the network map shown in Figure B, you will see that it shows the current computer passing through the local network to access the Internet. Just above the Internet icon, there is an option to view a full map. As it stands right now, if you click on the View Full Map link, you will pretty much see the same diagram except that the Network icon has been replaced by a Gateway icon.
Obviously, the current network map isn’t of much help to anyone. I have been told that as Vista gets closer to being released, that the network map will become a more comprehensive tool that displays the network in much greater detail than it does now.
Network Details
Although the network map doesn’t really do much yet, the network details option is useful right now. If you look at Figure B, you will see that there are two options in the Network Details section; Personalize and View Status.
I have to tell you that I absolutely love the Personalize option. What the Personalize option does is that it allows you to change the name and icon associated with a network connection. So why is this a big deal? Well, Microsoft created this feature for the benefit of people who connect to wireless networks. This feature gives you the ability to assign a meaningful name to various wireless networks that you connect to rather than having to be stuck with whatever name the access point might be using as its SSID. For example, I sometimes connect to a friend’s access point. The SSID for my friend’s wireless network is simply Linksys (this bothers me to no end). If I were running Vista on my laptop, I could assign a friendly name to the network instead though so that I would see a name like Phil’s House rather than Linksys.
I’m not actually running Vista on a computer that has a wireless network connection. So why do I love the Personalize feature so much? It’s because you can personalize wired connections too. Most of the computers that I buy, including the ones that I am running Vista on, have integrated network adapters. The problem is that these integrated network adapters usually have a maximum throughput of 100 Mbps. The network in my home is running at gigabit speeds, so the last thing that I want to do is to use a slow NIC just because it came with the computer. I therefore end up buying at least one NIC for each computer. Windows then displays a separate connection for every NIC that’s installed. The reason why I like the personalization feature in Vista so much is because I can assign each connection a meaningful name that helps me to keep track of which network connection I am actually using.
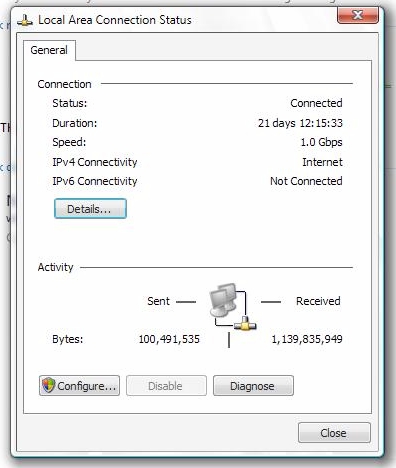
I mentioned earlier that the Network Details section includes a View Status option. If you click on the View Status link, you will see a screen similar to the one shown in Figure C. As you can see in the figure, this status screen provides you with information such as the connection speed, the connection’s duration, and whether the connection is using IPv4 or IPv6 (IPv6 is kind of a big deal in Vista). If you click the Details button, Windows will provide you with detailed information regarding the machine’s TCP/IP configuration.
Figure C: The Status screen provides summary information related to the connection
If you look at the bottom of Figure C, you will notice the Configure and Diagnose buttons. Clicking the Configure button simply takes you to the connection’s configuration screen. This screen is very similar to the one that you are used to seeing in Windows XP. What’s more interesting though is the Diagnose button.
Clicking the Diagnose button takes you to a diagnostic tool that you can use to figure out why the connection is not working. This tool is a neat concept, but it’s one of those areas where Microsoft needs to do a little more work.
As I mentioned earlier, IPv6 is kind of a big deal in Windows Vista. IPv6 is Vista’s preferred protocol, but Vista runs IPv4 along side IPv6 for backward compatibility with existing networks. The reason why I say that Microsoft needs to do a little more work on the diagnostic tool is because as you saw in Figure C, my network connection is working fine. The only catch is that I am using IPv4 instead of IPv6. However, when I click the Diagnose button, Windows returns a bunch of errors related to IPv6, which I am not actively using, as shown in Figure D.
Figure D: The Windows Network Diagnostic Tool is designed to help you troubleshoot connectivity issues

Conclusion
As you can see, the Network Center offers some promising tools for managing network connections within Vista. Right now some of these tools are a little buggy, but hopefully Microsoft will work out some of the kinks before the next beta.


