If you missed the first part in this article series please read ISA Firewall Stateful Application Layer Inspection Filters (Part 1).
If you would like to be notified when Thomas Shinder releases the next part of this article series please sign up to the ISAServer.org Real time article update newsletter.

Last week we discussed this application layer inspection filters for non-HTTP protocols. This week we’ll continue that discussion with coverage of one of the ISA firewall’s Web Proxy application layer inspection filters, the HTTP Security Filter.
ISA firewall Web filters are used to mediate HTTP, HTTPS, and FTP tunneled (Web proxied) connections through the ISA firewall. In this section, we discuss the following Web filters:
- HTTP Security filter
- ISA Server Link Translator
- Web Proxy filter
- SecurID filter
- OWA Forms-based Authentication filter
The HTTP Security Filter (HTTP Filter)
The ISA firewall’s HTTP Security filter is one of the key application layer filtering and inspection mechanisms included with the ISA firewall. The HTTP Security filter allows the ISA firewall to perform application layer inspection on all HTTP communications moving through the ISA firewall and block connections that do not match your HTTP security requirements.
The HTTP Security filter is tightly tied to the Web Proxy filter. When the Web Proxy filter is bound to the HTTP protocol, all communications outbound through the ISA firewall with a destination port of TCP 80 are subjected to the HTTP Security filter’s deep application layer inspection.
The HTTP Security filter is applied on a per-rule basis, and you can apply different HTTP filtering properties on each rule that allows outbound HTTP communications. This provides you very granular, fine-tuned control over what type of connections can move over the HTTP channel. In addition, you can bind the Web Proxy filter to other ports and enforce HTTP Security Filter policy over connections moving over alternate ports. This provides you another potent weapon against users and applications that try to subvert your network and Firewall Security policy by tunneling Web connections over alternate ports.
In this section, we discuss:
- Overview of HTTP Security Filter Settings
- HTTP Security Filter Logging
- Disabling the HTTP Security Filter for Web Requests
- Exporting and Importing HTTP Security Filter Settings
- Investigating HTTP Headers for Potentially Dangerous Applications
- Example HTTP Security Filter Policies
- Commonly Blocked Application Signatures
- The Dangers of SSL Tunneling
Overview of HTTP Security Filter Settings
The HTTP Security filter includes a number of tabs that allow you precise control over what HTTP communications are allowed through the ISA firewall on a per-rule basis. Configuration of the HTTP Security filter is done on the following tabs:
- General
- Methods
- Extensions
- Headers
- Signatures
The General Tab
On the General tab, you can configure the following options:
- Maximum header length
- Payload length
- Maximum URL length
- Verify normalization
- Block high bit characters
- Block responses containing Windows executable content
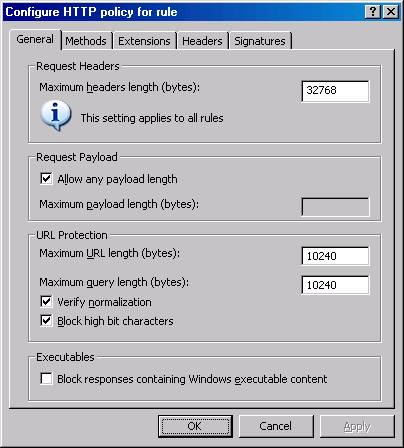
Figure 1
The Maximum headers length (bytes) option allows you to configure the maximum length of all headers included in a request HTTP communication. This setting applies to all rules that use the HTTP Security filter. This setting protects you from attacks that try to overflow Web site buffers by sending excessively long headers to the Web server. If you set the value too low, some applications on your site might not work correctly. If you set it too high, intruders may be able to construct a special HTTP request that could exploit known and unknown buffer overflow issues with your Web site or Web server. You might want to start with a value of 10,000 bytes and work upward from there. Your Web site administrator should be able to help you with the maximum header length required for sites your ISA firewall protects.
In the Request Payload frame, you have the option to Allow any payload length or to set a specific maximum payload length. The payload is the part of the HTTP communication that is not part of the HTTP header or command structure. For example, if you allow users to post content to your Web site (an ordering form or a discussion forum), you can set a limit on the length of their posts by unchecking the Allow any payload length checkbox and entering a custom value in the Maximum payload length (bytes) text box. Again, you may want to discuss your Web site’s requirements with your Web site administrator or Web programmer to get specific details on maximum payload length requirements for your protected Web sites.
There are several options in the URL Protection frame. The Maximum URL length (bytes) option allows you to set the maximum URL that the user can send through the ISA firewall when making a request through the firewall for a Web site. Exploits can send excessively long URLs in an attempt to execute a buffer overflow or other attack against a Web server. The default value is 10240, but you can increase or decrease this value based on your own site’s custom requirements. The Maximum query length (bytes) value allows you to set the maximum length of the query portion of the URL. The query part of the URL appears after a question mark (?) in the request URL. The default value is 10240, but you can make it longer or shorter, based on your requirements. Keep in mind that the Maximum URL length must be longer than the Maximum query length because the query is part of the URL.
The Verify normalization option is also included in the URL Protection frame. Normalization is the process of decoding so-called “escaped” characters. Web servers can receive requests that are encoded using escaped characters. One of the most common examples is when there is a space in the URL, as in the URL http://msfirewall.org/Dir%20One/default%20file.htm. The %20 is an “escape” character representing a “space.” The problem is that bad guys can also encode the “%” character and perform what is called “double encoded” requests. Double encoding can be used to attack Web servers. When the Verify Normalization option is selected, the HTTP Security filter will normalize or decode the request twice. If the request of the first and second decodings is not the same, the HTTP Security filter will drop the request. This prevents “double encoding” attacks. You should enable this feature, but keep in mind that poorly designed Web sites and Web applications are not always security aware, and may actually accept and require double encoded requests. If that is the case for sites you want to access on the Internet or for sites you publish through the ISA firewall, you will need to disable this option.
The Block high bit characters option allows you to block HTTP requests that include URLs with high bit characters in them. High bit characters are used by many languages that use extended character sets, so if you find that you can’t access Web sites that use these extended character sets in their URLs, you will need to disable this option.
The Block responses containing Windows executable content option allows you to prevent users from downloading files that are Windows executable files (such as .exe files, but any file extension can be used on a Windows executable). The HTTP Security filter is able to determine if the file is a Windows executable because the response will begin with an MZ. This can be very helpful when you need to prevent your users from downloading executables through the ISA firewall.
Remember that your HTTP policy is configured on a per-rule basis. Because you can configure HTTP policy on a per-rule basis, you can enable these settings for some rules, and disable them for other rules. This per-rule HTTP policy configuration option provides you a great deal of flexibility in what content is available from specific sites to specific users at specific times.
The Methods Tab
You can control what HTTP methods are used through an Access Rule or Web Publishing Rule using the settings on the Methods tab. You have three options:
- Allow all methods
- Allow only specified methods
- Block specified methods (allow all others)
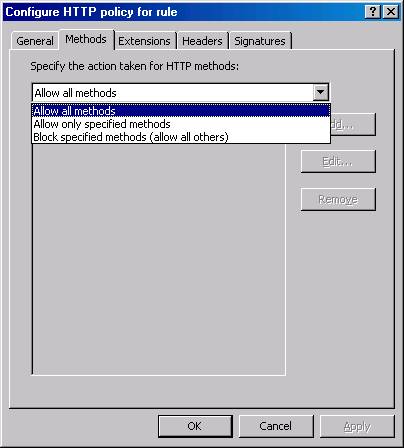
Figure 2
HTTP methods are HTTP commands that hosts can send to a Web server to perform specific actions; for example, GET, PUT, and POST. There are others that you, as a network and firewall administrator might not be familiar with, such as HEAD, SEARCH, and CHECKOUT. There are other methods that are proprietary and used by specific Web applications, such as Outlook Web Access. The Allow all methods option allows you to allow HTTP methods used in an HTTP communication through the ISA firewall.
Other HTTP methods you’ll encounter when allowing access to Microsoft applications include RPC_IN_DATA and RPC_OUT_DATA, which are used for securely publishing RPC over HTTP (Outlook Anywhere) for Outlook clients. However, remember that the filter only blocks communications set in the HTTP policy filter, so be careful not to block methods you might require, even when you’re not completely sure what the exact methods you might require will be. We recommend that you thoroughly test your filter settings and discuss with the Web application admins and developers what methods are required.
The Allow only specified methods option allows you to specify the exact methods you want to allow through the ISA firewall. If you can identify what methods are required by your Web site and Web application, then you can allow those only and block any other method. Other methods could be used to compromise your Web site, so if they’re not needed, block them.
The Block specified methods (allow all others) option allows you to allow all methods except those specific methods you want to allow. This option provides you a bit more latitude in that even if you don’t know all the methods your site might require, you might know some that are definitely not required. One example might be the POST method. If you don’t allow users to post content to your Web site, then there’s no reason to allow the POST method, and you can explicitly block it.
When you select either the Allow only specified methods or the Block specified methods (allow all others) option, you need to click the Add button to add the method you want to allow or block. The Method dialog box appears after clicking the Add button.
In the Add dialog box, you enter the method in the Method text box. You might also want to add a description of this method in the Description text box. This helps you remember what the method does and helps the next person who might need to manage your ISA firewall and isn’t aware of the insides of the HTTP protocol command set.
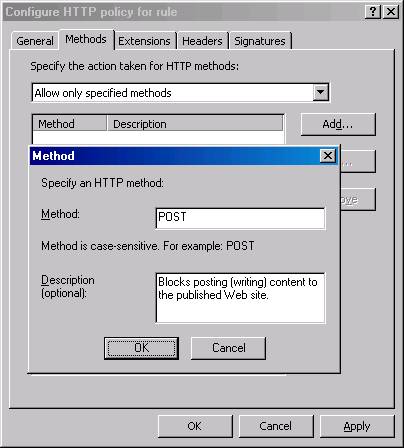
Figure 3
The Extensions Tab
On the Extensions tab, you have the following options:
- Allow all extensions
- Allow only specified extensions
- Block specified extensions (allow all others)
- Block requests containing ambiguous extensions
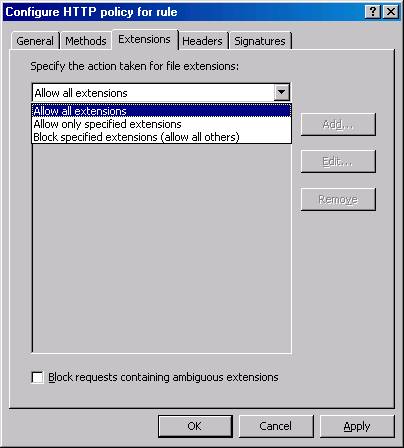
Figure 4
You can control what file extensions are allowed to be requested through the ISA firewall. This is extremely useful when you want to block users from requesting certain file types through the ISA firewall. For example, you can block users from accessing .exe, .com, .zip, and any other file extension through the ISA firewall.
The Allow all extensions option allows you to configure the Access Rule or Web Publishing Rule to allow users access to any type of file based on file extension through the ISA firewall. The Allow only specified extensions option allows you to specify the precise file extensions that users can access through the ISA firewall. The Block specified extensions (allow all others) option allows you to block specified file extensions that you deem dangerous.
If you select the Allow only specified extensions or Block specified extensions (allow all others) option, you need to click the Add button and add the extensions you want to allow or block.
The Extension dialog box appears after you click the Add button. Enter the name of the extension in the Extension text box. For example, if you want to block access to .exe files, enter .exe . Enter a description if you like in the Description (optional) text box. Click OK to save the new extension.

Figure 5
The Headers Tab
On the Headers tab, you have the following options:
- Allow all headers except the following
- Server header
- Via header

Figure 6
An HTTP header contains HTTP communication specific information that is included in HTTP requests made from a Web client (such as your Web browser) and HTTP responses sent back to the Web client from a Web server. These headers perform multiple functions that determine the status or state of the HTTP communications and other characteristics of the HTTP session.
Examples of common HTTP headers include:
- Content-length
- Pragma
- User-Agent
- Accept-Encoding
You can accept all HTTP headers or you can block certain specific HTTP headers. There are certain HTTP headers you might always want to block, such as the P2P-Agent header, which is used by many peer-to-peer applications. If you want to block a specific HTTP header, click the Add button.
In the Header dialog box, select either the Request headers or Response headers option from the Search in drop-down list. In the HTTP header text box, enter the HTTP header you want to block. Click OK.
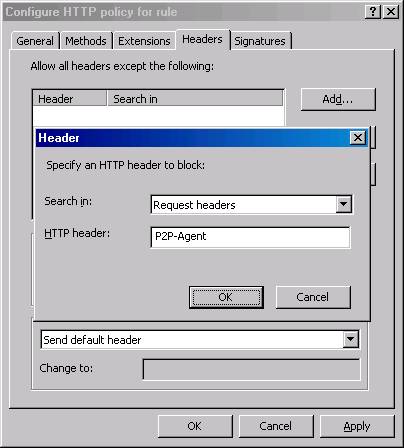
Figure 7
You can configure the Server Header returned in the HTTP responses by making a selection in the Server Header drop-down list. The Server Header is an HTTP header that the Web server sends back to the Web client informing the client of the type of Web server to which the client is connecting. Intruders can use this information to attack a Web server. You have the options to:
- Send original header
- Strip header from response
- Modify header in response
The Send original header option lets the header sent by the Web server go unchanged. The Strip header from response option allows the ISA firewall to remove the Server Header, and the Modify header in response allows you to change the header. You should change the header to confuse the attacker. Since this header isn’t required by Web clients, you can change it to something like Private or CompanyName or anything else you like.
These options all help to prevent (or at least slow down) attackers. Attackers will have to expend more effort and use alternate methods to “fingerprint” your Web server.
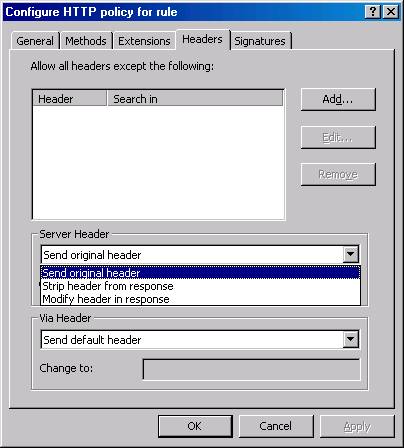
Figure 8
The Via Header option allows you to control the Via Header sent to the Web client. When Web Proxy servers are located between a client and Web server, the Web Proxy server will insert a Via Header in the HTTP communication informing the client that the request was handled by the Web Proxy server in transit. Each Web Proxy server in the request path can add its own Via Header, and each sender along the response path removes its own Via Header and forwards the response to the server specified in the next Via Header on the Via Header “stack.” The Via Header settings allows you to change the name your ISA firewall includes in its own Via Header and enables you to hide the name of your ISA firewall. The default setting is for your ISA firewall to include its own Computer name in the Via Header.
You have two options:
- Send default header
- Modify header in request and response
The Send default header option leave the Via Header unchanged. The Modify header in request and response option allows you to change the name included in the Via Header inserted by your ISA firewall. We recommend that you change this to hide the actual name of your ISA firewall to prevent attackers from learning the actual name of your ISA firewall machine.
Enter the alternate Via Header in the Change To text box.
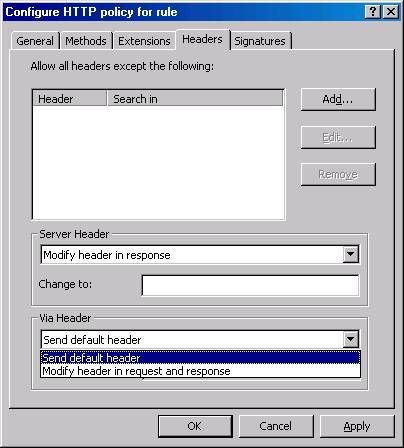
Figure 9
The Signatures Tab
The Signatures tab allows you to control access through the ISA firewall based on HTTP signatures you create. These signatures are based on strings contained in the following components of an HTTP communication:
- Request URL
- Request headers
- Request body
- Response headers
- Response body
You access the Signature dialog box by clicking the Add button.
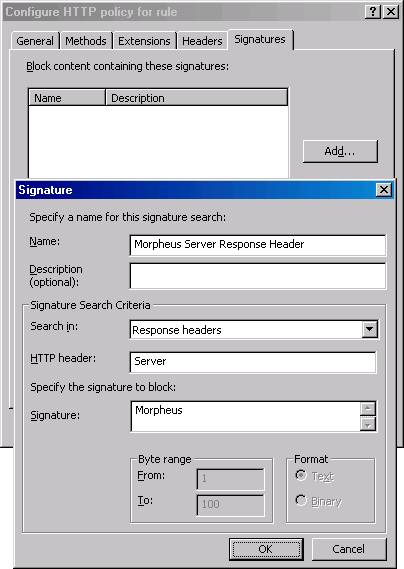
Figure 10
In the Signature dialog box, enter a name for the signature in the Name text box and a description of the signature in the Description text box. This is especially helpful so that you know the purpose and rationale for this signature.
In the Search in drop-down list, select where you want the ISA firewall to search for the specified string. You have the follow options:
Request URL When you select this option, you can enter a string that when found in the Web client’s request URL, the connection is blocked. For example, if you wanted to prevent all requests to sites that have the string Kazaa in the URL included in the Web client’s request, you enter Kazaa in the Signature text box.
Request headers When you select this option, you enter the specific HTTP header you want the ISA firewall to check in the HTTP header text box and then enter the string in the header you want the ISA firewall to block in the Signature text box. For example, if you want to block eDonkey P2P applications, you can select this option and then User-Agent in the HTTP header text box. In the Signature text box, you then enter ed2k. Note that this option gives you more granular control than you would have if you just blocked headers in the Headers tab. If you block a specific header in the Headers tab, you end up blocking all HTTP communications that use that specific header. By creating a signature that incorporates a specific header, you can allow that HTTP header for all communications that do not include the header value you enter for the signature.
Request body You can block HTTP communications based on the body of the Web request outside of that contained in the HTTP commands and headers. While this is a very powerful feature, it has the potential to consume a great deal of resources on the ISA firewall computer. For this reason, you need to configure the byte range you want the ISA firewall to inspect in the Byte range From and To text boxes. We don’t have any explicit recommendations on specific entries you might want to include in this section, but will provide updates on www.isaserver.org when we do.
Response headers When you select this option, you enter the specific HTTP header you want to block based on the HTTP response returned by the Web server. You enter the specific HTTP header in the HTTP header text box and the HTTP header value in the Signature text box.
Response body The response body option works the same as the Request body option, except it applies to the content returned to the Web client from the Web server. For example, if you want to block Web pages that contain specific strings that are identified as dangerous or inappropriate, you can create a signature to block those strings. Keep this in mind when reading about the latest Web-based attack and create a signature that blocks connections that employ such an attack.
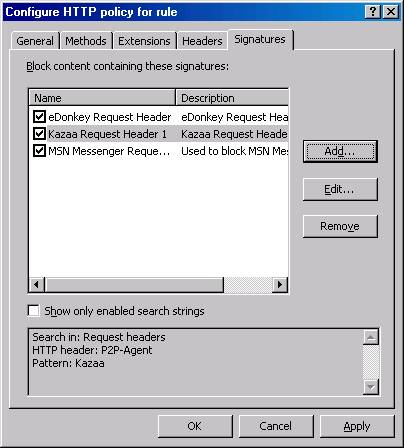
Figure 11
Another signature you might want to create is one that blocks the <iframe src=”?”/> string in the response body. This string can potentially peg the processor on the victim machine and hang the operating system.
HTTP Security Filter Logging
How do you know if your security filters are working? One way to determine the effectiveness of the entries you’ve made in the HTTP Security filter is to use the ISA firewall’s built-in log viewer. Perform the following steps to configure the ISA firewall’s built-in log viewer to view HTTP Security Filter actions:
- In the Microsoft Internet Security and Acceleration Server 2006 management console, expand the server name and click the Monitoring node in the left pane of the console.
- In the Monitoring node, click the Logging tab. In the Tasks tab of the Task Pane, click the Start Query link.
- Right-click one of the column headers and click the Add/Remove Columns command.
- In the Add/Remove Columns dialog box, click the Filter Information entry in the Available Columns list and click Add. The Filter Information entry now appears in the list of Displayed columns. Click OK.
- Issue a request from a client behind the ISA firewall that would be blocked by your HTTP Security Filter settings. shows an example of a connection that was blocked because the URL contained a string that was disallowed by the HTTP Security filter.

Figure 12
Summary
The ISA firewall has historically been considered the model of the application layer inspection firewall. While other firewalls have taken up the torch and significantly improved on their application layer inspection capabilities, the ISA firewall remains the leader in application layer inspection, not only because of its built in application layer inspection features, but also its ability to support a multiplicity of 3rd party application layer filters through it’s extensibility feature set. The HTTP Security Filter is one of the built-in application layer inspection filters that enables the ISA firewall to block untoward HTTP protocol traffic, which enables you to block both known, and to a certain extent, zero-day exploits.
If you missed the first part in this article series please read ISA Firewall Stateful Application Layer Inspection Filters (Part 1).
If you would like to be notified when Thomas Shinder releases the next part of this article series please sign up to the ISAServer.org Real time article update newsletter.


