If you would like to read the first part in this article series please go to A look at the Import/Export Mailbox improvements in Exchange 2010 Service Pack 1 (Part 1).
Introduction
In part 1 of this articles series, we talked about how it was possible to import and export mailbox data in previous versions of Exchange Server up until Exchange 2010 RTM. In addition, we had a quick look at what has changed with Exchange 2010 SP1 in this regard. I also provided you with a list of the 14 new cmdlets that has replaced the Import-Mailbox and Export-Mailbox cmdlets as well as a short description of each.
In this part 2, we will continue where we left of in part 1. I’ll walk you through how you import/export data using the new cmdlets available in Exchange 2010 SP1 as well as how you can see informational statistics for imports and exports while doing so.
Let’s get going…
Importing data from a PST file to a Mailbox
Time has come to try import data from a PST file to an Exchange 2010 SP1 mailbox using the New-MailboxImportRequest cmdlet. As mentioned already we can do this from any machine with the Exchange 2010 Management tools installed or a machine with just Windows PowerShell 2.0 (see sidebar in the end of this article for details).
Ok let’s suppose I want to import a PST file called hew.pst located in a file share called “PSTFiles” (yes unlike Import-Mailbox you now point at a file share and not a local path) on a server named “EX02” to my Exchange 2010 SP1 mailbox. To initiate a new mailbox import request where all data in this PST file is imported into my mailbox, I would use the following command:
New-MailboxImportRequest -Mailbox HEW -FilePath \\EX02\PSTFileShare\HEW.pst

Figure 1: Importing data from a PST file to a mailbox
This will simply take all folders and data in each and import it into the specified mailbox. Also note that things such as the dumpster will be imported (if the content in the PST file originates from another Exchange 2010 SP1 mailbox that is).
If we want to get additional details about the mailbox import request, we can use the Get-MailboxImportRequest or Get-MailboxImportRequestStatistics cmdlet. As you probably would have guessed, the latter provides more details on the import than the Get-MailboxImportRequest cmdlet does.
Since you can create multiple import requests for the same mailbox simultaneously (see Figure 2), you need to specify the import request name, when you use the Get-MailboxImportRequest* cmdlets. To get a list of existing import requests, you can use this command:
Get-MailboxImportRequest
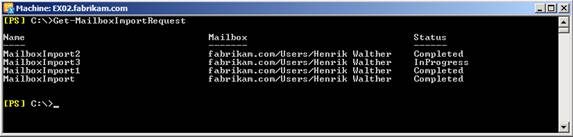
Figure 2: Mailbox Import Requests
If I want to get additional information for the mailbox import request called “MailboxImport2” using the Get-MailboxImportRequest cmdlet, I would need to use the following command:
Get-MailboxImportRequest HEW\MailboxImport2 | fl

Figure 3: Listing additional details for a mailbox import request
Or if using the Get-MailboxImportRequestStatistics cmdlet:

Figure 4: Listing mailbox import request statistics
When we have imported the data from the PST file, we need to manually remove the import request using the Remove-MailboxImportRequest cmdlet. We could also use this cmdlet to remove partially completed import requests, if you for some reason want to cancel the request.
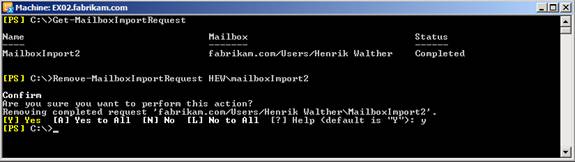
Figure 5: Removing a mailbox import request
Advanced Import Mailbox Request Commands
If the basic commands we just went through are not sufficient when it comes to what data you want to import from the PST file, you can use the “-IncludeFolders” parameter to specify which folder or folders from the PST files should be imported. For instance, if I only want to import the data in the Inbox folder, I would use the following command:
New-MailboxImportRequest -Mailbox HEW -FilePath \\EX02\PSTFileShare\HEW.pst -IncludeFolders “#Inbox#”
I can also specify that content from the PST files should be placed in a new folder (target folder) in the mailbox. This is a good approach if you don’t want items from the PST file to merge with items in the mailbox. To do so we would use this command:
New-MailboxImportRequest -Mailbox HEW -FilePath \\EX02\PSTFileShare\HEW.pst -TargetRootFolder “Date from PST file”
Note:
If the target root folder does not exist, it will be created automatically.
In addition to the above commands, you could also choose to have the request created but in a suspended mode (using the “-suspend” parameter) until you are ready to start it. In addition, you can use the “-ExcludeFolders” parameter instead of the “-IncludeFolders” if that suits the situation better. Moreover, you can exclude the dumpster using the “-ExcludeDumpster” parameter. Also and as mentioned already, you can perform the import via multiple import requests running against the same mailbox.
If you need to import multiple PST files named after the mailbox alias of the mailbox to which they need to be imported, we can use the following command (will import all PST files in the share “PSTFiles” on server “EX02” based on mailbox alias and PST name):
Dir \\EX02\PSTFiles\*.pst | %{ New-MailboxImportRequest -Name PSTImport -BatchName Imports -Mailbox $_.BaseName -FilePath $_.FullName }

Figure 6: Importing multiple PST files
Importing Data From a PST File to an Online Archive Mailbox
With Exchange 2010 RTM one of the disappointments for organizations that decided to move away from PST files and instead enable the native online archive mailbox for users within the organization, was the fact that they couldn’t import PST files directly to the online archive mailbox. Instead, they first had to import it to the primary mailbox of the user using the Import-Mailbox cmdlet, and then have the user drag and drop the content from there to the online archive mailbox or use retention policies.
The New-MailboxImportRequest cmdlet makes this a thing of the past as it allows Exchange admins to do exactly that. Let’s say I have a PST file that I used as an archive over the years, and I now want the data placed in my online archive. To do so I would use almost the same command as above but just add the “–IsArchive” parameter as shown below:
New-MailboxImportRequest -Mailbox HEW –IsArchive -FilePath \\EX02\PSTFileShare\HEW.pst
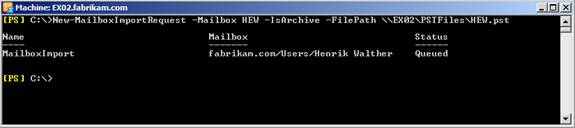
Figure 7: Importing a PST file to an Online Archive mailbox
When the import is complete, we can find the data in our Online Archive as shown in Figure 8.
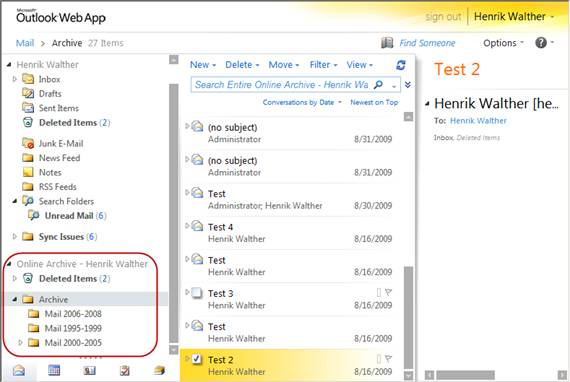
Figure 8: PST content imported to Online Archive mailbox
If you are migrating from a third party archive solution or just want to eliminate all PST files in the environemnt by providing the users with an online archive, you can import all PST files from a share to their equalent mailbox’s online archive using:
Dir \\EX02\PSTFiles\*.pst | %{ New-MailboxImportRequest -Name PSTImport -BatchName Imports -Mailbox $_.BaseName -FilePath $_.FullName –IsArchive }
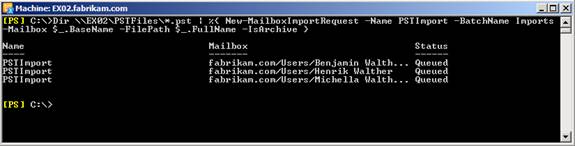
Figure 9: Importing multiple PST files to Online Archive mailboxes
Exporting Data From an Exchange 2010 SP1 Mailbox to PST File
Now that we have imported data from a PST file to an Exchange 2010 SP1 mailbox and the online archive, let’s try to take a closer look at how we export data from an Exchange 2010 SP1 mailbox to a PST file.
Exporting a mailbox to a PST file is very similar to the way we import data from a PST file to a mailbox. You use the following command:
New-MailboxExportRequest –Mailbox HEW –FilePath \\Ex02\PSTFiles\HEW.pst
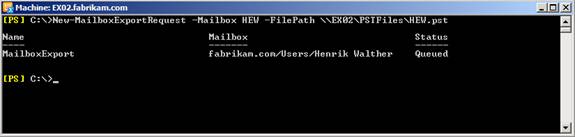
Figure 10: Exporting a mailbox to a PST file
This will simply take all folders and data in each and export it into the specified PST file. Also note that things such as the dumpster now can and by default will be exported.
If we want to get addition details about the mailbox export request, we can use the Get-MailboxExportRequest or Get-MailboxExportRequestStatistics cmdlet. Like is the case with the import cmdlets, the latter provides more details about the export than the Get-MailboxExportRequest cmdlet does.
Since you can create multiple export requests for the same mailbox (see Figure 11), you need to specify the export request name, when you use the above mentioned cmdlets.
If I want to get additional information for the mailbox import request called “MailboxExport2” using the Get-MailboxExportRequest cmdlet, I would need to use the following command:
Get-MailboxExportRequest HEW\MailboxExport2 | fl
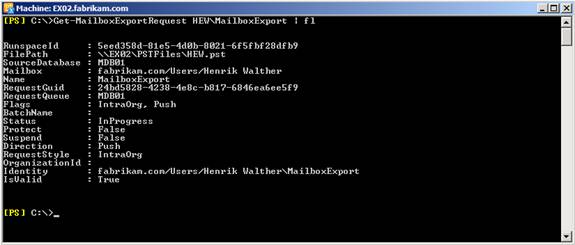
Figure 11: Listing additional details for a mailbox export request
Or if using the Get-MailboxExportRequestStatistics cmdlet:
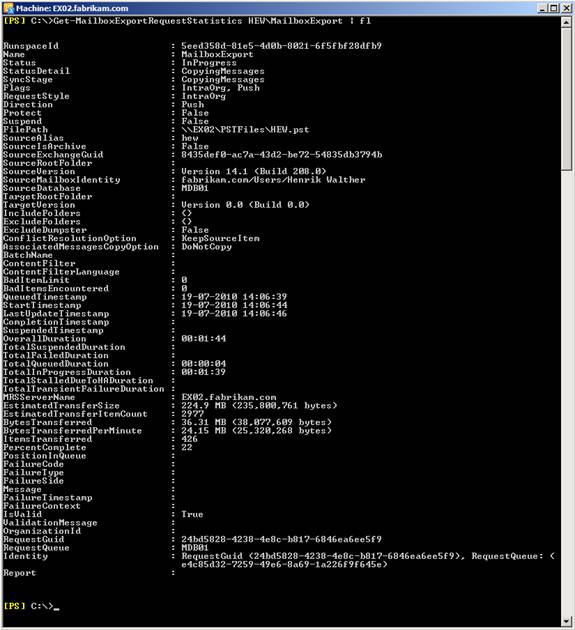
Figure 12: Listing mailbox export request statistics
Advanced Export Mailbox Request Commands
If the basic commands we just went through aren’t sufficient when it comes to what data you want to export to the PST file, you can use the “-IncludeFolders” parameter to specify which folder or folders from the mailbox should be exported. For instance, if I only want to export the data in the Inbox folder, I would use the following command:
New-MailboxExportRequest -Mailbox HEW -FilePath \\EX02\PSTFileShare\HEW.pst -IncludeFolders “#Inbox#”
I can also specify that content from the mailbox should be placed in a new folder (target folder) in the PST file. This is useful if you don’t want to have the data exported to the top of the folder structure in the PST file. To do so we would use this command:
New-MailboxExportRequest -Mailbox HEW -FilePath \\EX02\PSTFileShare\HEW.pst -TargetRootFolder “Date from Mailbox”
In addition to the above commands, you could also choose to have the request created but in a suspended mode (using the “-suspend” parameter) until you’re ready to start it. In addition, you can use the “-ExcludeFolders” parameter instead of the “-IncludeFolders” if you that suits the situation better. Moreover, you can exlcude the dumpster using the “-ExcludeDumpster” parameter. Finally and as mentioned already, you can perform the export via multiple export requests running against the same mailbox and PST file.
Finally its worth mentioning that the New-MailboxExportRequest cmdlet supports the “-ContentFilter” parameter, which means that you have a rich set of extra filtering options as your disposal when exporting data. You can filter content based on attachments, recipients in TO/CC/BCC field, message body or subject, category, message expiration time, whether or not message has attachment, importance, whther message is flagged or read, message locale, participants, received date/time, policy tag, size and so on (check the Exchange 2010 SP1 help file for details).
For instance, if I only wanted to export messages with “Exchange” or “2010” in the body received before August 1st 2010, I would use this command:
New-MailboxExportRequest -Mailbox HEW -ContentFilter {(body -like “*Exchange*”) -and (body -like “*2010*”) -and (Received -lt “01/08/2010”)} -FilePath \\EX02\PSTFiles\HEW.pst

Figure 13: Exporting specific mailbox content to a PST file
If you need to export multiple mailboxes in a specific mailbox database to PST files, we can use a command like the following:
$Export = get-mailbox –Database MDB01 ; $Export|%{$_|New-MailboxExportRequest -FilePath “\\EX02\PSTFiles\$($_.alias).pst”}
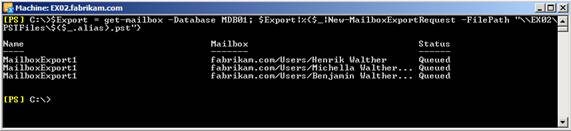
Figure 14: Export multiple Mailboxes to PST files
To export data for all databases in the organization, just remove “-Database MDB01” from the command. Or if you want to export based on which OU the user mailbox are located in use:
$Export = get-mailbox –OrganizationalUnit “Fabrikam Users” ; $Export|%{$_|New-MailboxExportRequest -FilePath “\\EX02\PSTFiles\$($_.alias).pst”}
Exporting Data From a Online Archive to a PST File
Just like it’s possible to import a PST file directly to an online archive mailbox, we can of course also export only the data contained in the online archive mailbox to a PST file. Let’s say I have an archive-enabled mailbox with an lias of “HEW” and I want to export this data to a PST file named HEW.pst in a file share called “PSTFiles”, I would use the following command:
New-MailboxExportRequest -Mailbox HEW –IsArchive -FilePath \\EX02\PSTFileShare\HEW.pst
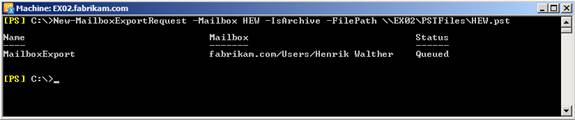
Figure 15: Export an Online Archive Mailbox to a PST file
Exporting online archive mailboxes to PST files in bulk, you can use something like this command:
$Export = get-mailbox –Database MDB01 ; $Export|%{$_|New-MailboxExportRequest -FilePath \\EX02\PSTFiles\$($_.alias).pst -IsArchive}

Figure 16: Export multiple Online Archive Mailboxes to PST files
Sidebar: Using Windows PowerShell 2.0 Remoting
If you sit on a machine that doesn’t have the Exchange Management tools installed and you can remote the Exchange 2010 servers using RDP, then why not use Windows PowerShell 2.0?
Like like it’s possible with any other Exchange 2010 cmdlet, you can manage mailbox import and export requests from a Windows PowerShell 2.0 shell. Just fire up Windows Powershell and run the following command to create a server-side PowerShell session:
$Session = New-PSSession -ConfigurationName Microsoft.Exchange -ConnectionUri http://ExchangeServer/PowerShell/ -Authentication Kerberos
Then import the new session using:
Import-PSSession $Session
The server-side session is imported to the client-side session, and you can now run the same commands as we did above:
New-MailboxImportRequest -Mailbox HEW -FilePath \\EX02\PSTFileShare\HEW.pst
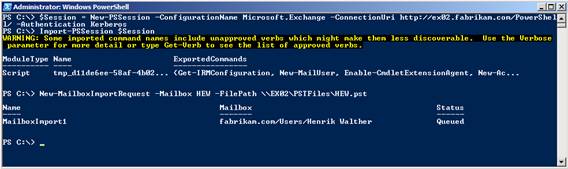
Figure 17: Using Windows PowerShell 2.0 Remoting to import and export mailbox data
Okay we have reached the end of this 2 part articles series and hopefully you learned something new along the way.
If you would like to read the first part in this article series please go to A look at the Import/Export Mailbox improvements in Exchange 2010 Service Pack 1 (Part 1).


