| Before you start, make sure your cabling to done properly ! Thin Ethernet (10base2) Twisted Pair Ethernet (10baseT/UTP) Check/configure plug on Multi-Connector Board on ISA-cards: Network card installation and IRQ/INT |
Once the new network card has been installed and you power-on the Windows95/98 system, 2 things can happen:
Windows95 detects the new card automatically
(This usually happens on PCI and Plug-and-Play ISA-cards)
If it is a board know to Win95, let it use it own drivers, otherwise you need to supply the new Network-driver software (usually delivered on a floppy).
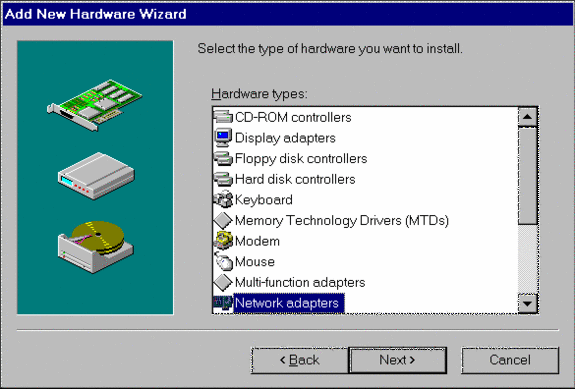
Windows95 does NOT automatically detect the new card
(this is usually the case with non Plug-and-play ISA cards)
Goto the “Control-panel”, select “Add new Hardware” and let Windows95 detect the new board.
(If you know the EXACT type, the Port-address and then IRQ, maybe also the required DMA),
you can save yourself the few minutes of “search-time” by NOT allowing Windows95 to search,
but by selecting first as “Hardware Type” the “Network adapters”:
In the windows “Select Device”, you pick first the manufacturer in the left box, then the model of the Network board :
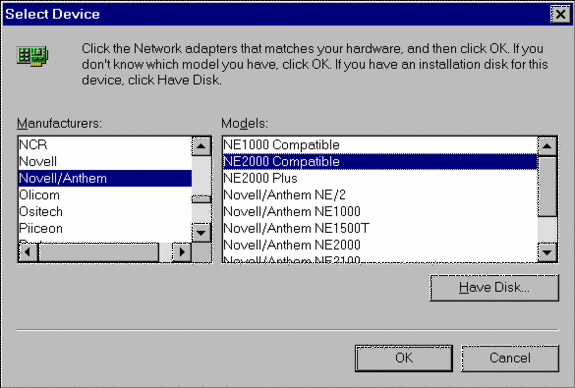
(I selected in this example an “NE2000 compatible”, which is a very popular board.
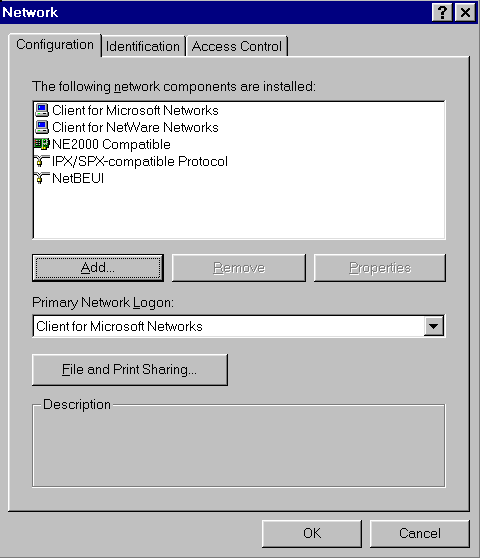
Now, in the “Control-Panel”, open the “Network” applet, it should show the following entries:
 |
 |
 |
 |
Windows95 installs by default the protocols NetBEUI and IPX/SPX, while Windows98 installs only TCP/IP.
I suggest now to verify, that Windows95/98 got it right in its hardware selection (and if you added the board yourself, you MUST check it now and define the proper resources).
Click on the line defining the “Network adapter”, then select “Properties”, then the tab: “Resources”:

Verify, that the settings match the jumpers or Software Configuration values (Network card installation and IRQ/INT), change the values if required (it may require to change the configuration type “Basic Configuration 0” or higher).
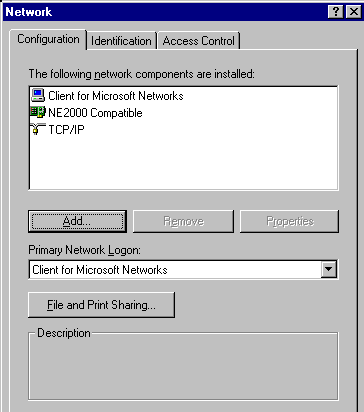
Go back to the “Network” tab:”Configuration”:
delete now all items, which are NOT required for a PC-to-PC Windows95/98 network
(to make it easy in setup, I select as protocol the “Microsoft NetBEUI”, because it is simple (NOTHING to configure) and fast, however, you can also choose to install IPX/SPX or TCP/IP as protocol, but these protocols require an additional configuration step):
|
– delete “Microsoft Client for Netware” – delete ” protocol IPX/SPX” |
|
– first, ADD “protocol “NetBEUI” – then, delete “protocol TCP/IP” |
Click now on the button “File and Print Sharing”, put the check-mark on “Sharing disks” and (if required) on “Sharing printers”.
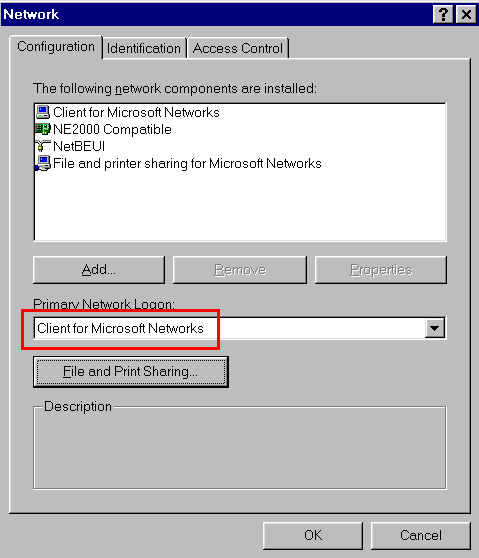
The “Network” tab:”Configuration” should now look like:
Now, you need to define a name for your computer and a workgroup:
Click on the Tab:”Identification”:

Give the computer now a name, which MUST be UNIQUE on the complete network.
Give the workgroup a name, which MUST be the SAME on all connected systems.
When you now close our network-applet, you need your Windows95 CD-ROM (or floppies), because Windows95 needs to load now the network-s/w.
Once rebooted, you will be asked for a User-name. On a Windows95 network (without a NOVELL-server or Windows NT server), you can enter ANY name as user-name.
But although the network is now installed and should work properly, you cannot yet access data on other systems, you first need to take care about Sharing and Mapping of network drives.


