If you would like to read the next part in this article series please go to Recovering an Exchange 2007 Clustered Mailbox Server (CMS) using the RecoverCMS Switch (Part 2)
In another article of mine, I showed you how you can recover an Exchange Server 2007 server, with one or more server roles installed, by using the RecoverServer switch. But what good is this if you end up in a situation where all nodes have been lost and you need to recover the whole cluster? Not much, I agree, since this switch cannot be used to recover an Exchange Server 2007 Single Copy Cluster (SCC) or Cluster Continuous Replication (CCR) based Clustered Mailbox server.
With Exchange Server 2003 we could recover non-clustered Exchange 2003 servers using the DisasterRecovery setup switch (a method which I uncover here), just like we can recover non-clustered Exchange 2007 servers with the RecoverServer switch. But as is the case with the RecoverServer switch, the DisasterRecovery switch cannot be used to recover a clustered Exchange 2003 server. Instead we often recover a lost Clustered Mailbox Server (or Exchange Virtual Server as it was called in Exchange 2003) using a Standby Cluster.
A Standby Cluster is a cluster that mirrors the cluster in the corporate production environment. It has been configured with the same operating system and Exchange Server version and the same service packs, Windows updates, and hotfixes. In addition, the storage configuration (drive letters) matched that of the production cluster. The only difference is that the Exchange Virtual Server was not created on the Standby Cluster yet. NetBIOS names, IP addresses did not have to be the same as those on the production cluster, but you must use the same cluster service account created in Active Directory. Exchange 2003 Standby clusters could also be used for site resiliency, and were actually a good alternative to expensive and often complex Geo-Clustering solutions, as you could recover the production cluster using a Standby Cluster in another site. Now this two part article series is not about how to recover an Exchange Server 2003 cluster using a Standby Cluster, so I will not go further into this subject. For additional details I instead recommend you check out this section in the Exchange 2003 Disaster Recovery Operations Guide on Microsoft TechNet.
Note:
With Exchange Server 2003 it was also possible to recover from a failure where all nodes had been lost by restoring the full computer backup or using the cluster’s information records, although the latter was a relatively complex operation.
Are you ready to perform a disaster recovery procedure, where the Exchange Server 2007 Clustered Mailbox Server (CMS) is offline, because you lost all nodes in your Windows Cluster? Well unless you have tried out the necessary steps to recover a CMS in a test environment my guess is you are not! As I will show you in this article series, because we now have the RecoverCMS switch, the process of recovering an Exchange 2007 Clustered Mailbox Server is even simpler than was the case with Exchange Server 2003 but as with everything else you should have tested out the procedure as part of your disaster recovery plan.
All right my Clustered Mailbox Server is gone, now what?
Well that depends on whether you already have a Standby Cluster available. The Standby Cluster should be a Windows cluster with the same storage configuration (drive letters and LUN sizes) as the lost one. As is the case with Exchange Server 2003, the NetBIOS names and IP addresses can be different from those of the nodes in the lost cluster as Exchange Setup is smart enough to detect these differences, when you run Setup with the /RecoverCMS switch. Even the Windows virtual cluster name can be named differently.
For details on how to configure the new cluster nodes and form the Windows Cluster, see my previous article series which provides step by step instructions on how to deploy a Single Copy Cluster (SCC) or Cluster Continuous Replication Cluster (CCR) clustered Mailbox server in your messaging environment:
Also remember to configure the new Windows Cluster to point at the Majority Node Set File share witness (the Hub Transport server on which this share was created when you deployed the originally cluster). In addition, make sure you install the necessary Windows components and patches on any nodes in the new Windows Cluster.
Installing the Passive Mailbox Server Role on one of the New Nodes
Before we can recover the Clustered Mailbox Server, we first need to install the Passive Mailbox Server role on one of the new nodes. As most of you are aware, this can be done using either the Exchange Setup wizard or the command line interface. In this article series, we will do so using the Exchange Setup wizard.
Log on to the first node in the new Windows cluster then launch Exchange Setup wizard by executing Setup.exe from the DVD media or the folder where the Exchange Server 2007 binaries are to be found. When the splash screen (also referred to as the “Can opener” or bootstrap) appears click install Microsoft Exchange Server 2007. On the Introduction page shown in Figure 1.1 click Next.
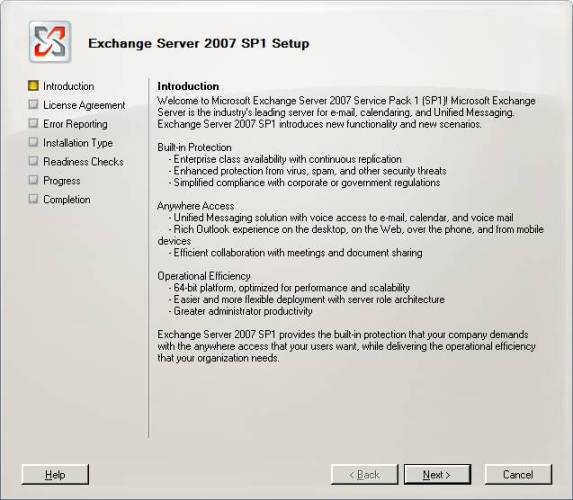
Figure 1.1: Exchange 2007 Setup Wizard – Introduction Page
Accept the License agreement and click Next then select whether you want error reporting enabled or not followed by clicking Next. Now choose Custom Exchange Server Installation and click Next (Figure 1.2).

Figure 1.2: Selecting a Custom Exchange server Installation
Tick Passive Clustered Mailbox Role and click Next as shown in Figure 1.3.
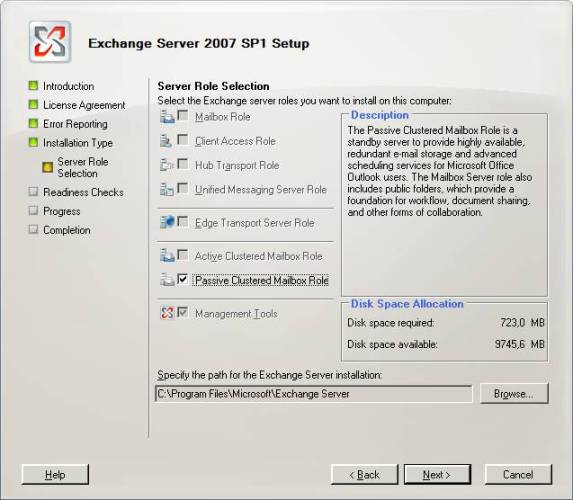
Figure 1.3: Selecting to install the Passive Clustered Mailbox Role
After the Readiness Check has completed, click Install in order to install the Passive Clustered Mailbox Role. When the installation is complete click Finish in order to exit the Exchange Setup wizard.
Recovering the Clustered Mailbox Server using the RecoverCMS Switch
Now that we have installed the Passive Clustered Mailbox role on the first node in the new Windows cluster, we can begin the recovery process of the CMS itself. In this article series, I will recover a CMS that uses CCR cluster technology, but the steps are more or less identical when recovering an SCC CMS. The only difference is that SCC uses a shared storage. In addition, an SCC cluster based solution often has more than 2 nodes (2 nodes is the maximum amount of nodes in a CCR cluster).
On the node on which you just installed the Passive Clustered Mailbox role, open a Command prompt window and then change to the Bin folder under the Exchange installation folder (by default C:\Program Files\Microsoft\Exchange Server). From here enter the following command and hit Enter:
Setup.com /RecoverCMS /CMSName:EXCHMBX01 /CMSIPAddress:10.10.1.200
Where the CMSName is the name of your original clustered mailbox server (the name the Outlook clients on the internal corporate network connect to) and the CMSIPAddress is the associated IP address.
Exchange Setup will now go through the required pre-requisite steps and then start recovering the CMS by pulling information from Active Directory (Figure 1.4).
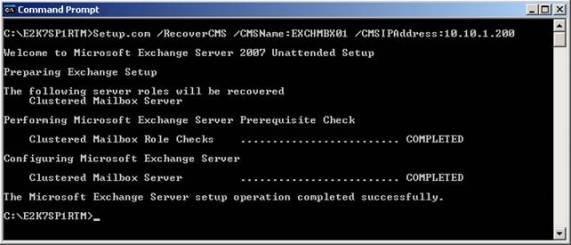
Figure 1.4: Recovering the Clustered Mailbox Server using the RecoverCMS Switch
As can be seen in Figure 1.5 below, the CMS has now been re-created using information and configuration settings stored in Active Directory. Also note, that the Storage groups on the respective databases are offline (Figure 1.6) and that the Storage groups have replication suspended. This reason for this is that you may want/have to restore the databases after recovering the CMS itself.
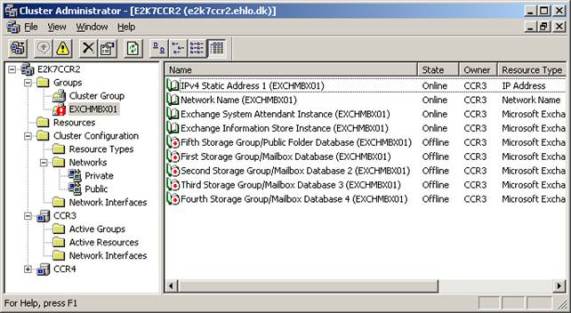
Figure 1.5: CMS only partially online after recovery

Figure 1.6: All Storage groups suspended and all database dismounted after recovery
We have now recovered the CMS itself and can move on to the next task, which is recovering any lost Mailbox databases.
Recovering Mailbox Databases by Restoring from Backup
Depending on whether the CMS you are recovering is using Directed Attached Storage (DAS) or a Storage area Network (SAN) based storage solution as well as whether you have lost the CMS or both the CMS and any related databases and log files stored on the DAS or SAN, you may also need to recover the databases by performing a restore from the latest backup.
In this article series, we will assume the databases have been lost as well. We will also assume that Windows Server 2003 Backup has been used to perform the backup of the databases. In addition, we will restore the databases from a .bkf, but the procedure is very similar for tape based restores.
On a CMS where the Mailbox databases have not been mounted yet, no EDB databases or log files will exist in the Mailbox database and Storage group paths, meaning you can move right on and begin the restore. But if you for some reason did try to mount the Mailbox databases, you must make sure you enabled “This database can be overwritten by a restore” under the General tab on the property page for each Mailbox database in the Exchange Management Console (EMC) as shown in Figure 1.7.
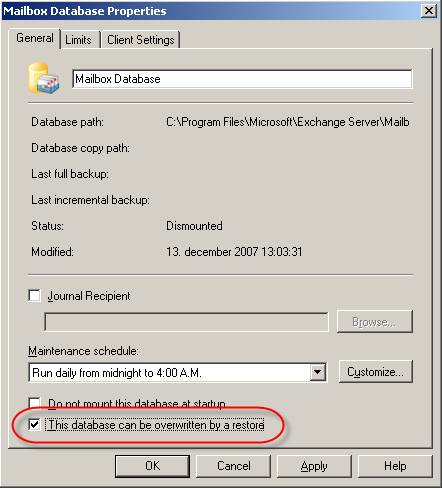
Figure 1.7: Selecting that the database can be overwritten by a restore
On the Active node, open Windows Server 2003 Backup by clicking Start > Run and type NTBackup followed by hitting Enter. Select Advanced Mode and then click the Restore and Manage Media tab as shown in Figure 1.8.

Figure 1.8: Restoring the databases from backup
In the menu select Tools > Catalog a backup file. Navigate to the .bkf that hold the Mailbox database backups then click Open > OK (Figure 1.9).
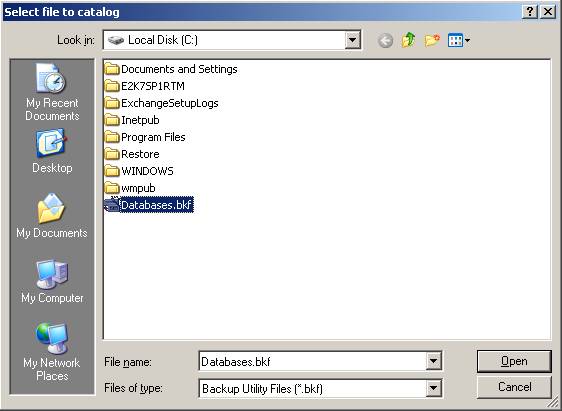
Figure 1.9: Opening the .bkf that holds the Mailbox Databases that have to be restored
Now tick the Storage Groups holding the Mailbox databases you want to restore (Figure 1.10).
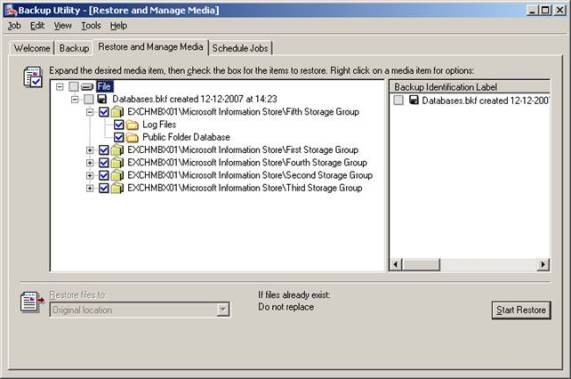
Figure 1.10: Selecting which databases should be restored
We are ready to restore the Mailbox databases so click Start Restore. In the appearing windows make sure the CMS name is entered in the Restore To: text field, then specify a temporary location for the log and patch files. If you do not need to perform any incremental or differential restores, also make sure you tick Last Restore Set (Log file replay will start after this restore completes) like I did in Figure 1.11.
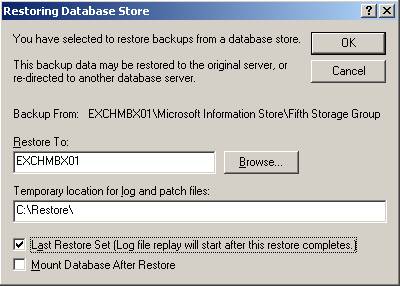
Figure 1.11: Specifying the Mailbox Server and the temporary location for log and patch files
Click OK and the restore process will begin (Figure 1.12).
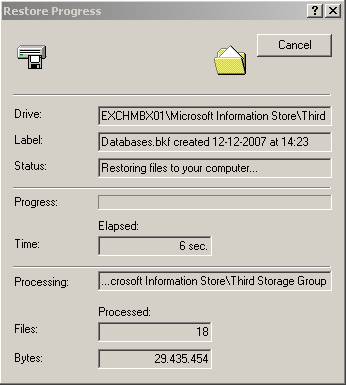
Figure 1.12: Databases are being restored
When the restore has completed (hopefully with success!) we can mount the Mailbox databases. To do so open the EMC and select the respective Mailbox databases one at a time and click Mount Mailbox Database (Figure 1.13).
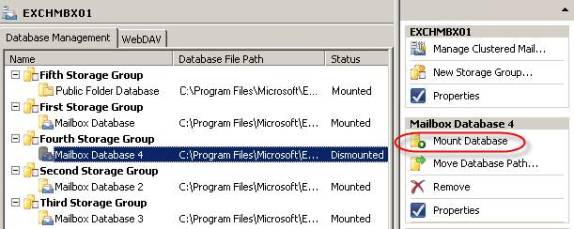
Figure 1.13: Mounting the databases
Note:
You could also specify that the Mailbox databases should be mounted automatically after the restore is completed by ticking Mount Database After Restore, but I like to do this manually afterwards.
All resources are now online in the Cluster Administrator console (Figure 1.14), and we can move on to the next task which is to install the Passive Mailbox Server Role on any additional nodes (in this case the second and last node as we are dealing with a CCR cluster).
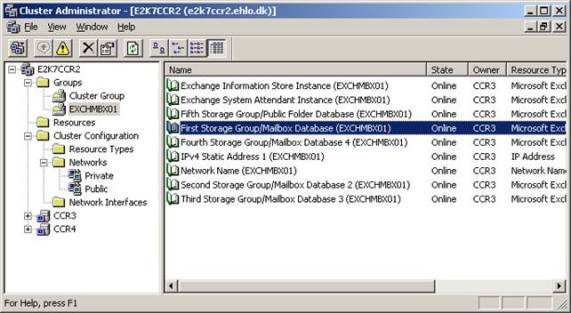
Figure 1.14: All resources are online in the Cluster Administrator Console
That was it for part one in this two part article series covering how you install the first passive mailbox server role on the first node, recover a lost CMS as well as recover the databases. Next time, I will explain how to install the Passive Mailbox Server role on additional nodes, update storage group copies, resume replication, testing cluster fail-over and finally explain how you clean up the obsolete computer account objects and A-records Active Directory and DNS.
If you would like to read the next part in this article series please go to Recovering an Exchange 2007 Clustered Mailbox Server (CMS) using the RecoverCMS Switch (Part 2)


