If you would like to read the next part in this article series please go to Using POP3 and IMAP4 to Access Exchange 2007 (Part 2)
Brief
In this, the first part of a two article series, I will provide an overview of the use of POP3 and IMAP4 with Exchange 2007. First I will take a look at some of the differences between the two protocols. I will then discuss a few scenarios where they can be used, followed by the actual configuration details required, including how to set up a client connection.
In the second part of the series I will show some of the more advanced configuration settings and touch on some best practises for using the two protocols. Finally I will take a look at what is to come for IMAP4 and POP3 in SP1 (Service Pack 1) for Exchange 2007.
Introduction
POP3 (Post Office Protocol 3) and IMAP4 (Internet Message Access Protocol 4) are both protocols which allow access to mail on/from a remote server. Both of these protocols are widely used outside the enterprise for accessing personal mail from ISPs, but, I have found they are also used on occasion within the business setting, for example on a mobile phone.
The key difference between the protocols is that IMAP4 provides access to mail on a server and doesn’t download it to the local machine, compared to POP3 which does download mail to the local machine (note: there is also an option to leave a copy on the server). Also, POP3 only downloads mail from the inbox, although other local folders can be created whereas IMAP4 allows access to all server based mailbox folders. Compared to other remote access methods like OWA (Outlook Web Access), neither protocol offers more advanced features like scheduling, task, or contact management.
Various things have changed for these protocols in Exchange 2007. Firstly they are now fully part of Exchange 2007 and not installed as part of IIS. Secondly, perhaps more importantly, unlike in Exchange 2003 there is no GUI to manage POP3 or IMAP4 (at least until SP1). One thing that has not changed is the fact that both of these protocols are mail retrieval protocols, neither of them let you send mail. To do that you need to relay through an SMTP server. In the next section I will show you how!
Installing / Enabling IMAP4 & POP3
As mentioned above, IMAP4 and POP3 are fully part of the CAS (Client Access Server) role of Exchange 2007, which means that to use them no further installation is required, they simply require enabling. To do this, proceed as follows:
First enable the relevant service and set start-up mode to automatic, see Figure 1:

Figure 1: Setting the start-up options of the POP3 Service
Next Start the Service, see Figure 2:
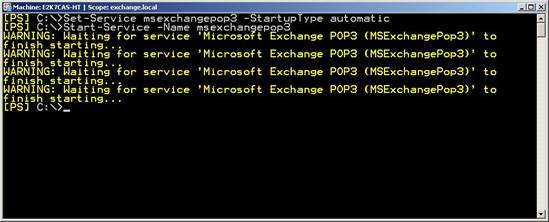
Figure 2: Starting the POP3 Service
Once the PowerShell command returns to the prompt, it is worth checking that the services have actually started as this is not information PowerShell returns! To do this, run the commands shown below in Figure 3.
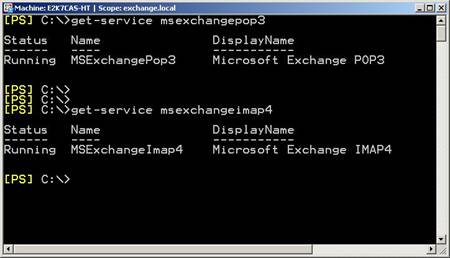
Figure 3: Checking the services have started
Note for IMAP4: replace “POP3” in the examples above with IMAP4
Having enabled the server side protocol, ensure that the user who needs access has the relevant protocol enabled for use. In the released version of Exchange 2007 this must be done by using the PowerShell commands below, but in Exchange 2007 SP1 it will also be possible to go in to the properties of the user and view/set the required setting on the Mailbox Features tab (Figure 4)
Set-CASMailbox -Identity mailboxname -PopEnabled $true
Set-CASMailbox -Identity mailboxname -IMAPEnabled $true
Note: $false disables the protocol for the specified user
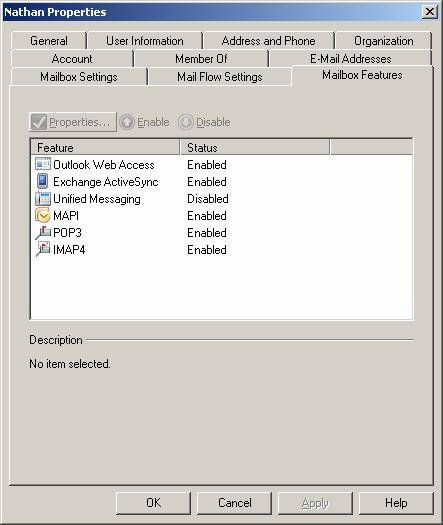
Figure 4: Mailbox Features of a User
Having covered the retrieval mail protocol setup sorted, we must now allow mail to be sent. In Exchange 2007, SMTP mail flow is dealt with by both the Hub Transport (HT) server role and the Edge Transport (ET) server role. Both can have connectors set up to allow the receipt and forward of mail however, in this instance, you are more likely to use the HT server to relay mail because, as the ET server is not part of your production AD (see Rodney Buike’s article here for more), your HT server will be best placed to authenticate those who need to relay mail, which is far better than allowing unauthenticated relay!
By default, an HT server already has a suitable connector set up and waiting for you to authenticate and submit mail; the “Client HTServerName” connector. When looking at its properties (Figure 5) you will immediately notice the port which the connector listens on is port 587. Yes, this is an SMTP connector, but instead of using port 25, the standard for server to server SMTP, port 587 is used because this is the standard for SMTP mail received from client software.
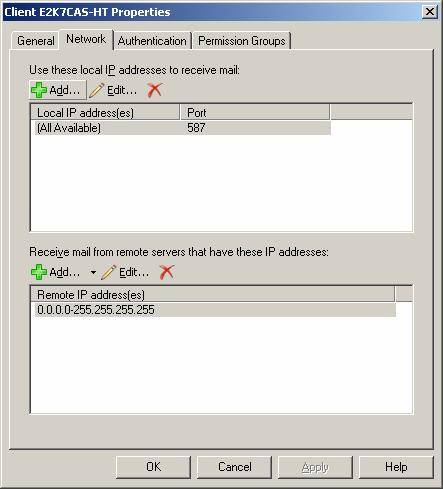
Figure 5: The network settings tab showing the port value for the Client Connector
Having looked into the enabling of POP3 and IMAP4 access and the provision of transport for relaying outbound mail, I will now move on and take a look at actually setting up the client. You will find that this is not as simple as you might think!
Client Setup – Authentication and Ports
Although Outlook Express 6 is installed on the majority of machines, I decided to use the new Windows Live Mail Desktop client to demonstrate the client setup because of an issue with Outlook Express detailed below. Having opened up the client I entered the account setup area as follows:
- Select “Accounts” from the “Tools” menu.
- To create a new account click “Add” and selected “Email Account”.
- Then enter the users name, email address (in my case “imap” and “[email protected]” respectively) and the login credentials. Also check the “Manually configure server settings for e-mail account” box. (Figure 6)
- Next select the protocol (either IMAP or POP3) and enter the server details for both receiving and sending mail, which in my case were the same “e2k7cas-ht.exchange.local”. (Figure 7)
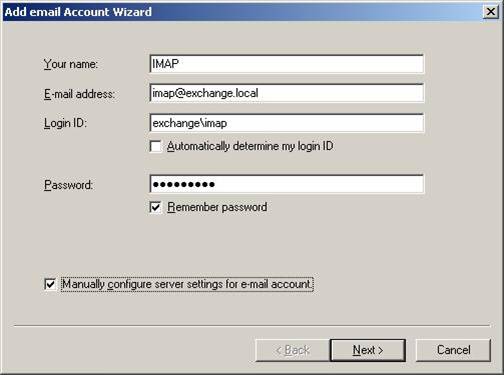
Figure 6: Username and login settings
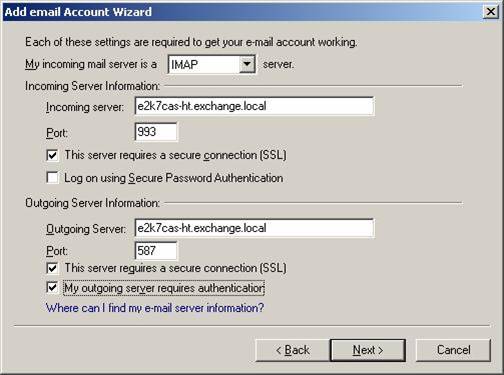
Figure 7: Server settings
Having completed the account as above, you may have noticed a few differences from what you were expecting. In Exchange 2007 the default settings are a little more secure than in previous versions. By default Exchange 2007 requires SSL/TLS secured connections, which means ensuring the client connects to the secured port. For IMAP4 that port is 993 and for POP3 it is 995. When using the SSL/TLS connection, as with OWA using HTTPS, it is important to make sure your client computer trusts the certificate path used for traffic encryption, otherwise an error occurs as shown in Figure 8.
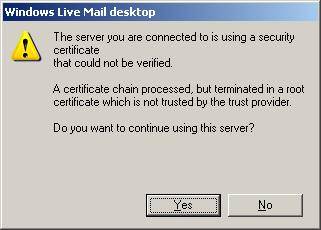
Figure 8: Un-trusted Certificate chain error
The steps above show you how to connect in the most secure manner, however, you could loosen the settings using the “set-popsettings –logintype” or the “set-imapsettings –logintype” commands. The commands are followed by the following options;
- PlainTextLogin
- PlainTextAuthentication
- SecureLogin
Using PlainTextLogin option opens things up, completely allowing connection to the standard (non TLS) ports (110 for POP3 and 143 for IMAP4). It also allows passwords in plain text over the network.
The PlainTextAuthentication options still allows for connection to the standard (non TLS) ports, but requires the use of secured passwords as used with the Secure Password Authentication option in the client.
Finally, the SecureLogin option is the default as detailed in the walkthrough above. After changing any of these settings, restart the relevant service for it to take effect. Personally, I would leave the settings at their defaults as anything less is simply not secured.
Note: If you are trying the above with Outlook Express 6 or earlier, then you will have a problem setting the SMTP server to use SSL/TLS over port 587. The problem is that Outlook Express can only negotiate explicit TLS over port 25. Outlined below are both explicit and implicit TLS:
Explicit TLS: In order to establish the SSL link, explicit security requires that the client issues a specific command (STARTTLS) to the server after establishing a connection.
Implicit TLS: Implicit security automatically begins with an SSL connection as soon as the client connects to a server. With implicit security, the server defines a specific port for the client (for POP3 and IMAP4, 995 or 993) to be used for secure connections.
If you want to keep using SSL/TSL with Outlook Express 6, one solution to this problem is to make use of the default SMTP connector which is set up to use SSL/TLS over port 25. However, perhaps a better option would be to separate the traffic off to a new connector listening on a different IP address but still on port 25.
Summary
As you have seen, both the configuration and security of IMAP4 and POP3 have changed a fair bit in Exchange 2007. Hopefully you will have found that although there are now many more feature rich methods of accessing Exchange 2007. IMAP4 and POP3 present a useful and secure method for situations where the more feature rich methods are not available.
If you would like to read the next part in this article series please go to Using POP3 and IMAP4 to Access Exchange 2007 (Part 2)