If you would like to read the other parts in this article series please go to:
Introduction
In this part, the final part of the series I will finalise the development of script that I began in Parts 1 and Part 2. The main objectives for this part are to deliver the following functions:
|
Function Name |
Purpose |
|
empty_DeletedItems |
Empties the delete items folder within Outlook after the XML files have been processed |
|
manage_XMLPostProcessing |
Archives the old XML files |
Table 1
I will also clarify the pre-required steps (initially described in part 1) within your Environment that you need to ensure that you have set up in order to execute the script correctly. I will then wrap up by explaining how the Script can be scheduled.
Finalising the Script
|
Code |
Description |
|
functionempty_DeletedItems{ Write-Host“Invoking: Empty Deleted Items”-ForegroundColorBlue Start-Sleep-Seconds 10 $Outlook=New-Object-ComObjectOutlook.Application Foreach($fldin$Outlook.Session.Folders){ Foreach($mFin$fld.Folders){ if($mF.Name -eq”Deleted Items”){ foreach($itmin$mF.Items){ $Itm.Delete() } } } } } |
The empty_DeletedItems function is called from the perform_MailboxQueryfunction and is only invoked if the $EmptyDeletedItemsAfterProcessingglobal constant is set to $true. Very much like the perform_MailboxQuery it makes use of the Outlook.Applicationobjects to connect to the “Deleted Items” folder within Outlook – get all mail items that are present and then delete them one by one. |
|
functionmanage_XMLPostProcessing{ $XMLFiles=Get-ChildItem“$AuditFolder\*.xml”
$aDirPresent=Test-Path$ArchivePath if($aDirPresent-eq$false){ New-Item$ArchivePath-ItemTypeDirectory }
Foreach($xFilein$XMLFiles){ Write-Host$xfile Move-Item$xFile$ArchivePath-ErrorActionSilentlyContinue }
} |
The manage_XMLPostProcessingfunction is designed to move all of the XML files that have been processed in a session to the archive folder. The function archives this by getting all files contained within the $AuditFolderdirectory which match the filter *.xml into a variable called $XMLFiles. The function then tests to see if the Archive Folder contained in $ArchivePathglobal constant is present on the system – if it is not, the function creates it. Then using a Foreach loop each file contained within $XMLFilesis moved to the Archive folder. |
Table 2
Script Download
You can download a full copy of the script from here.
Pre-Requisites
There are a number of technical pre-requisites that you should comply with before you try and execute this script – these were set out in part 1.
There are also a number of operational requirements that must be in place – and these are:
-
Before you use the script you should ensure that you have an OU in AD which contains a number of accounts that have mailboxes which you wish to audit – the location of AD OU should be configured in the $OUPath variable
-
You must have a dedicated mailbox setup to receive the XML files generated by the script – the SMTP address of this mailbox is configured in $AuditMailbox
-
You MUST ensure that the account that the script executes under has FULL ACCESS permissions on the Audit Mailbox
-
You must have a version of Outlook installed on the server or workstation where you intend to run the script. You should have setup a MAPI profile for this mailbox and place the name of the profile in the $OLKProfile variable in the script
-
You should configure the folder locations for the XML files in the $AuditFolder and $ArchiveFolder variables
Using and Scheduling the Script
In order to make use of the script in your environment please use the following steps –
-
Download it to an Exchange / Management Server of your choosing
-
Within the script file change the following lines to match the settings in your own environment:
[email protected]
$AuditFolder=”x:\Audits”
$ArchivePath=”x:\Audits\Archive”
$OUPath=”prepad.local/AuditedMailboxes”
$OLKProfile=”Audit”
$EmptyDeletedItemsAfterProcessing=$true
$AccessTypes=”Owner,Delegate,Admin” -
Save and close the script file
-
Ensure that the Execution Policy for PowerShell is set to “Remote Signed”
Open a PowerShell command prompt and type “Set-ExecutionPolicy RemoteSigned” -
Create a batch file called “ExMon.bat” on your Exchange Server and add the following lines:
@Echo off
@Powershell -command “& {x:\Audits\MailboxAuditScript.ps1 }”
See figure 1 below:

Figure 1: Audit Script Batch File
-
Save the file
-
Use the Windows Task scheduler to execute the batch file at a re-occurring time which is convenient for you (I recommend once a day at around 23:00) – you should ensure that the account that the task context executes in has the correct permissions to access both the Audit Mailbox and the folder paths defined in the script
Customisation of the HTML Reports
The script generates simple HTML reports that contain a footer with MSExchange.org’s logo and a strap line entitled “Generated by: MSExchange.org’s Mailbox Audit Script” – you can customise these by changing the following lines in the WriteFooter function
|
Code |
Customisation |
|
Add-content$fileName”<tr><td><img alt=’MSExchange.org Logo’ height=’60’ src=’http://www.msexchange.org/img/logo-mse.gif’ width=’300′ /><td>Generated by <a href=’http://msexchange.org’>MSExchange.org’s</a> Mailbox Audit Script</td></td><tr>” |
· Change the <img src=> tag to the location of the image file. · Change the <img alt=> tag to the desired description · Change the <a href=> tag after the <td>Generated by tag to your custom company URL |
Table 3
You can also play around with the fonts, colours and other styles that the report uses, by modifying the values for the Style sheet codes contained within the WriteHeader function.
Disabling Mailbox Auditing
Using mailbox auditing does add a slight space overhead within each mailbox.
All of the auditing data for a mailbox is contained within a hidden folder within each audited mailbox located in the “Recoverable Items -> Audits” folder – see figure 2 below;
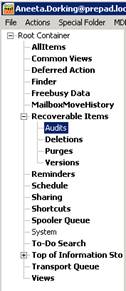
Figure 2: Location of mailbox Audit within a mailbox
With this in mind, having mailbox auditing turned on for large numbers of mailboxes for extended periods of time is not recommended – the focus should be on specific mailboxes.
Therefore below I have provided a script, purely for reference that can be used to disable auditing for all mailboxes in the Audited OU:
|
Code |
Description |
|
$OUPath=”prepad.local/AuditedMailboxes” functionreturnUsers{ $Usrs=Get-QADUser-SearchRoot$OUPath return$Usrs } functionget_OU_CheckAudit{ $Users=returnUsers
Foreach($Usrin$Users){
$Audit=Get-Mailbox$Usr.samAccountName If($Audit.AuditEnabled -eq$true){
Write-Host“Removing Mailbox Audit Settings: $Audit”-ForegroundColorGreen Set-Mailbox$Audit-AuditEnabled$false }
} } get_OU_CheckAudit |
This code is in effect a reversal of the get_OU_CheckAudit which is included in the main script file. Rather than enable the audit for all users, it executes the Set-Mailbox command with the -AuditEnabledparameter set to $false. |
Table 4
Conclusion
In this final part we have concluded the development of our sample auditing script. We have gone through the pre-requisites required for it to run correctly, and explained how it can be scheduled.
I have explained a few options for customisation of logo’s and footer “strap” lines, as well as provided a small “undo” script to remove Auditing from the mailboxes in the Auditing OU.
If you would like to read the other parts in this article series please go to:


