If you missed the first part of this article series please read Windows 2003: Data Backup and Recovery (Part 1) – A General Overview.
About the Windows 2003 Backup Utility
There are many third-party backup software packages out there – HP, Veritas, and CA being some of the big name players on the market. Depending on the size and budget of your enterprise you may wish to choose any of these. If however, you are after a simple solution to backup individual systems and data on shared folders, then why not use the Backup Utility that comes ‘free’ with the Windows 2003 operating system? Alternatively, why not use Backup in conjunction with another software backup to provide a complete backup and recovery solution?
The Backup Utility in Windows 2003 will allow you to, amongst other things, archive files and folders on the current system or remote shared folders to a hard disk and then restore these files to any accessible disk sometime in the future, create a copy of the system state, system/boot partition (and any files needed to start up your system in the event of a system failure), schedule automated backups, create a log file of what was backed up and when, and also create an ASR (Automated System Recovery) disk that will save system files and configuration settings. You can also use Backup remotely to back up Microsoft Exchange Server databases and information about other machines.
Discussing anything other than backing up and restoring data using this tool is outside the scope of this article, but I will briefly touch on how and when other features can be used in relation to the backup and recovery of data.
Backing up Data
To open the backup utility, go to the Start menu, navigate to Programs > Accessories > System Tools and click Backup. This will start the Backup and Restore Wizard or go straight to the Backup and Restore utility (depending on your previously chosen settings).
For the purpose of this explanation I will walk you through Advanced mode. If you start in Wizard mode, click ‘Advanced mode’ to switch.
Setting backup options
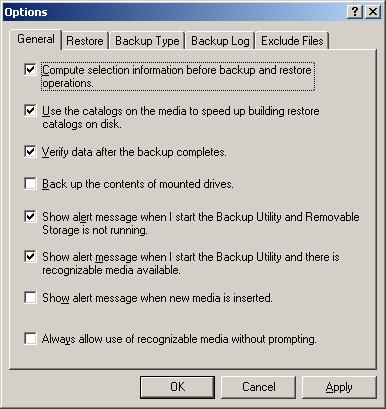
Select Tools > Options to open the Options dialog box and select your backup preferences. The General tab will allow you to choose whether you want to verify backup after the backup process has completed – this is a good idea as it will compare the data on the source with that of the destination to make sure an identical copy has been made. The Restore tab gives you the option to replace files, not to replace files or to replace files on disk if they are older than those on the backup media. The Backup Type tab allows you to select which default backup type you want to use – choose from Normal, Copy, Differential, Incremental and Daily (as discussed in Part 1 of this series). From the Backup Log tab you can set the level of logging you want for a backup – choose from ‘Detailed’ to log all information, ‘Summary’ to log the most important information and ‘None’ to log nothing at all. Finally, the Exclude Files tab will let you set which files to exclude from being backed up.
The image below shows the General tab of Backup Options:
Figure 1
Performing an interactive backup
From the Backup tab you can choose which drive, file or folder you want to back up and to which destination. In the left hand pane, click the checkboxes for which drive, file or folder you want to be backed up. The details for the selected folder appear in the right hand pane, as seen in the image below:
Figure 2
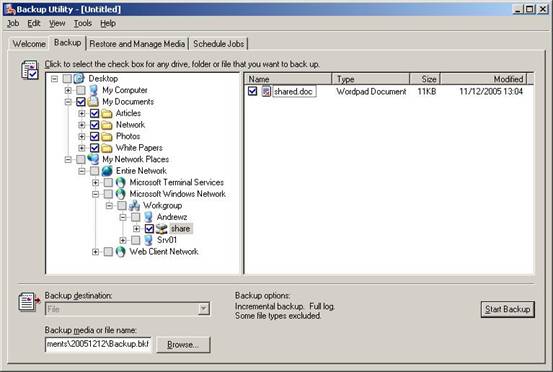
In my example I have chosen to back up the contents of My Documents on the local machine and a share located on another computer in my workgroup.
NOTE:
Backup files usually have an extension of .bkf, but you can change it to whatever extension you like when assigning the file name.
Scheduling a Backup job
To save you from having to manually backup files, you can schedule a backup job and let the backup utility do everything for you automatically. At a certain point in time the backup utility will start, and initialize the backup job. This is great if you want to perform routine backups – like a weekly Full backup of all drives, for example.
Once you have selected which files to backup and pressed ‘Start Backup’, click the ‘Schedule’ button in the Backup Job Information screen. After you have saved the backup job you will be asked to enter the username and password of the account you want the job to run under. From the ‘Scheduled Job Options’ dialog, type a job name and click the Properties button to set the date, time, and frequency of this job.
NOTE:
You will have to be a member of the local Administrators or Backup Operators group to perform this task.
Viewing a Backup log
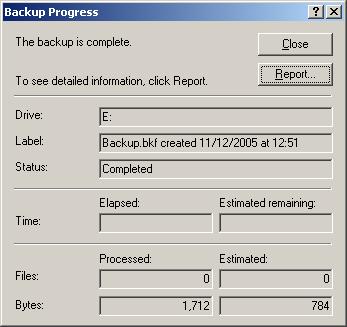
Once the backup is complete you can view the report by clicking on the Report button. This will show you details like what type of backup was performed and if the backup was a success.
Figure 3
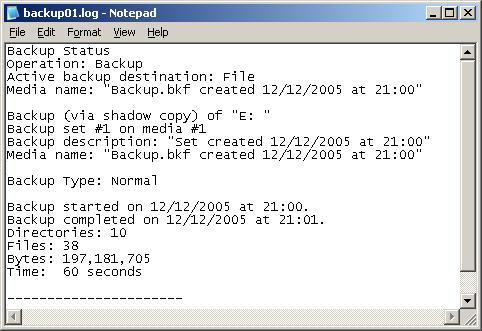
To view previous backup reports, go to Tools > Report to open the Backup Reports dialog window. Select a report and press ‘View’ to open the report in your default text editor or ‘Print’ to print to a file or print device.
The image below shows a simple report for an interactive backup job:
Figure 4
Restoring Data
Restoring data is a pretty simple procedure using the Backup utility. Go to the Restore and Manage Media tab and select which media you wish to restore from – this will be displayed in the left hand pane. Once you have selected the backup media, the details will be displayed in the right hand pane, as seen below:
Figure 5
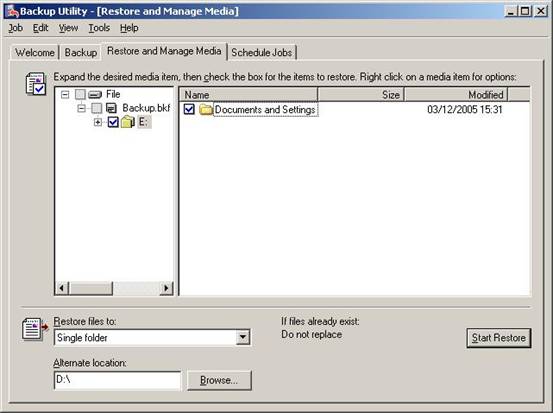
Your next step is to choose where you want the data to be restored to. Choose ‘Original location’ for the files to be restored to the location which they were backed up from, ‘Alternate location’ to restore the files to a different location (perhaps a different drive or folder) and keep the original folder structure, or ‘Single folder’ if you want to restore the files to a folder and not keep the original folder structure (all files will be placed in the folder you choose).
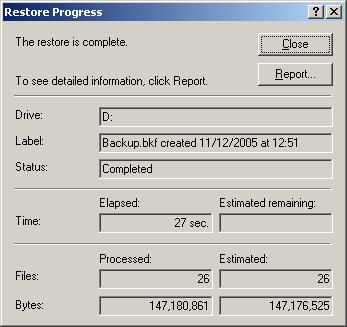
The final step would be to choose ‘Start Restore’. After asking you to confirm whether you want to restore the data and give you the option to change Advanced settings, a dialog box will open and start the restoration process. You will be notified when it is complete by means of a “restore is complete” message, as shown below.
Figure 6
Disaster Recovery
Disaster Recovery is the ability to recover system operations after a disaster has occurred. One of the most significant aspects of disaster recovery is planning and designing a comprehensive backup plan that includes procedures, maintenance and backup storage methods.
During a recovery, it may not always be necessary to bring all systems and services back online at once. The most critical systems should be a top priority, with other systems (such as the public website) being of lesser priority. This will allow you to bring the core of the system back up and running again before turning your attention other services.
Usually companies in different locations have a bi-lateral agreement that allows them to use the others site in case of a disaster. There are three types of sites available that will allow you to restore system operations in the event that a natural disaster destroys your main site. These are:
- Hot Site – A site that provides the ability to get back online and resume operations within a few hours of failure, by having the equipment needed on stand by.
- Warm Site – A site that provides some capabilities in the event of a recovery. Everything will be in place for the organization to install and configure the systems to get operations up and running again.
- Cold Site – A physical location that has all the resources necessary to allow an organization to use it if the original site has been deemed impossible to use. The systems will have to be installed, setup and configured. A decision on moving to this alternate site is normally made within a few hours of the disaster.
I cannot talk about disaster recovery without giving a small mention to the much-loved recovery console; it’s saved me a few times! When your system does not start properly, or if it does not start at all, then you can use the Windows 2003 Recovery Console to help recover your system software and perform administrative tasks such as format drives, read and write data on a local drive, and enable/disable system services. Three of the most commonly used commands in the recovery console are:
- fixmbr – Repairs the master boot record (MBR) of a specific disk.
- fixboot – Writes a new boot sector onto a specific partition.
- chkdsk – Checks a local drive and displays a status report, and allows you to fix common disk errors.
To view all recovery console commands, enter the recovery console and type help at the command prompt.
Conclusion
As we have seen, planning is the most essential part of backup and recovery. Never exclude the possibility of a worst case scenario and always compare the value of your data against your available options. Test your backups and review your backup/recovery procedure annually to pin-point any drawbacks and look for improvements.
Remember that a good back up solution must be a crucial part of your tasks as an administrator. It can decrease down time and protect data integrity. It’s all about the what, the with, and the how – what data you should back up, with what should you back it up and how you should back it up.
All things considered, backup remains your top method of protection against a Windows 2003 disaster.
If you missed the first part of this article series please read Windows 2003: Data Backup and Recovery (Part 1) – A General Overview.


Great article, I’m a I.T Manager of a large manufacturing company and looking for a new centrally managed backup solution. I currently have 7 physical dell servers and 4 virtual host running Vmware. I found this article with Symantec Backup Exec VS Paragon Software Group https://vellicore.com/backup-exec-vs-paragon/. Can anyone reccomend a good solid solution. I know VEAAM is great but its more for virtual machines.