If you would like to read the first part in this article series please go to X.400 Addresses and Exchange 2010 (Part 1).
Authoritative Domains
Because of the requirements of Authoritative Domains, you cannot configure a X.400 authoritative domain on an Edge Transport server – you must do it on a Hub Transport server. When you configure your organizations as authoritative for a X.400 domain, it is assumed you host all the mailboxes for recipients in that domain. After you create this domain, you can create an e-mail address policy that specifies that domain in the e-mail proxy address.
Exchange will accept e-mail that is addressed to recipients who have a X.400 e-mail proxy address assigned of that domain namespace. Any X.400 recipient addresses that do not resolve to a mailbox or a contact in Active Directory [AD] are treated as an error and results in a Non-Delivery Report [NDR]. If the e-mail that causes the error is a Delivery Status Notification [DSN], such as an NDR, it is simply deleted.

However, Exchange 2010 also supports non-authoritative X.400 domains as long as they are a subdomain of an authoritative domain. To configure these, you use the -X400ExternalRelay parameter of the New-X400AuthoritativeDomain cmdlet to define the domain exceptions where your organization is not authoritative for. This will make Exchange not treat recipient resolution failures as an error and make it route messages that are addressed to a recipient in the X.400 subdomain to an external address.
Format
Unlike RFC1685, when you configure an X.400 authoritative domain, you can only use the C, A, P, O, OU1, OU2, OU3 and OU4 attributes with C and A being the only ones required by default. Remember that when you configure such domain, your Exchange organization is considered authoritative for all X.400 addresses in the hierarchy.
When specifying a X.400 namespace, you separate the attributes by semicolons (as in RFC1685) and enclose the whole address in quotation marks (“”). You can also only use the following ASCII characters: A to Z, a to z, 0–9 and the punctuation and special characters: (space) ‘ ( ) + , – . / : = ?
You cannot include asterisk (*) and each attribute can only appear once in the X.400 namespace.
Once again, remember that any address in the hierarchy must resolve to a recipient or contact in AD unless you create an exception for a subdomain. For example, if you’ve configured an X.400 authoritative domain as “C=US;A=ATT;O=LetsExchange“, your Exchange organization is also considered authoritative for the X.400 namespace “C=US;A=ATT;O=LetsExchange;OU1=Sales Department“. If all the recipients for the Sales Department are located in another organization, each one of these recipients must be represented as a contact in the AD of the LetsExchange organization. If you cannot do this, then you must define the Sales Department namespace as an external relay subdomain.
Examples
In this first example, we create a X.400 authoritative domain called Sales in the private domain LetsExchange, which is under the administrative domain MSExchange:
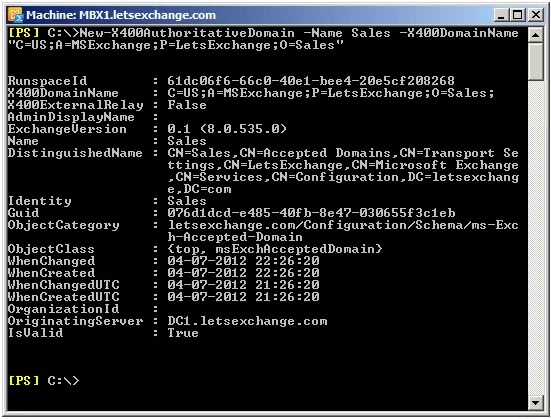
Figure 2.1: Creating an X.400 Authoritative Domain
In the second example we create an external relay domain for the X.400 namespace Europe organizational unit under the Sales organization in the private domain LetsExchange, which is under the administrative domain MSExchange:
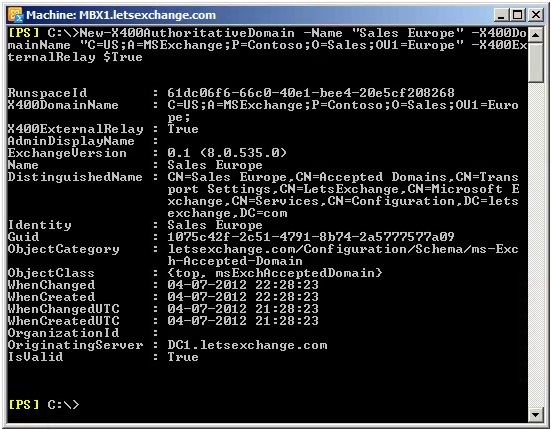
Figure 2.2: Creating another X.400 Authoritative Domain
Foreign Connector
The second way of connecting Exchange 2010 to X.400 systems is to use a Foreign Connector. As with the Authoritative Domain, a Foreign connector for use with X.400 (or any Foreign connector for that matter) can only be configured on Hub Transport servers and using the Shell. This connector will use a Drop directory (more details below) to send messages to a local messaging server that does not use SMTP as its primary transport mechanism. Examples of these messaging servers, also known as foreign gateway servers, include Lotus Notes and third-party fax gateway servers.
The outbound messages are put in this Drop directory on a Hub Transport server or in a network file share on a remote server. The foreign gateway server is then configured to obtain messages from the Drop directory.
Let’s create a Foreign connector to send e-mails to the X.400 address space of “C=US;A=MSExchange;P=LetsExchange;O=Sales”, with an address space cost is 1 and assign it to the Hub Transport servers HTCAS1 (you can add multiple HUB servers for fault tolerance):
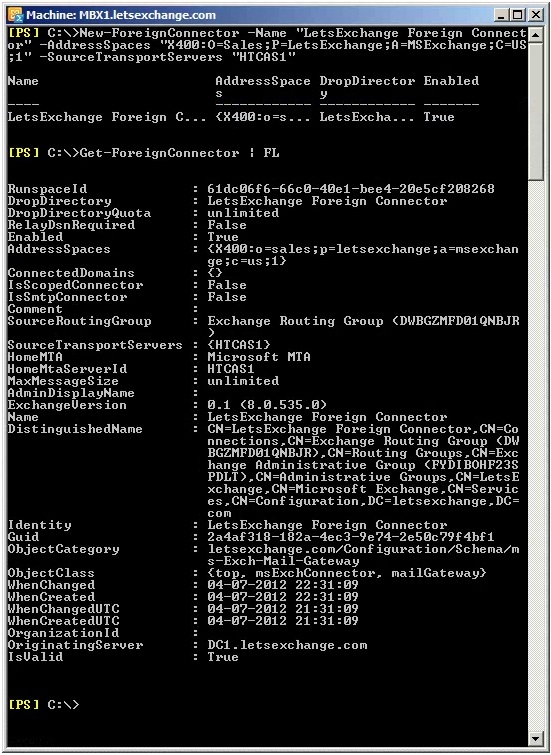
Figure 2.3: Creating a Foreign Connector for X.400
What is a Drop Directory?
Every Foreign connector uses a Drop directory to send messages to the foreign gateway server that does not use SMTP to transmit e-mails. Messages sent to recipients of the address space defined on the Foreign connector are copied into the Drop directory so that the foreign gateway server can pick them up.
One of the issues is that by default the Drop directory is not created automatically when you create a Foreign connector – you must manually create the directory folder in Windows Explorer… After you manually create it, you use the Shell to configure its location by using one or two different settings:
-
The -RootDropDirectoryPath parameter in the Set-TransportServer cmdlet is used for all Foreign connectors that exist on the Hub Transport server;
-
The -DropDirectory parameter in the Set-ForeignConnector cmdlet is used for each Foreign connector that exists on the Hub Transport server. By default, the value of the DropDirectory parameter is the name of the Foreign connector.
If the value of the -DropDirectory parameter does not contain an absolute path, the location of the Drop directory is the combination of the -DropDirectory and the -RootDropDirectoryPath parameters. If the value of the -DropDirectory parameter is an absolute path, then the value of the -RootDropDirectoryPath must be unspecified.
For example, let’s set the root Drop directory for all Foreign connectors on the Exchange 2010 Hub Transport server HTCAS1 to C:\Drop Directory and set our LetsExchange Foreign Connector to use the Drop directory LetsExchange. As a result of running these two cmdlets, the LetsExchange Foreign Connector will use the C:\Drop Directory\LetsExchange folder as its Drop directory:
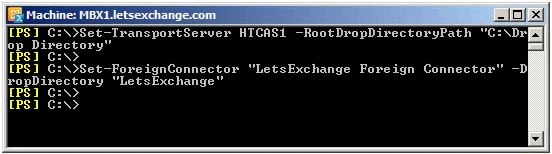
Figure 2.4: Configuring the Drop Directory
Be aware that:
-
Changing the location of the Drop directory does not copy any existing message files from the old Drop directory to the new one;
-
On the Drop directory you must assign Full Control permissions to Network Service, System and Administrators;
-
You can control the maximum size of the Drop directory by running the cmdlet Set-ForeignConnector “LetsExchange Foreign Connector” -DropDirectoryQuota 400MB. When the specified limit is reached, no new e-mails can be copied into the Drop directory until the existing messages are delivered and deleted. By default, the maximum size is unlimited.
Once everything is configured (you might have to restart the Microsoft Exchange Transport service if you made changes to the connector), users and/or applications will be able to send e-mails to recipients specified in the address space of the Foreign connector. When this happens, you will be able to see e-mail messages being placed in the Drop directory and if you check the Message Tracking Logs you will see that that Source for these messages is no longer SMTP but GATEWAY instead:

Figure 2.5: Messages in Drop Directory and Message Tracking Logs
Removing X.400 Addresses
Although Exchange 2007 and 2010 do not require X.400 proxy addresses, legacy Exchange servers still do because of the Message Transfer Agent [MTA]! So until you are purely on Exchange 2007 or 2010, do not remove the X.400 proxy address from the Default Address Policy and/or from your users’ list of addresses! This is also true if you still have applications that make use of X.400 addresses.
If you are absolutely sure your environment does not need X.400 addresses, you can remove them. As always, please test this in your lab or pre-production environment first! When doing it in your production environment, first try with a couple of users to ensure everything still works as expected and keep a close eye on your Event Logs as well.
Start by updating the Default Address Policy and remove the entry for X.400 addresses so that new users don’t get one. Then check if or how many users have an X.400 address:
ForEach ($addressin Get-Mailbox -ResultSize Unlimited | SelectEmailAddresses) {$address.EmailAddresses | Where {$_.Prefix -match“X400”} | SelectAddressString}
Once you verify there are users with X.400 addresses and that you do not experience any problems in removing them, it is time to get rid of them. Although you can use ADModify (a tool to bulk modify/import/export objects in Active Directory), my preferred method is, as always, PowerShell. The following code will go through every user and set their e-mail address(es) with the exception of X.400 ones:
ForEach ($mbxin (Get-Mailbox -ResultSize Unlimited)) {
$addrs=$mbx.EmailAddresses | Where {$_.Prefix -ne“X400”}
Set-Mailbox $mbx -EmailAddresses $addrs
}
We can make the code more efficient by first getting a list of users with X.400 addresses and then just setting those updating, but this method is perfectly fine for small/medium environments.
Note that your Distribution Groups will probably also have an X.400 address if they were created in Exchange 5.5 for example. For these, the code is very similar:
ForEach ($mbxin (Get-DistributionGroup -ResultSize Unlimited)) {
$addrs=$mbx.EmailAddresses | Where {$_.Prefix -ne“X400”}
Set-DistributionGroup $mbx -EmailAddresses $addrs
}
Now, verify that you do not get any warnings or errors in the event logs of your Exchange servers and, once again, that everything is working as expected.
Conclusion
In this article series, we explored what X.400 addresses are and if they are used by Exchange 2010. We also looked at how to configure an Authoritative Domains and Foreign Connectors so that Exchange 2010 can communicate with e-mail systems that do not use SMTP. We finalized by exploring a few scripts to help administrators remove legacy X.400 addresses when no longer required.
If you would like to read the first part in this article series please go to X.400 Addresses and Exchange 2010 (Part 1).


