Our series on Microsoft 365 administration continues with a subject even many veteran IT pros are ignoring. Logging and setting up alerts for on-premises infrastructure is the bread and butter of administrators, but many admins seem to forget all about it in the cloud when they migrate to Microsoft 365. Sort of like how they forget about backups. By default, the Microsoft 365 logging and alerts settings may not be quite what you want. Logging is set up for you, but no alerts are configured. I’ll show you some to consider enabling, and you can then build your own set. (For more on this series about Microsoft 365 administration, check out the links at the end of the article.)
Audit log retention
The first thing to know is which logs are enabled by default, which aren’t, and the retention time for those logs. The chart below will help with that.
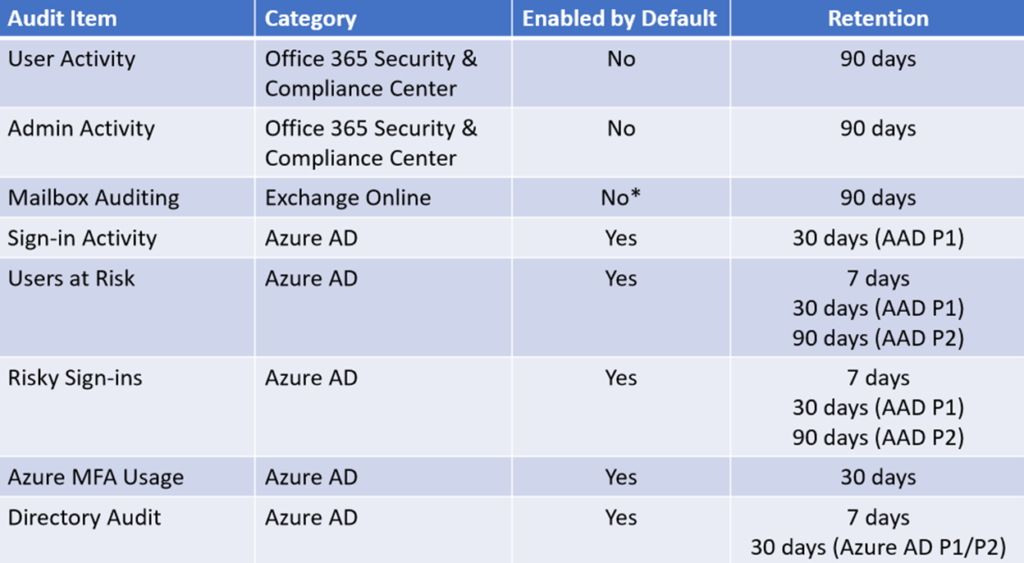
The retention time is important and, as you can see, varies with the type of licensing that you have. So, when you’re evaluating licensing, log retention is yet another factor to take into account.
Mailbox auditing
Mailbox auditing may or may not already be enabled. It actually depends on when your tenant was created. To make sure that it is enabled run the following command in PowerShell. You want all of the Exchange logs enabled since the data in them is important to many services and applications in Microsoft 365.
Get-Mailbox -ResultSize Unlimited -Filter {RecipientTypeDetails -eq “UserMailbox”} | Set-Mailbox -AuditEnabled $true
Unified auditing
If you haven’t enabled auditing in your tenant, you should see a faded yellow bar when you click on Audit log search in the main menu system. This will have a handy “Turn on auditing” button you can simply press.

However, if that isn’t present, you can also run these PowerShell commands:
Enable-OrganizationCustomization
Set-AdminAuditLogConfig -UnifiedAuditLogIngestionEnabled $true
OK, so great, now we have auditing enabled. But we also need an audit log retention policy to go with it. I call this one of the hidden buttons of Microsoft 365 because it is easily overlooked. Here’s how to find it: Log in at protection.office.com, then go to Search, Audit log search, and press the + to create a new retention policy. Use the chart referenced at the top of this article to determine how long you are eligible to retain logs.
Unfortunately, there’s no place in the GUI to view your retention policies. If you’d like to see your retention policies, you’ll need to run this PowerShell command. (I think this a big oversight on Microsoft’s part.)
Get-UnifiedAuditLogRetentionPolicy | Sort-Object -Property Priority -Descending | FL Priority,Name,Description,RecordTypes,Operations,UserIds,RetentionDuration
Configuring Microsoft 365 alerts
Now that we have alerts configured, we can turn our attention to monitoring and being alerted to problems as they occur.
Microsoft has a Twitter location where they post Network Operations Center (NOC) and service-status notifications. I recommend that you click the bell icon and have those alerts shipped to text or email or somewhere you’ll notice right away.
To configure alerts about activity in our own tenant, you’ll again go to protection.office.com and expand the Alerts menu item. Then click on Alert Policies. You’ll find quite a few new default alerts configured. The number of alerts configured for you will depend upon your licensing level. In the listing below, the asterisks (*) represent that there are default alerts available at higher licensing levels.
- Suspicious email sending pattern
- Elevation to exchange admin
- Someone started eDiscovery
- Someone created an email forwarding rule
- User email blocked because of suspicious activity
- ZAP filter removed a message after delivery
- Messages are stuck in the queue
- The entire tenant is restricted from email
- *Malware campaign detected and blocked
- *User reported email as phishing or malware
- *Unusual volume of file deletion
- *Unusual external file activity
- *Malware detected in SharePoint or OneDrive
- Admin submission completed (malware)
- Email limit exceeded by a user
- *Unusual volume of phishing
- *Unusual volume of file sharing to external users)
- Tenant restricted from sending unprovisioned email
- *Malicious URL was clicked
Create custom Microsoft 365 alerts
You can also configure custom alerts. Press the “New Alert” policy button to configure your first alert. The sky is nearly the limit on the detail you can choose to alert on. I’ll show you two that I like.
The first sends an alert when a new computer starts to sync data down locally. There are many reasons why syncing data is a normal activity. Pretty much everyone will have some need to sync SharePoint document libraries or OneDrive data. But I like to know which computers are doing that. As people become more tech-savvy, it isn’t out of reach for the normal computer user to decide to sync data down to their home computer, for example. This probably occurred a lot when suddenly everyone started working from their home offices this year.
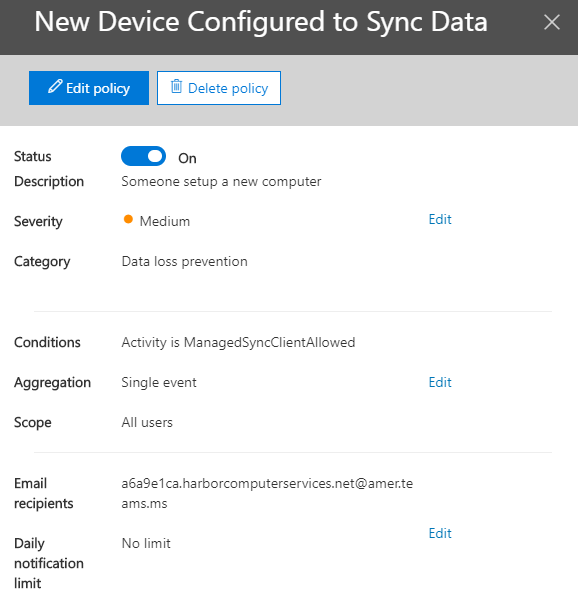
To configure this alert, click the “New alert policy” button. Give your new alert a description. In this case, “someone set up a new computer.” Decide how severe this alert is to you. The category of alert is important because it will determine what options you have available. The category of this alert is “data loss prevention.”
Here is where it gets interesting. The activity type that we’re interested in is “Allowed computer to sync files.” But as you’ll see, you have many choices. Looking through these should give you some ideas for other alert policies that you’re interested in.
The specific category of activity that we’re interested in is in the synchronization activity section. In this section, you have the following choices.
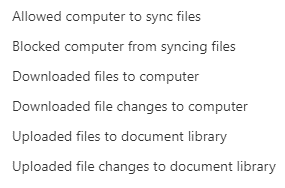
That one that we want for this alert is Allowed computer to sync files. The wording of that sounds like a permission setting, but it’s actually that they’ve selected to sync some SharePoint or OneDrive data to the computer.
We aren’t going to do it for this alert, but you’ll see an “Add a condition” button when you can, as it says, add more conditions to fine-tune the alert and make it quite sophisticated if you choose.
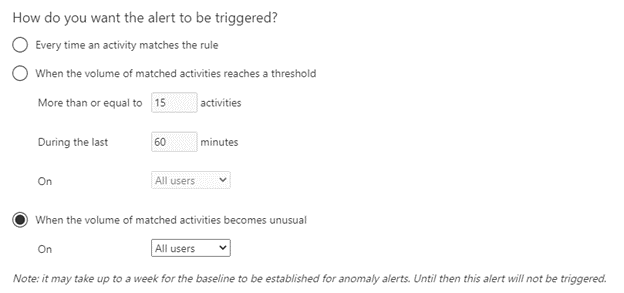
Our next choice is to tell the policy how often we want to be alerted. Your choices are every time or to set some level of occurrence of sync activity. If your licensing level allows, you may have a third choice, which to alert when the activity becomes unusual. This leverages Microsoft Graph, which builds a profile of each user. Alerting on activity that is out of the norm for each person is one of the powerful tools that Microsoft has developed to help administrators sort through the noise and focus on what is important.
The only other thing we have to do is tell it where to send the alerts and then save the policy.
The second alert policy that I’ll recommend triggers off of the “Report email” Outlook add-in. This add-in lets users inform Microsoft and you after this alert is configured that a bad email got through to their inbox. This is important because it allows the admin to consider whether the email filtering settings need to be adjusted.
If you have advanced licensing, this alert may be configured for you already, but for many, it might not be. I wanted to point this alert out because it has a second condition in it. This alert contains two conditions: Activity type and Submission type.
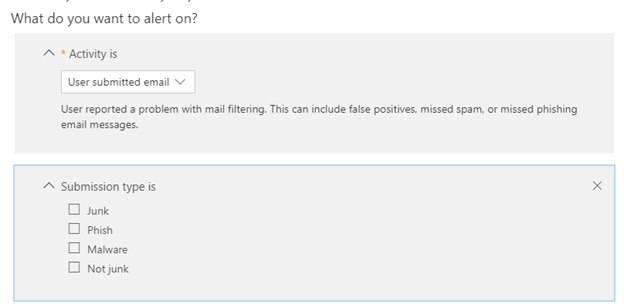
To configure this alert, you’ll follow the same procedure as above until you get the activity section. In this section, you’ll select User submitted email and then select one of the more bad email types to be alerted on. Continue to select your preferences for alerted frequency and destination.
Now that you’ve set up Microsoft 365 audit log retention and a set of policies for items in those logs, what’s next? Take a look at Azure Sentinel. This is a log aggregation service, and it is free to import and work with your Microsoft 365 logs and alerts there. You can set up alerts and workflows in Sentinel to automatically take action and automate some of your more frequent or severe audit responses.
Featured image: Shutterstock