Arduino boards are small computers that can be used for building homemade IoT devices, and a wide variety of other electronic projects. One of the things that makes Arduino projects different from other types of component-level electronic projects is that you have to program the Arduino board to do whatever it is that you need it to do.
As I have worked with Arduino, there are a few key things that I have picked up on. I wanted to share a few beginner-level pointers in an effort to help those who might just be getting started with Arduino.
Beware of counterfeit Arduino boards
One of the first bits of advice that I would pass along is to beware of counterfeit Arduino boards. Although you can often get Arduino clones at a great price, there may be a reason why these boards are cheap. Internet message boards are filled with stories of counterfeit boards that just didn’t work quite the way that they were supposed to. I have even heard stories of code that works flawlessly on a genuine Arduino board failing to work properly on one of the knock-off boards. You can get a genuine board from Arduino here.
Admittedly, you can’t always believe everything that you read on an Internet message board. I don’t actually own any counterfeit Arduino boards, so I have no way of knowing with any certainty whether or not the stories are true. Being that Arduino boards are relatively inexpensive, I would recommend spending a little bit extra to get a genuine Arduino board. That way, you shouldn’t have to waste time debugging code that is written correctly, but that is not being properly interpreted by your board.
Don’t switch editors in the middle of the coding process
One of the lessons that I have learned about programming Arduino devices is that the code that you write can be displayed differently depending on which editor you are using. Of course, the Arduino editor is the editor of choice for Arduino projects. After all, this editor doubles as a tool for uploading a sketch to your Arduino board. (A sketch is the name that Arduino uses for a program.)
It is possible to use a different editor for coding, but if you are going to use a different editor, then you should make the switch as early in the coding process as possible. Let me show you why.
If you look at the figure below, you can see what happens when you create a brand new program from within the Arduino editor. Clicking File | New caused a few lines of code to be created. As it exists in the figure, there is an area for Setup code, and there is an area for the program’s operational loop, but both blocks of code are empty aside from a comment line.

After creating the empty shell of a program that you see above, I saved the program using a filename of Demo. Upon doing so, the editor creates a folder named Demo, and then places a file named Demo.ino into that folder. So far, so good. But here is where things get a little bit weird.
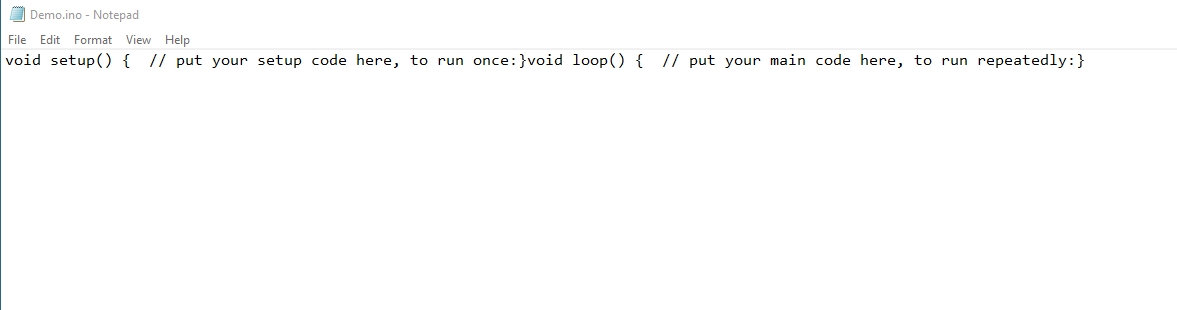
Even though I am relatively new to Arduino, I write huge amounts of PowerShell code. When doing so, I have gotten into the habit of using Windows Notepad as my editor. Sure, PowerShell comes with the PowerShell ISE editor, and there are also some really nice third-party editors available, but for whatever reason I just like Notepad’s minimalist, uncluttered display. That being the case, I was initially curious as to whether it might be possible to edit Arduino code using Notepad. To find out, I right clicked on an INO file that I had written, and then used the Open With command to open the file in Notepad. As it turns out, you can indeed open an Arduino program in Notepad (and presumably any other plain-text editor). The only thing is that the formatting is completely off. Here is what it looks like when I open it in Notepad.
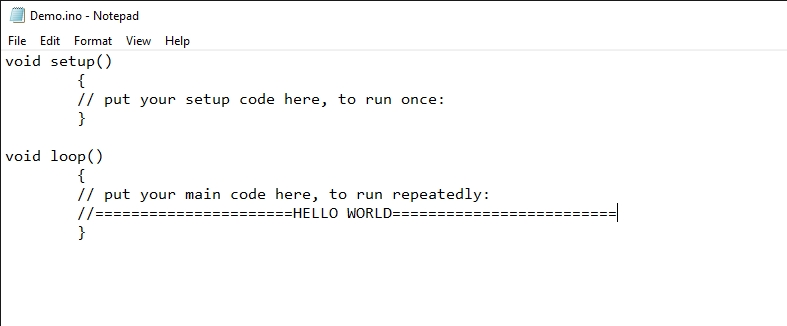
As you can see, the text is all there, but the formatting was lost. No problem, the formatting is easy enough to fix. If you look at the next screen capture, you can see that I have reformatted the text, and just to make things interesting, I added an extra line of code. It’s a comment that says “Hello World.” Keep in mind that even though this line of code is only a comment, any new code at all would produce the same end results. It doesn’t matter what the code actually does.
If I save the code, close Notepad, and then open the code in Notepad once again, it looks exactly the same as it did in the previous screen capture. Now, if I go back into the Arduino editor and open the file, it looks like what you see below. The code is all there, and the formatting is essentially the same as it was in Notepad, but there are a bunch of extra line breaks.

What I just showed you probably isn’t a big deal for short programs, but it can be a real pain if you’ve got a long program with lots of special code formatting. That’s why I recommend using a single editor for all of your coding if possible.
Incidentally, regardless of which editor you choose to use, make sure that it works properly before you write too much code. Although it may very well have been a mistake on my part, I experienced a situation a few months ago in which the code that I wrote in Notepad was not showing up in the Arduino editor when I opened my file.
Use the serial monitor for debugging
One of the best tips that I can give to those who are new to Arduino programming is to use the Serial Monitor to help debug your code. One of the things that makes Arduino projects really unique is that in many cases, there is no visible output. Unless the device that you have built has a screen attached, you might not have an easy way of telling whether or not things are working correctly. Fortunately, the serial monitor can help.
The Serial Monitor is a tool that is built into the Arduino Editor. You can access it by choosing the Serial Monitor option from the Tools menu.
To use the serial monitor, there are a couple of things that you will have to do. First, you are going to have to tell your program what you want the monitor to display. Writing this code is really painless, because it works almost exactly like sending text to an LCD display.
One of the first Arduino projects that I ever created displayed text on an LCD display. To do so, I had to add the line #include <LiquidCrystal.h> at the beginning of the program. Next, I had to tell the program what to display on the LCD. Here is a simple example:
Lcd.print(“Hello World”);
This line of code displays the words “Hello World” on an LCD screen. If I wanted instead to display the words on the serial monitor, I could simply change “LCD” to “Serial.” Here is what such a line might look like:
Serial.Print(”Hello World”);
Actually, there is one more line of code that you will need. You will need to add a Serial.Begin command to the setup section to specify the baud rate to be used by the serial monitor. An example might be:
Serial.begin(9600);
Incidentally, when displaying text within the serial monitor, you can use Serial.Println instead of Serial.Print if you want to insert a line feed at the end of the text that is displayed.
In this example, I have instructed the Serial Monitor to display static text, but I could have just as easily displayed the contents of a variable. By inserting a few strategic Serial.Print commands, it is possible to monitor an Arduino program to make sure that its values fall within the expected range.
Like any other type of programming, programming for Arduino takes a little bit of getting used to. Even so, I have found that once you get a handle on the basics of creating and uploading Arduino sketches, everything else becomes fairly intuitive.
Photo credit: Arduino


Hello Brien,
I am fairly certain that your Notepad vs. Arduino editor problems are appearing because Arduino is Unix-ish and uses the newline character to end a line of text while Windows uses the carriage return + newline pair to end a line of text. This is a common problem when writing code in a text editor for one system then compiling on another. Since Arduino is essentially ANSI C light and uses semi colons to end a line of code the visual display of your code only matters to people trying to read it.
Thanks for the insight Mark! I really appreciate you filling me in on where the extra line of code is coming from.