Introduction
Readers interested in understanding how to perform image-based unattended installs of Windows Vista using Windows Automated Installation Kit (Windows AIK) tools such as Windows System Image Manager (Windows SIM), the Windows Preinstallation Environment (WinPE), the System Preparation Tool (Sysprep) and ImageX are referred to articles 1 through 13 of my Deploying Vista series here on WindowsNetworking.com.
Readers interested in understanding how to use Windows Deployment Services (Windows DS) for server-based unattended installs of Windows Vista are referred to articles 14 through 23 of my Deploying Vista series.
For more information on using Microsoft Deployment Toolkit for deploying Windows Vista, see the following articles in this series:

This present article continues our look at the Windows Deployment Services (Windows DS) server role by examining how to deploy Windows images to bare-metal hardware using Windows Deployment Services.
Note:
Readers interested in understanding the basics of deploying Vista using the Windows Automated Installation Kit (Windows AIK) are referred to the first 13 articles of this series, which are listed on the author’s home page on WindowsNetworking.com.
In the previous article of this series we examined how to use a capture boot image to capture an install image from a preconfigured master installation of Windows Vista so that we can then duplicate this installation onto multiple destination computers. In other words, we have now completed the first five steps of the following six-step process for using Windows DS to deploy images:
-
Install the reference computer.
-
Customize the reference computer.
-
Sysprep the reference computer.
-
Create a capture boot image and add it to the store of your Windows DS server.
-
Boot the reference computer and select the capture image from the boot menu, then walk through the pages of the Capture Image Wizard to capture an image of your reference computer, upload the image to your Windows DS server, and add the image as an install image.
-
Use Windows DS to deploy the captured image of your reference computer onto destination computers.
What remains to demonstrate is how to perform the final step, that is, how to take the captured image of our reference computer which is stored in the image repository on our Windows DS server and apply this captured image onto a bare-metal PXE-enabled destination computer.
Manually Deploying an Image Using Window DS
Let’s first examine how to manually deploy images from a Windows DS server. Our goal in this walkthrough will be to deploy the captured image of our reference computer onto a bare-metal PXE-enabled client computer. Based on the previous few articles on this series, the following table shows the state of each Windows DS server and of the boot and install images on each server:
|
Server |
Boot images |
Install images |
|
SEA-WDS (running) |
Default boot image (disabled) WDS discover image (enabled) WDS2 discover image (enabled) |
Windows Vista Enterprise (enabled) |
|
SEA-WDS2 (running) |
Default boot image (disabled) Capture image (disabled) WDS discover image (enabled) WDS2 discover image (enabled) |
Windows Vista Enterprise (enabled) VistaMaster03 captured image (enabled) |
What we want to do is boot our bare-metal client computer from server SEA-WDS2 using the WDS2 discover boot image on that server, then, we want to deploy the captured image of our reference computer onto the client computer.
Begin by ensuring that the bare-metal client computer has its BIOS configured to boot from the network (Figure 1):
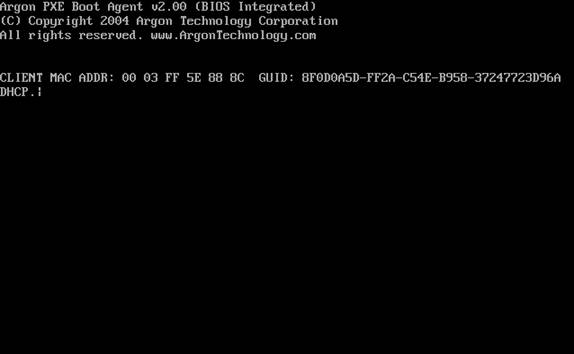
Figure 1: Booting the PXE-enabled bare-metal client computer.
What is happening in the above figure is this. The client computer broadcasts DHCP DISCOVER to any listening DHCP server on the network. The DHCP server, which in this example is SEA-DC1.contoso.com, respond with DHCP OFFER, offering an available IP address to the requesting client computer. The client computer then responds with DHCP REQUEST, asking the DHCP server if it may lease the offered IP address. The DHCP server responds with DHCP ACK indicating that the client has leased the offered address.
At this point the client computer broadcasts DHCP REQUEST again, this time to any listening PXE server on the network. The Windows DS servers are of course PXE servers, so one of them responds at this point with DHCP REPLY. The client computer then downloads the default network boot program (WDSNBP.com) which runs on the client computer using Trivial File Transfer Protocol (TFTP), detects the architecture type of the client computer (here x86), displays the name (IP address) of the responding Windows DS server (ServerHostName), displays the name of the default boot program for the client’s hardware architecture (in this case the boot program is pxeboot.com since the client’s hardware platform is x86), and prompts the user to press F12 to continue the network boot process (see Figure 2):
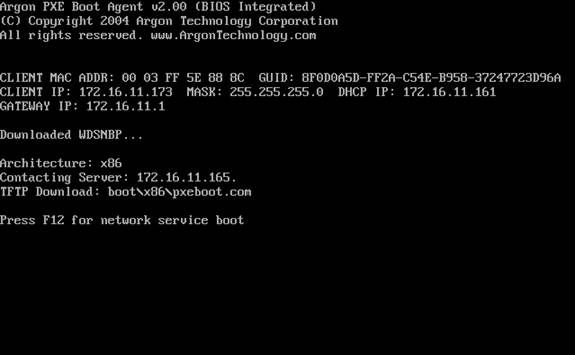
Figure 2: Network boot begins.
When the user presses F12, the default boot program (pxeboot.com) is downloaded to the client and then runs, displaying the Windows Boot Manager menu (Figure 3). This menu displays the available boot images on the responding Windows DS server, and in this example we see the two discover images we created earlier in Part 20 of this series. We’ll select the boot image named “Microsoft Windows Longhorn Setup (x86) – WDS2” as we want to deploy an install image from SEA-WDS2 onto the client computer.
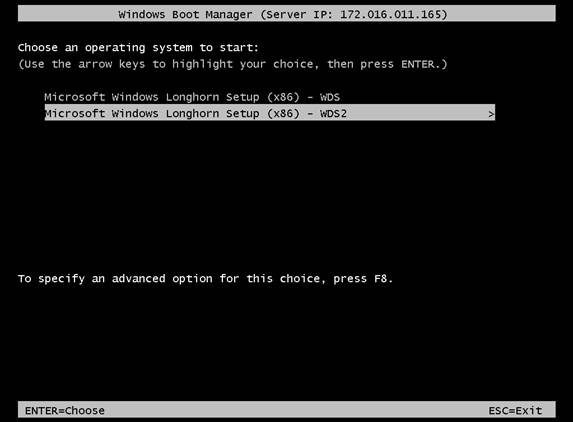
Figure 3: Select the Windows DS server you want to deploy an image from.
Pressing ENTER shows the next screen (Figure 4) in which the boot image is being downloaded via TFTP from the Windows DS server to the client computer:
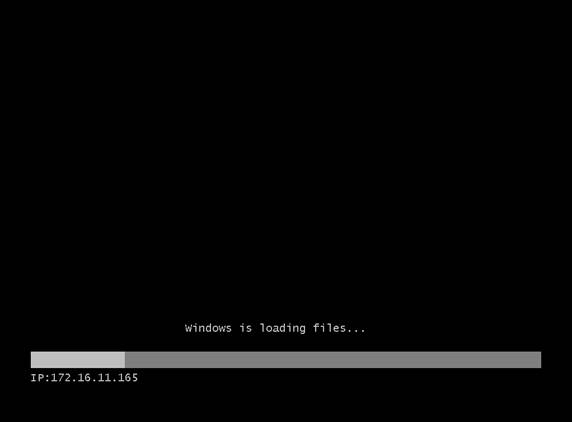
Figure 4: Downloading a boot image from the Windows DS server.
Once the boot image has been downloaded and initialized, the Windows Preinstallation Environment (Windows PE) is now running on the client. For more information on Windows PE, see article 10 and article 11 in this series. The first screen when the boot image initializes prompts you to select your locale and keyboard language (Figure 5):
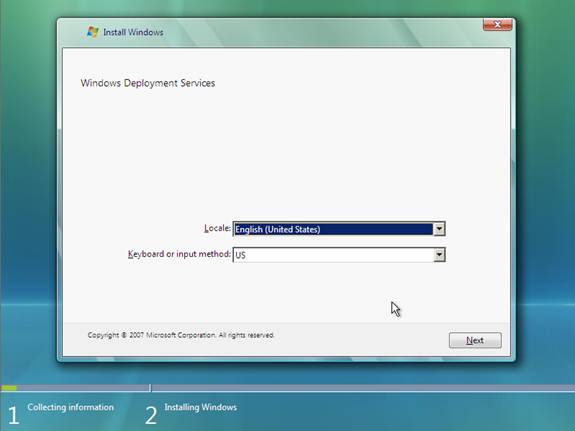
Figure 5: Initial screen when the boot image initializes.
Clicking Next brings up a credential dialog, and you must enter credentials for performing the deployment (Figure 6). Since image groups have Allow Read and Execute permissions for the Authenticated Users built-in identity for all their images, any domain user credentials will do here. Note that this credential box also displays the name of the Windows DS server you’ve connected to in its title bar.

Figure 6: Enter credentials for deploying the image.
Clicking OK now displays a list of available install images on the Windows DS server (Figure 7). Since we want to deploy the image we captured earlier from our reference computer, we are going to select the first option (VistaMaster03) from the list of install images displayed on this screen.
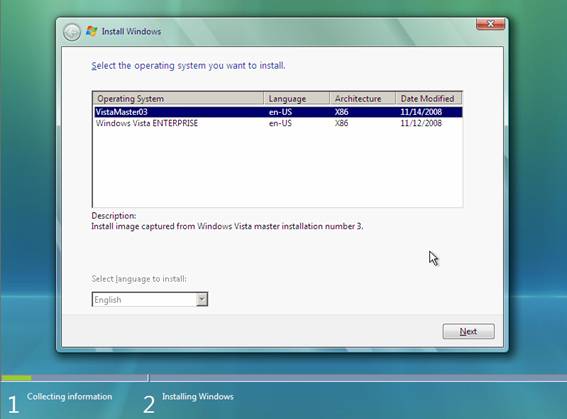
Figure 7: Selecting an install image to deploy onto the client computer.
Clicking Next lets us choose the disk on which we want to install Windows Vista (Figure 8):
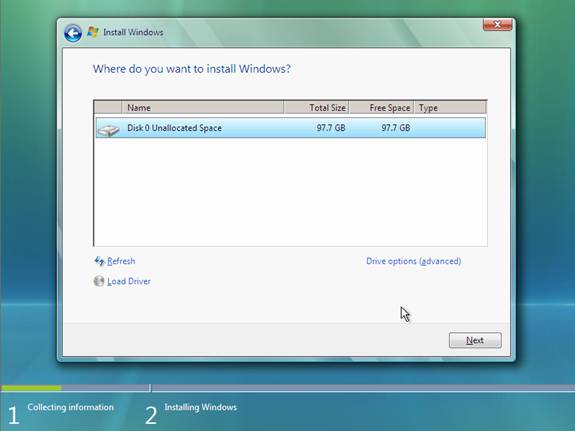
Figure 8: Select the disk to use for installation.
Clicking Next causes the client to wait for the Windows DS server to begin deploying the image (Figure 9):
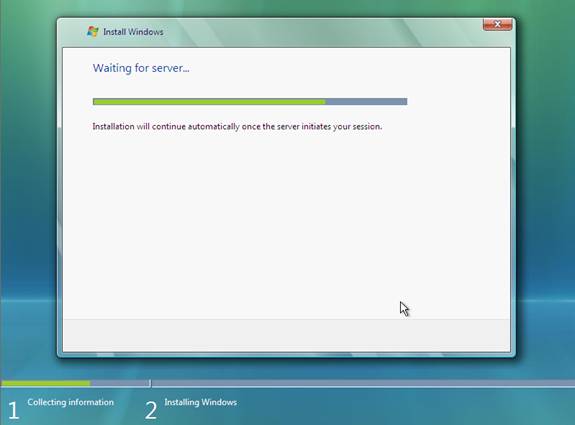
Figure 9: The Windows DS server is preparing to deploy the image.
After a few moments, the server begins deploying the image to the client system (Figure 10):
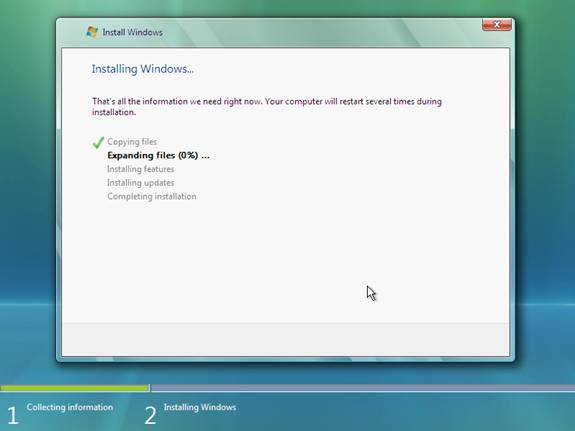
Figure 10: The install image is being deployed to the client.
At this point Windows Setup continues in the usual way until the machine OOBE (a.k.a. Windows Welcome) begins as shown next in Figure 11:
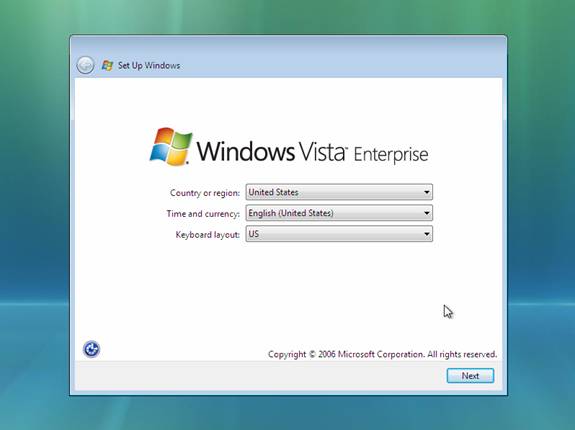
Figure 11: First screen of the machine out-of-box-experience (OOBE).
The machine OOBE allows each user to customize their computer by giving it a name, creating a local user account, selecting a desktop background, and so on. For example, if you were an OEM and you were going to deliver the computers to customers, the customer would walk through OOBE the first time they turned the computer on. Once you complete the machine OOBE, you are then prompted to enter your credentials for logging on to the domain (Figure 12):
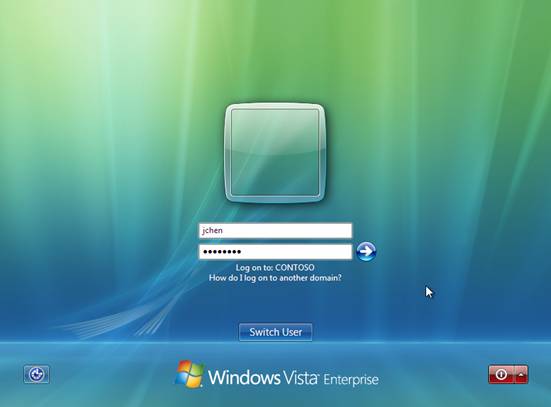
Figure 12: The user named John Chen logs on to his computer for the first time.
At this point, you can verify the installation. The reference computer whose image we captured had the game Freecell installed on it, so if we look under Games on the Start menu the program should be present (Figure 13):
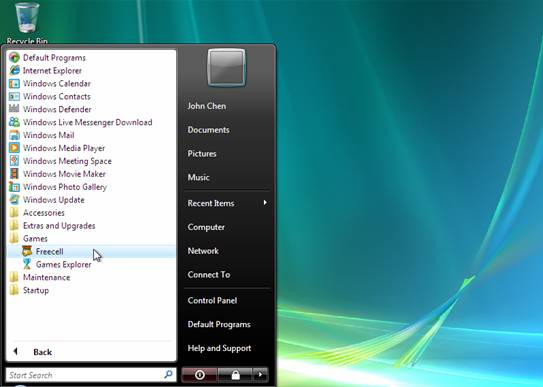
Figure 13: Verifying that John’s computer was deployed using the captured image of the reference computer.
Conclusion
In this article we have examined how to deploy a captured Vista image manually using Windows Deployment Services. In the next article we will look at how to automate such a deployment using answer files.
Readers interested in understanding how to perform image-based unattended installs of Windows Vista using Windows Automated Installation Kit (Windows AIK) tools such as Windows System Image Manager (Windows SIM), the Windows Preinstallation Environment (WinPE), the System Preparation Tool (Sysprep) and ImageX are referred to articles 1 through 13 of my Deploying Vista series here on WindowsNetworking.com.
Readers interested in understanding how to use Windows Deployment Services (Windows DS) for server-based unattended installs of Windows Vista are referred to articles 14 through 23 of my Deploying Vista series.
For more information on using Microsoft Deployment Toolkit for deploying Windows Vista, see the following articles in this series:


