If you would like to read the other parts in this article series please go to:
- Networking Basics: Part 1 – Networking Hardware
- Networking Basics: Part 2 – Routers
- Networking Basics: Part 3 – DNS Servers
- Networking Basics: Part 4 – Workstations and Servers
- Networking Basics: Part 5 – Domain Controllers
- Networking Basics: Part 6 – Windows Domain
- Networking Basics: Part 7 – Introduction to FSMO Roles
- Networking Basics: Part 8 – FSMO Roles continued
- Networking Basics: Part 9 – Active Directory Information
- Networking Basics: Part 10 – Distinguished Names
- Networking Basics: Part 11 – The Active Directory Users and Computers Console
- Networking Basics: Part 13 – Creating Groups
- Networking Basics: Part 14 – Security Groups
- Networking Basics: Part 15 – Universal Groups & Group Nesting
- Networking Basics: Part 16 – The Windows Operating System’s Role in Networking
- Networking Basics: Part 17 – The OSI Model
- Networking Basics: Part 18 – Sharing Resources
- Networking Basics: Part 19 – Share Level Permissions
In the previous part of this article series, I began discussing the Active Directory Users and Computers console. Although that article explained how to connect to the domain of choice using the console, it never actually explained how to use the console for day-to-day management tasks. In this article, I will show you some basic techniques for user account maintenance.
Creating a User Account
One of the most common uses for the Active Directory Users in Computers console is to create new user accounts. To do so, expand the container corresponding to the domain that you are attached to, and select the Users container. When you do, the console’s details pane will display all of the user accounts that currently exist in the domain, as shown in Figure A.
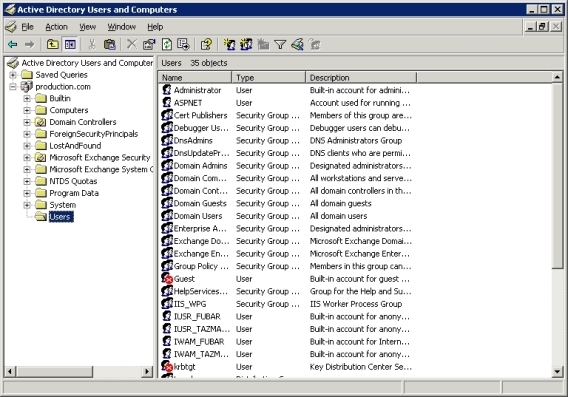
Figure A: Selecting the Users container causes the console to display all of the user accounts in the domain.
Now, right click on the Users container and select the New command from the resulting shortcut menu. When you do, you will see a submenu that gives you the choice of many different types of objects that you can create. Technically, the Users container is just a container and you can put pretty much any type of object in it. It is generally considered bad practice though to store objects other than user objects in the Users container. That being the case, select the User command from the submenu. When you do, you will see the dialog box shown in Figure B.
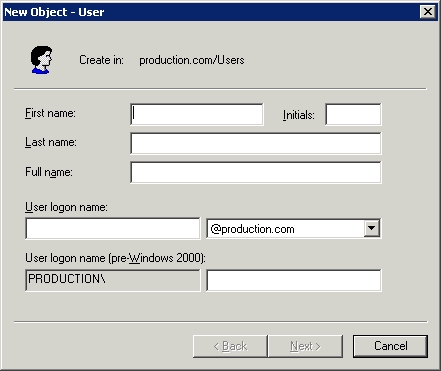
Figure B: The New Object – User dialog box allows you to create a new user account.
As you can see in the figure, Windows initially only requires you to enter some very basic information about the user. Although this screen asks for things like first name and last name, these are not technically required. The only piece of information that is absolutely required is the User Logon Name. Although the other fields are optional, I recommend filling them in anyway.
The reason why I recommend filling in as many fields as you can is because a user account is nothing more than an object that will reside within the Active Directory. Things like first name and last name are attributes of the user object that you are creating. The more attribute information that you fill in, the more useful the information stored in the Active Directory will be. After all, the Active Directory is a database that you can query for information. In fact, many applications work by extracting the various attributes from the Active Directory. When you have filled in the various fields, click the Next button, and you will be taken to the screen shown in Figure C.
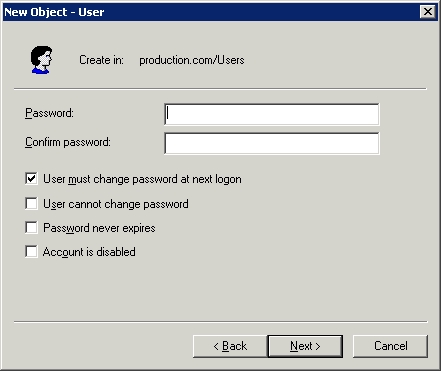
Figure C: You will be prompted to assign a password to the new user account.
As you can see in the figure, assigning a password is fairly simple. All you really have to do is type, and retype the password. By default, the user is required to change the password at the next logon. You can prevent this behavior by clearing the User Must Change Password at Next Logon check box. There is another check box allowing you to prevent the user from changing their password at all. You also have the option of setting passwords to never expire, or disabling the account completely.
Although there is nothing overly complex about the password screen, there is one important thing to keep in mind. When you assign a password to a new user account, the password must comply with your corporate security policy. If the password that you use does not meet the requirements dictated by the applicable group policies, then the user account will not be created.
Click next and you will see a screen displaying a summary of the options that you have chosen. Assuming that everything looks good, click Finish and the new user account will be created.
Editing User Account Attributes
Earlier, I discussed the importance of filling in the various attributes as you create a new user account. You might have noticed that the screens involved in creating a new user account did not really have many attributes that you were able to fill in. However, the Active Directory contains dozens of built in attributes related to user accounts.
I am not saying that you have to go through the console and populate dozens of attributes for every single user account. There are some attributes that do come in handy. I recommend populating attributes that are related to basic contact information. In fact, some corporations create corporate directories that are based solely on information stored in these Active Directory attributes. Even if you are not interested in building applications that extract information from your Active Directory, it is still a good idea to populate the Active Directory with user contact information. For example, suppose that you need to reboot a server, and a user is still logged into an application that resides on the server. If you have the user’s contact information stored in the Active Directory, then you can simply look up the user’s phone number, and call the user to ask them to log out.
Before I show you how to populate the various Active Directory attributes, I want to mention that the same technique can also be used for modifying existing attributes. For example, if a female employee were to get married, she might change her last name. You could use the techniques that I am about to show you to modify the contents of the Last Name attribute.
To access the various user account attributes, simply right click on the user account of choice and select the Properties command from the resulting shortcut menu. Upon doing so, Windows will display the screen shown in Figure D.
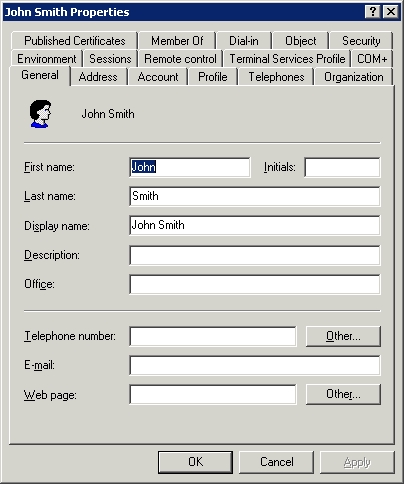
Figure D: The user’s properties sheet is used to store attribute and configuration information for the user account.
As you can see in the figure, the properties sheet’s General tab allows you to modify the user’s first name, last name, or display name. You can also fill in (or modify) a few other fields such as Description, Office, Telephone Number, E-mail, or Web Page. If you are interested in storing more detailed information about the user, then check out the Address, Telephones, and Organization tabs. These tabs all contain fields for storing much more detailed information about the user.
Resetting a User’s Password
You probably noticed in Figure D that there are a lot of different tabs on the user’s properties sheet. Most of these tabs are related to the security and configuration of the user account. One thing that most new administrators seem to notice right away when exploring these tabs is that there is no option on any of the tabs to reset the user’s password.
If you need to reset a user’s password, then close the user’s properties sheet. After doing so, right click on the user account and select the Reset Password command found on the resulting shortcut menu.
Conclusion
In this article, I have walked you through the processes of creating a user account, populating the various Active Directory attributes related to that account, and resetting the account password. In the next article in the series, I will continue the discussion by demonstrating more of the Active Directory Users and Computers console’s capabilities.
If you would like to read the other parts in this article series please go to:
- Networking Basics: Part 1 – Networking Hardware
- Networking Basics: Part 2 – Routers
- Networking Basics: Part 3 – DNS Servers
- Networking Basics: Part 4 – Workstations and Servers
- Networking Basics: Part 5 – Domain Controllers
- Networking Basics: Part 6 – Windows Domain
- Networking Basics: Part 7 – Introduction to FSMO Roles
- Networking Basics: Part 8 – FSMO Roles continued
- Networking Basics: Part 9 – Active Directory Information
- Networking Basics: Part 10 – Distinguished Names
- Networking Basics: Part 11 – The Active Directory Users and Computers Console
- Networking Basics: Part 13 – Creating Groups
- Networking Basics: Part 14 – Security Groups
- Networking Basics: Part 15 – Universal Groups & Group Nesting
- Networking Basics: Part 16 – The Windows Operating System’s Role in Networking
- Networking Basics: Part 17 – The OSI Model
- Networking Basics: Part 18 – Sharing Resources
- Networking Basics: Part 19 – Share Level Permissions


