If you would like to read the next part in this article series please go to Removing the First Exchange 2003 Server (Part 2).
Introduction
Decommissioning an old Exchange 2003 server is a fairly straightforward process. However, there are additional steps that you need to consider if you are decommissioning the first server within an administrative group. This is because the first Exchange server installed into an administrative group holds specific configuration elements or additional roles that you may not have moved to another Exchange server within the same administrative group. By taking the time to make sure these additional roles have been correctly and successfully migrated to the new Exchange server, you can save yourself a few potential headaches later on when you decide to decommission the old Exchange server.
These configuration elements or additional roles can be broadly identified as:
- System folders, such as those holding calendar free/busy information.
- The Recipient Update Service (RUS).
- The Routing Group Master role.
- Any Exchange connectors that are homed on, or have an endpoint on, the server to be decommissioned.
In part 1 of this 2-part article, we’ll look at replicating the system folders to the new server, removing them from the old server and also updating the RUS. In part 2, we’ll look at ensuring you transfer the routing group master role, any connectors you may have installed, and I’ll also cover a common error you see when attempting to uninstall Exchange.
For the purposes of this article, I’m going to assume that there are just two Exchange servers within a single administrative group but obviously the techniques discussed here are effective in a multiple administrative group scenario. I’m also going to assume that the option to display administrative groups within Exchange System Manager has been turned on. In my example below, the first server within the administrative group and the one that is being decommissioned is named DCEX1. The new server is named EX2.
You may have already replicated the user public folders to the new server but if you haven’t, the techniques below can be used to do this. You will need to ensure that all user public folder data has been replicated to the new server and any replicas removed from the old server prior to decommissioning it. Obviously you’ll also need to ensure that all user mailboxes have been moved across.
Replicating System Folders
The first major step in decommissioning the first Exchange 2003 server installed into an administrative group is to replicate and re-home the system folders. These consist of the following folders:
- Schedule+ Free/Busy
- Offline Address Book
- Organizational Forms
If you’ve replicated the user public folders to the new server you’ve already got a detailed understanding of the replication process. Despite this, for completeness I’ll detail the whole process of replicating the system folders and ensuring no replicas remain on the old server.
- Run the Exchange System Manager snap-in.
- Expand the administrative group and then expand the Folders object.
- Right-click the Public Folders object and choose View System Folders from the context menu. This is shown in Figure 1. Now expand the Public Folders object and you should be presented with Exchange system folders rather than the users’ public folders.
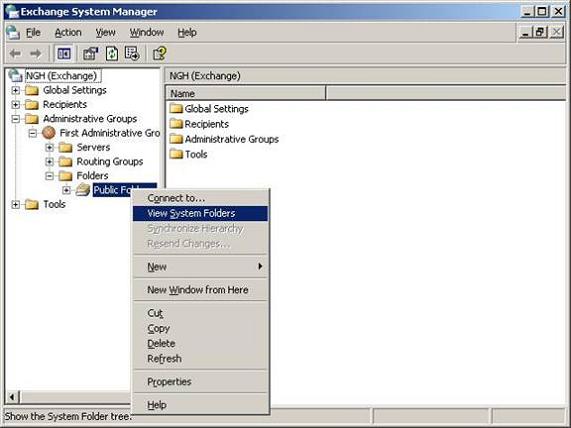
Figure 1: Displaying System Folders
- Locate the SCHEDULE+ FREE BUSY system folder and expand it. Underneath, you should find another folder with a name similar to EX:/o=organization name/ou=administrative group name. In my example, this folder’s name is EX:/o=NGH/ou=First Administrative Group. Note that, on systems with multiple administrative groups, you should see one folder for each administrative group. For simplicity, let’s refer to this folder as the free/busy folder. Right-click the free/busy folder and choose Properties from the context menu.
- Within the properties of this folder, choose the Replication tab. You’ll notice that the only server listed as containing a replica of this folder is the old server that you are migrating from, in this case DCEX1. This is shown in Figure 2.

Figure 2: Free/Busy System Folder Replicas
- Click the Add button and in the Select a Public Store window, choose the new server that you’ve recently migrated your user mailboxes to and then click OK all the way out of the various windows. In my case, I’ve added server EX2 to the list of replicas meaning this server will now receive a replica of the free/busy system folder.
- Repeat this process for any subfolders underneath the free/busy folder, if there are any. You can perform this task quickly by right-clicking the free/busy folder, choosing All Tasks from the context menu, and then choosing Manage Settings. This option will be unavailable if the folder doesn’t have any subfolders. Choosing the Manage Settings option will bring up the Manage Public Folder Settings Wizard if you are running Exchange 2003 Service Pack 2. This will allow you to send the replica changes down to the subfolders. To stop me repeating information already available on msexchange.org, see Henrik Walther’s article In-depth look at the Public Folder Improvements in Exchange 2003 Service Pack 2 on using this wizard. For older versions of Exchange, you’ll be presented with the Propagate Folder Settings window. Within this window, choose the Replicas check box and then click OK. This ensures that the replicas that you configured for this folder will be propagated down to all subfolders.
- Next you can turn your attention to the OFFLINE ADDRESS BOOK folder. This will be found under the Public Folders object where you originally found the SCHEDULE+ FREE BUSY folder. Underneath the OFFLINE ADDRESS BOOK folder you’ll find another folder with a name similar to /o=organization name/cn=addrlists/cn=oabs/cn=Default Offline Address List. In my example, this folder’s name is /o=NGH/cn=addrlists/cn=oabs/cn=Default Offline Address List which is shown below in Figure 3. For simplicity let’s refer to this folder as the offline address list folder. Note also the subfolders, namely the OAB Version X folders. Right-click the offline address list folder and choose Properties from the context menu.
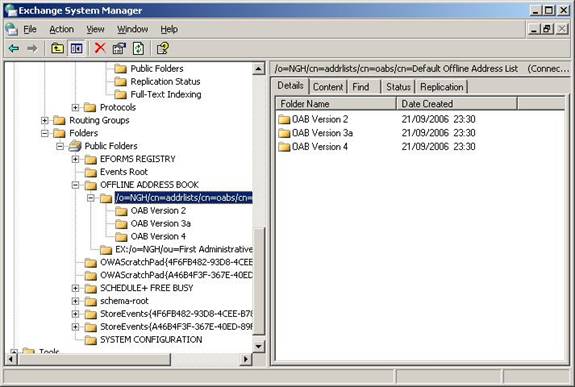
Figure 3: Offline Address Book System Folder
- The process now is the same as before. That is, add the new Exchange server to receive a replica of this system folder. Make sure you include all of the OAB Version X subfolders of the offline address list folder to also have replicas on the new server.
- Once you’ve done this, the final system folders to replicate are the Organization Forms libraries, if you have any. Once again, these will be found under the Public Folders object where you originally found the SCHEDULE+ FREE BUSY folder. Underneath the EFORMS REGISTRY folder, you may have some organizational forms folders created with custom names. Note though that none are present on a new build of Exchange 2003 in a new Exchange organization. If you don’t have any folders in EFORMS REGISTRY, you don’t have any organizational forms to replicate.
- Now you need to wait for public folder replication to take place, which can take some time depending on settings like the replication schedule of the free/busy folder. Be sure to allow enough time. How will you know that the folders have fully replicated? One method I sometimes use is allowing plenty of time coupled with examining the public folder store instances of the second server that we added as a replica. For example, Figure 4 shows the public folder instances for the public store on server EX2, which you can see now contains a replica of the free/busy system folder. Also, the amount of data shown in the size column (1KB) matches what is seen on the public folder store on server DCEX1. Admittedly that’s a small amount as this is just a test system. It’s not an exact science and you may want to supplement this with some careful monitoring of your event logs to check replication is working well. For information on this, see my article on Public Folder Replication – Troubleshooting Basics. You can also right-click the system folder, choose Properties and go back to the Replication tab. Here you will see a Details button. Click this and check that the Replication Status column shows In Sync, although I must admit I don’t always choose to rely on this method personally.
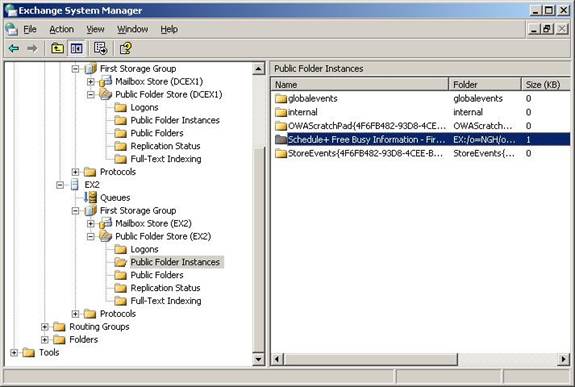
Figure 4: Public Store Instances
- Once you know that all of these system folders have been replicated to the new server, you can proceed to remove the replicas from the old server so that you can decommission it. To remove replicas from the old server, in this case server DCEX1, right-click each system folder that you modified above, bring up its properties and on the Replication tab, highlight the old server and click Remove. This is shown in Figure 5. Don’t forget to do this for all the system folders mentioned so far, including the subfolders.
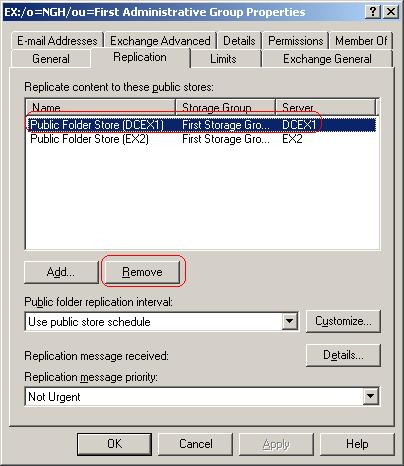
Figure 5: Removing Old System Folder Replicas
Offline Address List Server
The Offline Address List that you replicated previously is generated daily by an Exchange server. By default, this will be the first server within the administrative group. To change this to be the new Exchange server, perform the following steps:
- Run the Exchange System Manager snap-in.
- Expand the Recipients container and select Offline Address Lists.
- In the right-hand pane, you should now see the Default Offline Address List. Right-click this and choose Properties from the context menu. The result will be similar to Figure 6.
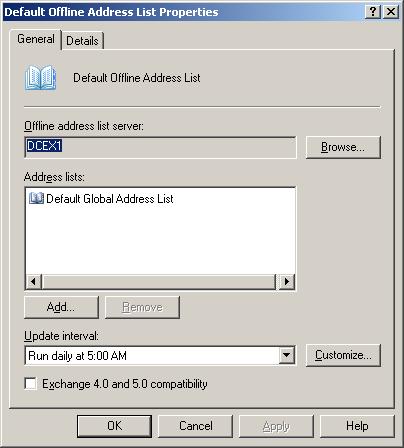
Figure 6: Default Offline Address List Server
- Note that the Offline address list server field is set to the old server, DCEX1. To change this, click the Browse button next to this field.
- In the Select Exchange Server window, type in the new server name and choose Check Names.
- Assuming the new server is found, the name should now be underlined. Click OK and check that the new server name is now listed back in the properties of the Default Offline Address List. Click OK again to exit this window and confirm the changes.
Summary
So far, we’ve covered how to replicate several important system folders to a new Exchange server as well as how to ensure the Offline Address List is generated by the new server. That completes the information within part 1 of this 2-part article. In part 2, we’ll complete our look at what to consider when removing the first Exchange server installed into an administrative group.
If you would like to read the next part in this article series please go to Removing the First Exchange 2003 Server (Part 2).


