The Azure Blueprints feature is still in preview, but it is fantastic when you want to do a professional package and deployment of an entire application on your Azure environment. Using Azure Blueprints, we can automate the creation of ARM Templates, Azure Policies, and RBAC permissions in a single package with just a few clicks. You may be wondering: Can I use PowerShell or ARM Templates to automate the entire process? Yes, you can, but it is time-consuming and complex to keep huge declarative files (ARM Templates) or long scripts to build your environment. Using Azure Blueprints, we can add those small chunks of ARM Templates and combine them with other resources to build your complete environment. The feature also supports versioning, which makes it easier to go back and forth without versioning your scripts.
Although the feature is in preview, the team announced some features that they want to introduce as part of their roadmap. I will list some of them here, and you can keep an eye on Azure announcements to see when they are available.
- Pre/post-deployment script
- Passing values between artifacts
- Lock the artifacts instead of the whole deployment
- Ability to delete resources
- Ability to assign a blueprint to a management group
We are going to show Azure Blueprints features using the Azure Portal. However, the feature can take advantage of PowerShell to import and export Azure Blueprints and use them in different tenants.
We can also take advantage of DevOps and create a CI/CD using Source control to maintain the Azure Blueprints.
Creating your first blueprint
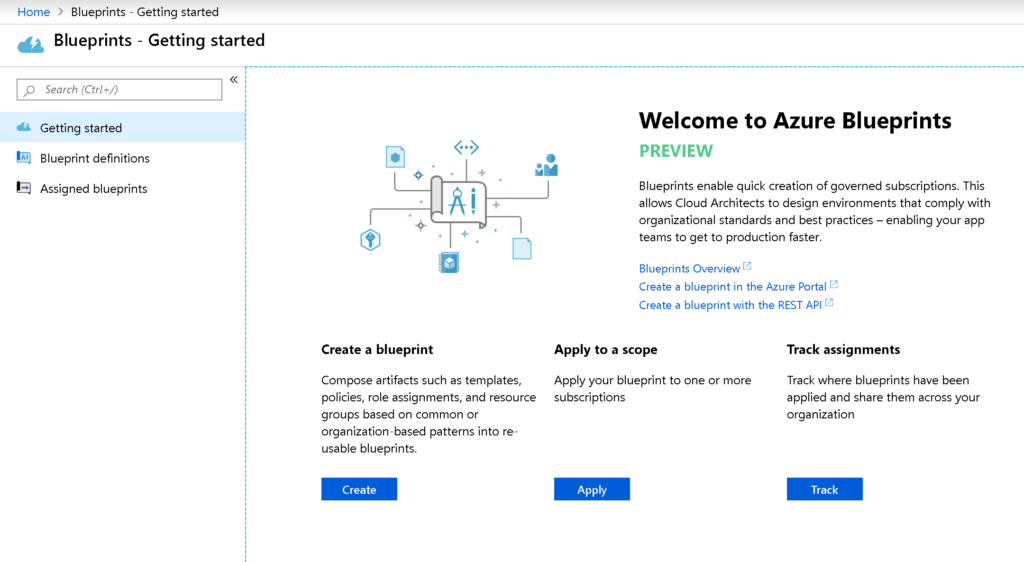
Logged on to the Azure Portal, search for blueprints, and the first page will be similar to the image depicted below. The Azure Blueprints feature is simple, and it is comprised of three items: overview page, blueprint definitions, and assigned blueprints.
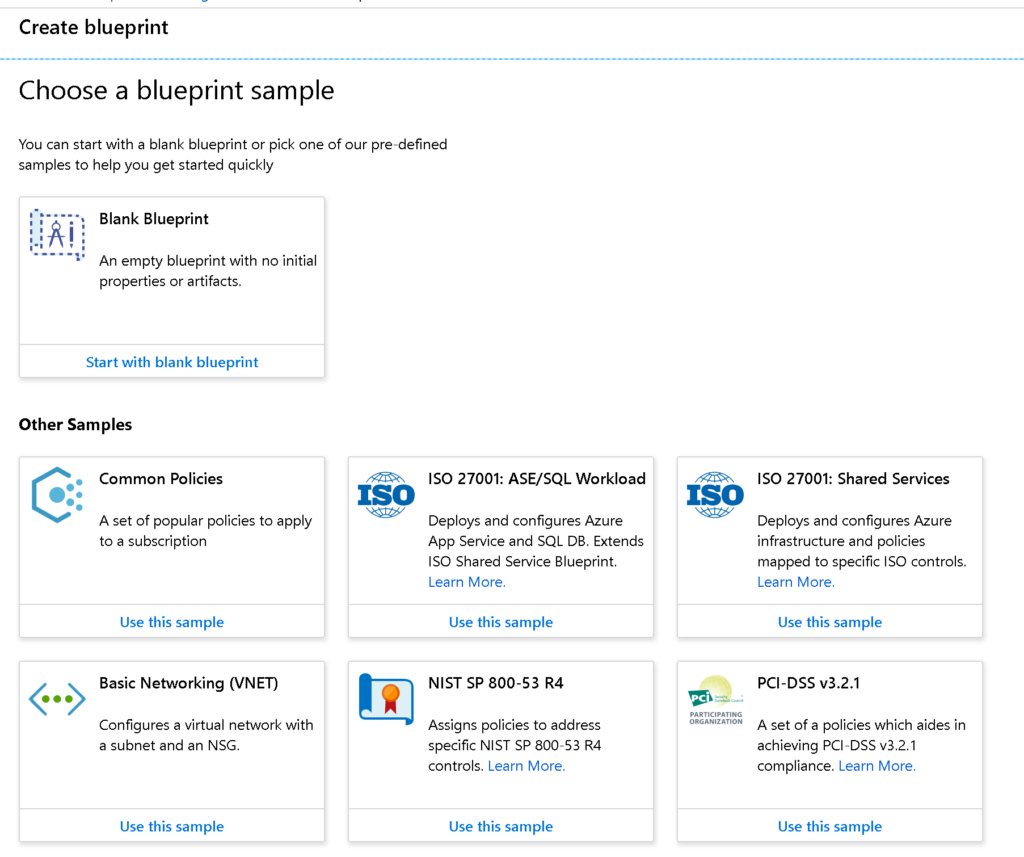
To create our first blueprint definition, click the Create button located in the Create a blueprint column.
We are going to start from scratch with a blank blueprint. However, we have several options to start from a template that contains some rules to help compliance in your organization. There are built-in blueprints containing compliance standards, such as PCI DSS, NIST SP 800, and ISO 27001.
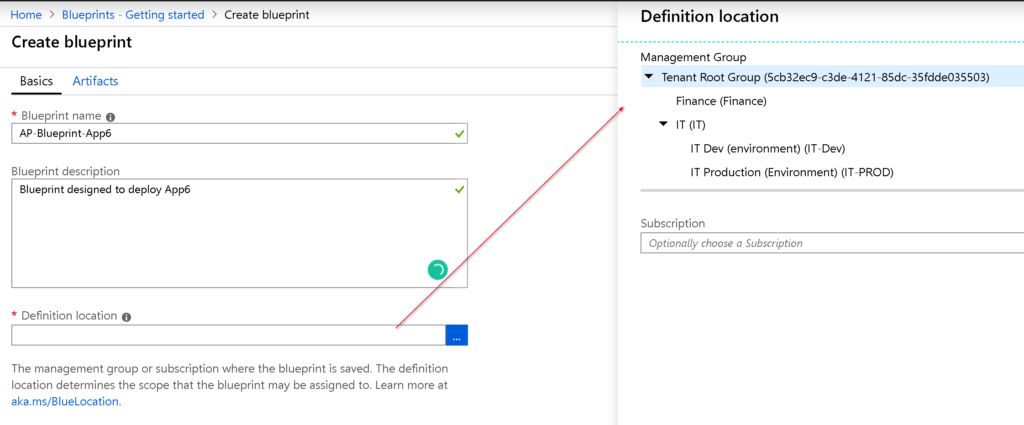
The creation process is comprised of two areas: Basics and Artifacts. In the Basics page, we will define a name, description, and location where our Azure Blueprints will be saved. We can save at Management Group level or Subscription.
In the Artifact page is where the fun begins, we have the option to add a couple of artifact types, as follows:
- Policy assignment
- Role assignment
- Resource group
- Azure Resource Manager template (subscription)
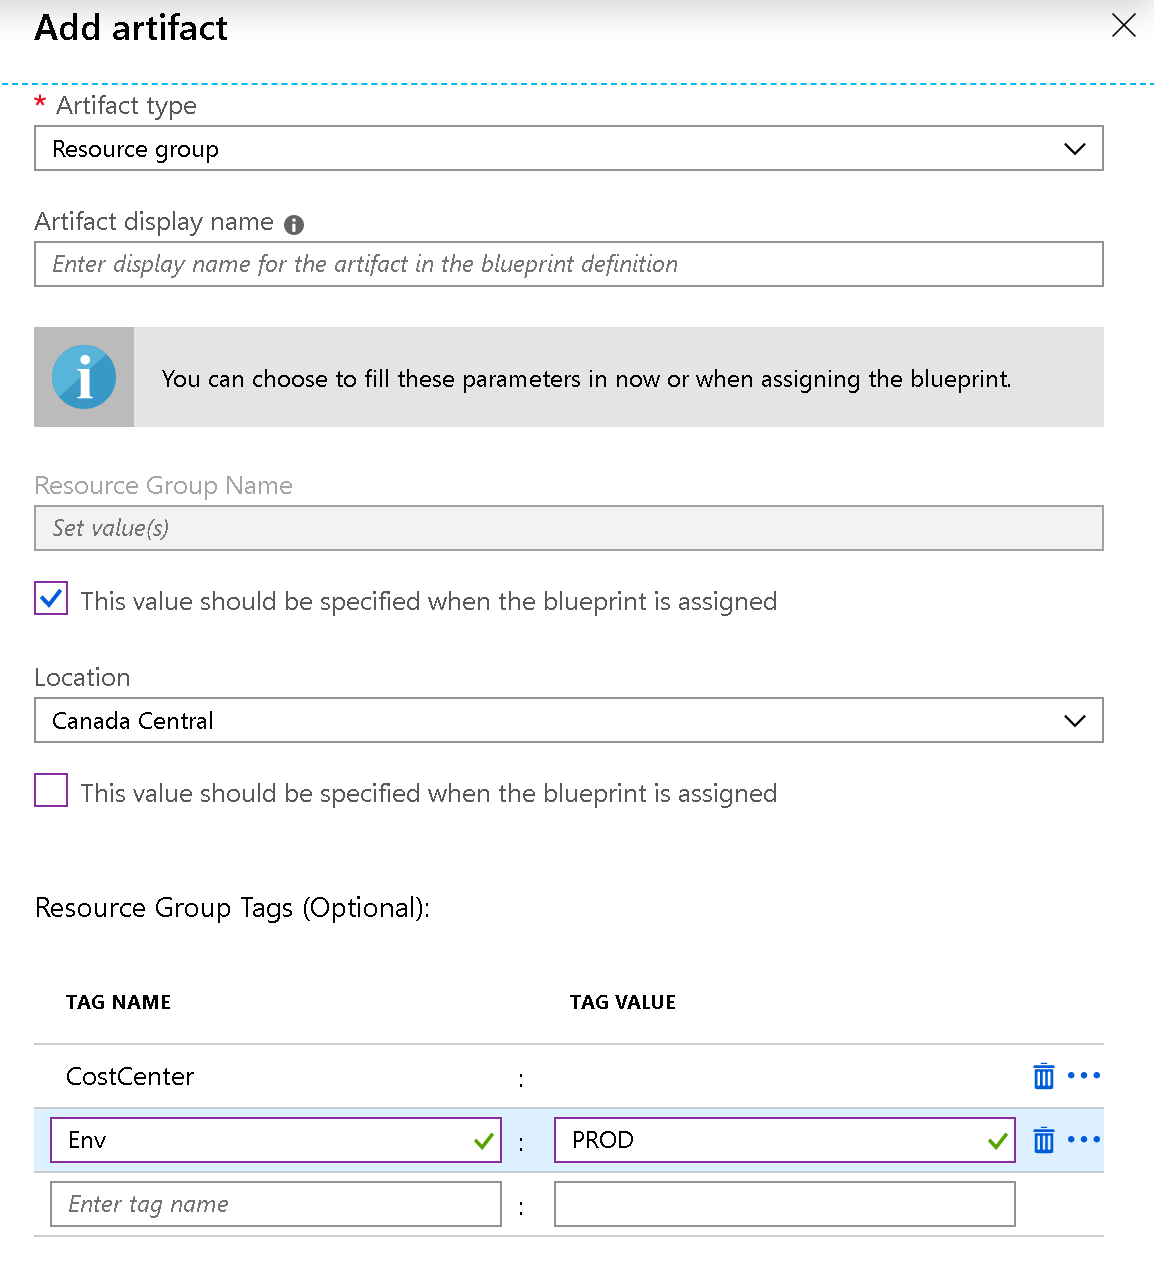
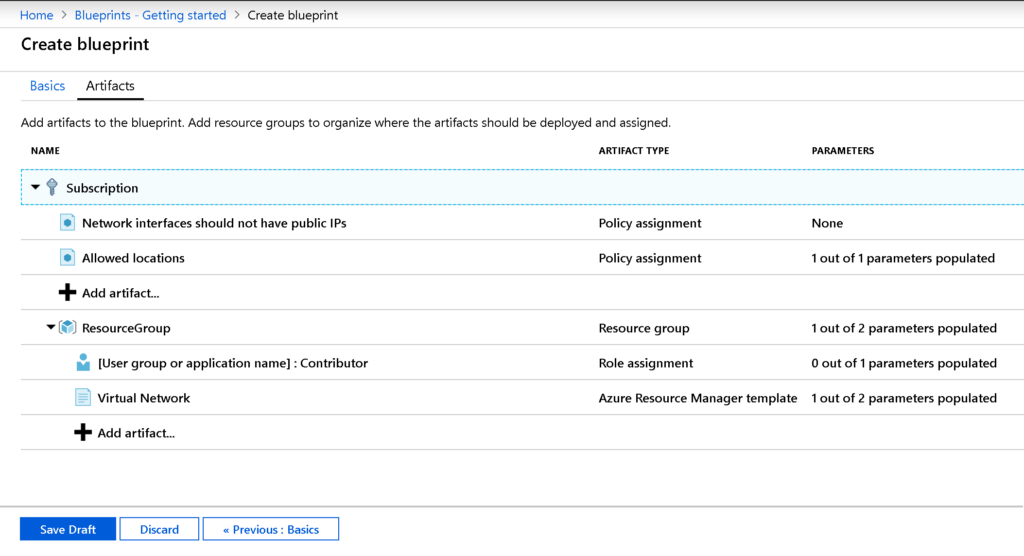
We have a blank canvas to add all the artifacts that we want to build our application/environment. Let’s start with a Resource Group artifact. Click on Add artifact and select Resource Group from the new blade displayed on the right side.
We can assign a label to the artifact, and define Name, Location, and Tags. There is an essential concept that we need to understand at this stage, which is parameters.
A parameter can be static or dynamic. The static parameter is defined during the blueprint creation and it won’t change. The dynamic parameter is set during the assignment phase.
My favorite artifact is the Azure Resource Manager template, and we can add our piece of ARM Template. If there are parameters to be used, we can click on the Parameters tab and fill it out accordingly. Using Azure Blueprints, we can add small pieces of ARM Templates and keep adding them to complete the overall solution.

If you are wondering how complex the ARM Template was to create the VNet, don’t worry, it was simple. Here is the code that I added in the template tab above.
{
"$schema": "https://schema.management.azure.com/schemas/2015-01-01/deploymentTemplate.json#",
"contentVersion": "1.0.0.0",
"parameters": {
"pVNETName": {
"defaultValue": "Network",
"type": "String"
},
"pSubnetName": {
"defaultValue": "servers",
"type": "string" }
},
"variables": {
"vVNETName": "[concat(‘AP-VNET-’,parameters(‘pVNETName’))]"
},
"resources": [
{
"type": "Microsoft.Network/virtualNetworks",
"apiVersion": "[providers(‘Microsoft.Network’,’virtualNetworks’).apiVersions[0]]",
"name": "[variables(‘vVNETName’)]",
"location": "[resourceGroup().location]",
"properties": {
"addressSpace": {
"addressPrefixes": [
"192.168.12.0/22"
]
},
"subnets": [
{
"name": "[parameters(‘pSubnetName’)]",
"properties": {
"addressPrefix": "192.168.12.0/24",
"delegations": []
}
}
],
"enableDdosProtection": false,
"enableVmProtection": false
}
},
{
"type": "Microsoft.Network/virtualNetworks/subnets",
"apiVersion": "[providers(‘Microsoft.Network’,’virtualNetworks’).apiVersions[0]]",
"name": "[concat(variables(‘vVNETName’), ‘/’,parameters(‘pSubnetName’))]",
"dependsOn": [
"[resourceId(‘Microsoft.Network/virtualNetworks’, variables(‘vVNETName’))]"
],
"properties": {
"addressPrefix": "192.168.12.0/24",
"delegations": []
}
}
]
}
The same way that we added resource groups and resource manager templates, we can add policy and role assignments. The final result of your working Blueprint will be something similar to the image depicted below. When you have a working blueprint, click on Save Draft.
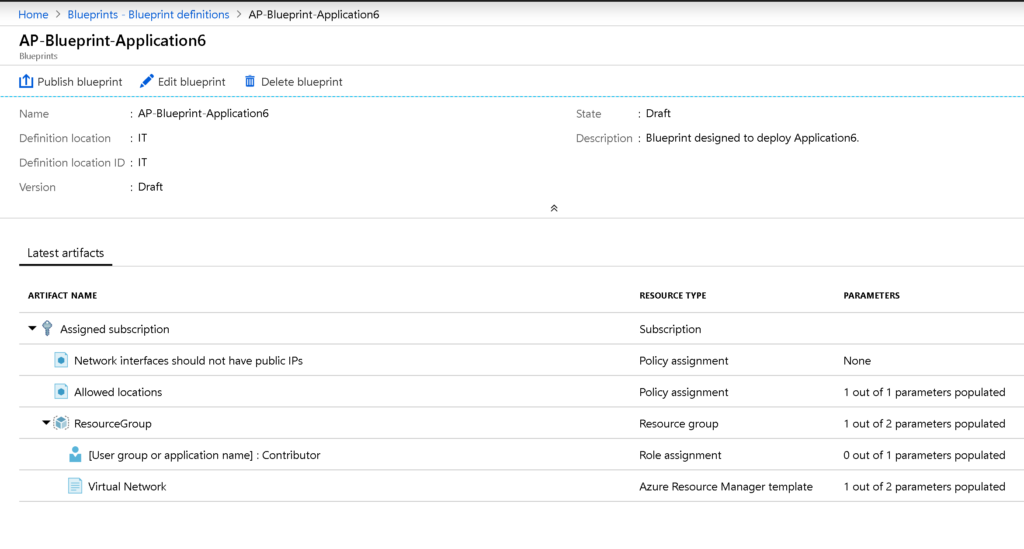
To check existent Azure Blueprints and the ones recently created, click on Blueprint definitions. A list of all blueprints with their latest versions, published status, and location will be listed. Click on the one that we have just created.
We can go back and do more changes by clicking on Edit blueprint. When the blueprint is in a working condition, click on Publish blueprint. The result will be a new blade on the right side, and we need to define the new version that we are going to assign, some notes, and then click on Publish.
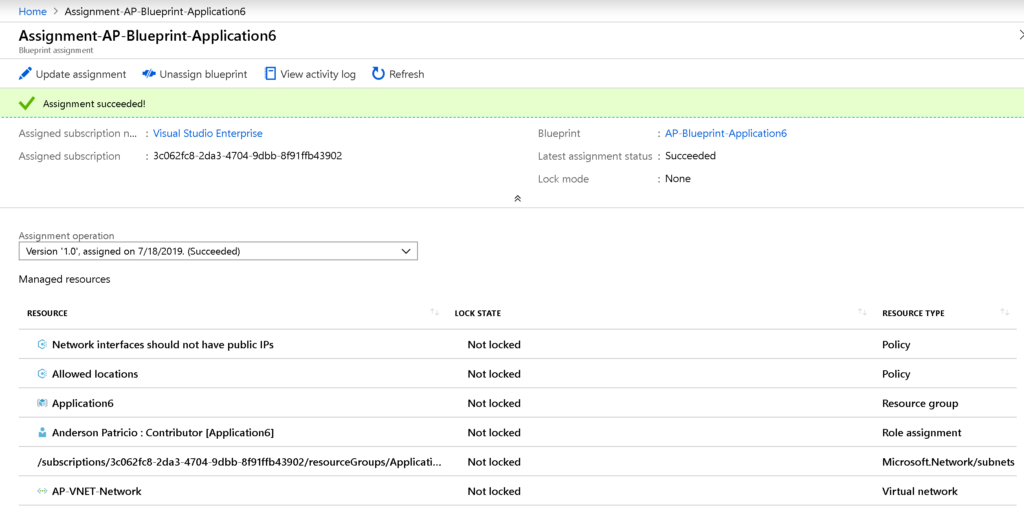
When a blueprint reaches the published state, we can assign it. Click on Assign blueprint, which now is available. The Assign Blueprint page will have two sections: Basics and Artifacts. At this time, we need to fill out the parameters.
In the Basics, we need to select the subscription that we will apply this current Blueprint, a location and this location is required to define where the Managed Account will be created. This Managed account will be responsible for the deployment. (We can assign a managed account instead of an automatic one.)
Before completing this section of the wizard, we can define the version (if there is more than one) that we want to assign. Lastly, we can take advantage of Locks feature as part of the deployment and configure for this deployment. Note: Locks may take up to 30 minutes to take effect.

In the Artifact parameters section, all variables that are dynamic require to be filled out with the proper information. When complete click on Assign.

The process may take some time, and the result of the assignment process will be displayed on the same blade. Wait for the confirmation.
Azure Blueprints: A building block for cloud architects
The result is a new resource group, new Azure policies, new RBAC permissions, and resources being added in the subscription that we selected when assigning Azure Blueprints. This feature helps cloud architects express their designs in a package and distribute that to the operations team to deploy the solution.
Featured image: Shutterstock


