If you would like to read the other parts in this article series please go to:
- Configuring the Native Exchange 2007 MP for OpsMgr 2007 R2 (Part 1)
- Configuring the Native Exchange 2007 MP for OpsMgr 2007 R2 (Part 2)
- Configuring the Native Exchange 2007 MP for OpsMgr 2007 R2 (Part 4)
- Configuring the Native Exchange 2007 MP for OpsMgr 2007 R2 (Part 5)
- Configuring the Native Exchange 2007 MP for OpsMgr 2007 R2 (Part 6)
Enable Exchange 2007 Server Role Discovery
After importing the Exchange 2007 MP, it will not start discovering Exchange machines immediately. This behavior is by design so that you can first test the management pack on a limited set of servers.
There is though a lightweight registry discovery that runs automatically on all Windows servers, the Exchange 2007 Discovery Helper, its only purpose is to discover Exchange 2007 servers in your environment without actually starting monitoring them (allowing you to see the “big picture”).
Verifying the Discovery Helper results should be the first action after importing the Exchange 2007 MP.
- In the Operations Console, click the Monitoring button, navigate to Discovered Inventory and then click Change Target Type in the Actions pane. In the Look for field, type Exchange 2007 Discovery Helper, select it, and then click OK (Figure 1). A list of Exchange 2007 servers appears with a status of Not Monitored (Figure 2).
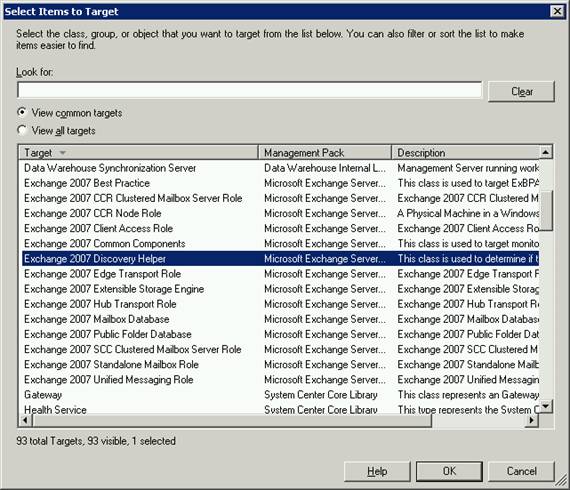
Figure 1: Select Items to Target
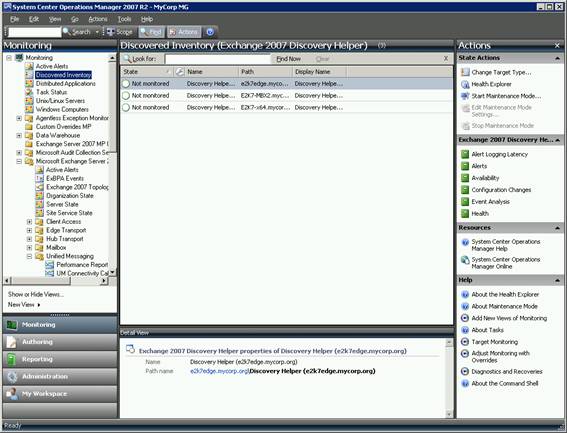
Figure 2: Discovered Inventory
- Next, we will need to enable Exchange 2007 Server Role Discovery. Go to the Object Discoveries node located under Management Pack Objects, in the Authoring section of the Operations Console. In the Look for field, type Exchange 2007 Server Role and click Find Now. A list of Exchange 2007 Server Role Discoveries appears (Figure 3). Notice the Enabled by default column, most of the role discoveries are disabled.
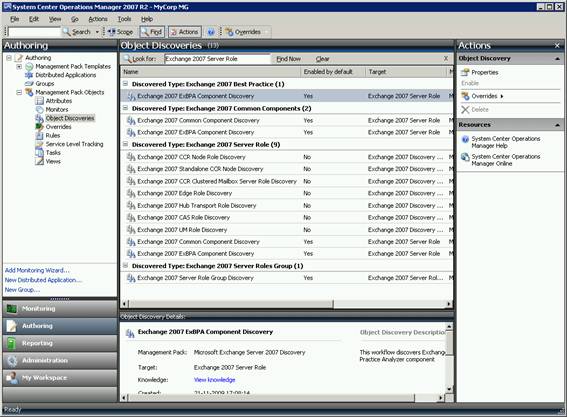
Figure 3: Object Discoveries
Although one can feel compelled to enable all the roles at once, my recommendation is to enable just the roles you effectively have in your environment.
|
Discovery Name |
Description |
|
Exchange 2007 CCR Clustered Mailbox Server Role Discovery |
Discovers CCR and SCC clustered Mailbox servers |
|
Exchange 2007 CCR Node Role Discovery |
Discovers CCR node servers in a CCR cluster (the physical nodes) |
|
Exchange 2007 Standalone CCR Node Discovery |
Discovers standalone CCR node roles (nodes that are participating in log shipping but are not part of an active Mailbox server) and standalone mailbox roles (also includes SCR targets) |
|
Exchange 2007 CAS Role Discovery |
Discovers Client Access server roles |
|
Exchange 2007 Hub Transport Role Discovery |
Discovers Hub Transport server roles |
|
Exchange 2007 Edge Role Discovery |
Discovers Edge Transport server roles |
|
Exchange 2007 UM Role Discovery |
Discovers Unified Messaging (UM) roles Bottom of Form |
Table 1: Exchange Server Role Discoveries
Note:
To discover standalone Exchange Mailbox servers you have to enable Exchange 2007 Standalone CCR Node Discovery.
- The process of enabling each role is the same, for example, to enable discovery of all Edge servers, right-click the Exchange 2007 Edge Role Discovery and select Overrides | Override the Object Discovery | For all objects of class: Exchange 2007 Discovery Helper (Figure 4).
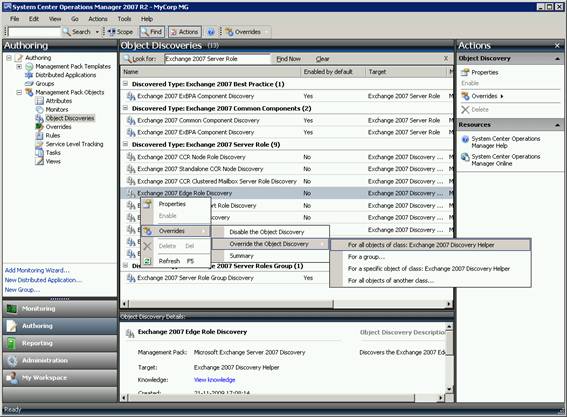
Figure 4: Override the Object Discovery
- In the Override Properties dialog box, set the Enabled parameter to True, choose a destination management pack and click OK.
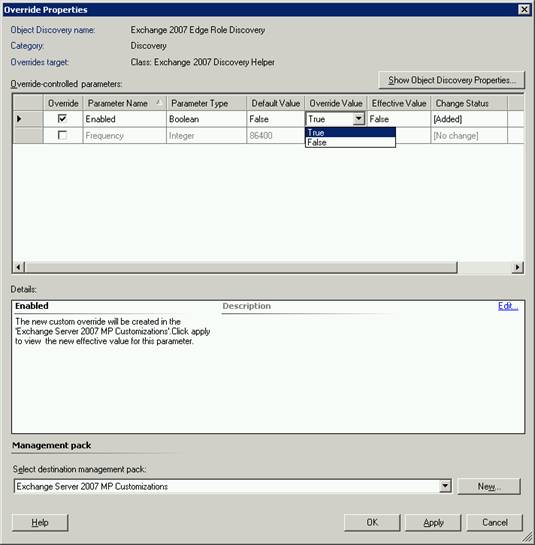
Figure 5: Exchange 2007 Edge Role Discovery: Override Properties
Exchange 2007 discoveries run every 24 hours by default, meaning you may have to wait until you start seeing your Exchange servers correctly categorized.
Configure Disk Monitoring
I am sure that everyone agrees that disk monitoring is absolutely crucial to guarantee overall system health on any Exchange 2007 environment. But doubling the monitoring will not necessarily mean better results… Why am I talking about double disk monitoring? Because Exchange 2007 disk monitoring discovers the following disks (mount points are also considered as Exchange 2007 disks):
-
Disks that store an Exchange 2007 mailbox database file
-
Disks that store an Exchange 2007 mailbox log file
-
Disks that store Exchange 2007 Hub or Edge Queue files
Since one of the additional imported management packs was Windows (the Server Operating System MP), it is likely that you are also monitoring disk usage using this management pack, causing duplication of disk space alerts.
To prevent duplication of alerts, it is recommended to disable Exchange disks monitoring from one of the management packs (Exchange 2007 or Windows Operating System). Although the same result can be achieved by disabling the correct monitors on either of the management packs, I prefer to disable disk monitoring from the Windows Server Operating System MP.
Please be aware that the Exchange Server 2007 MP only discovers disks that contain the Mailbox database, log files or queue files, meaning that you might not want to disable disk monitoring for system disks from the Windows Server Operating System MP (assuming system disks do not contain Exchange data files).
- To disable disk monitoring for Exchange servers from the Windows Server Operating System MP, in the Authoring section of the console, go to the Monitors node, under Management Pack Objects. Click Change Scope and in the Look for field, type Logical Disk (Figure 6). Select logical disk classes from all operating system versions where you are running Exchange 2007 servers and click OK.
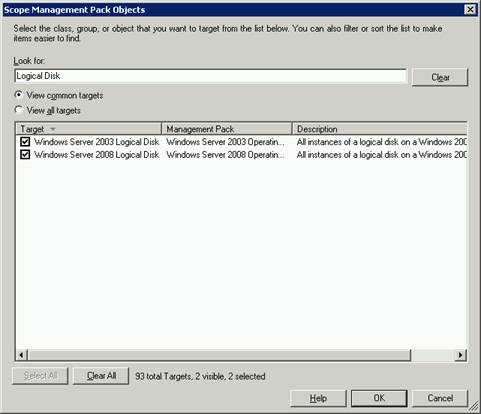
Figure 6: Scope Management Pack Objects: Logical Disk
- Expand Windows Server 200x Logical Disk, expand Entity Health, and then expand Availability to see the Logical Disk Availability and Logical Disk Free Space monitors. Right-click the Logical Disk Free Space monitor, click Overrides | Override the Monitor | For a group (Figure 7). Select the Exchange 2007 Computer Group, and click OK (Figure 8).
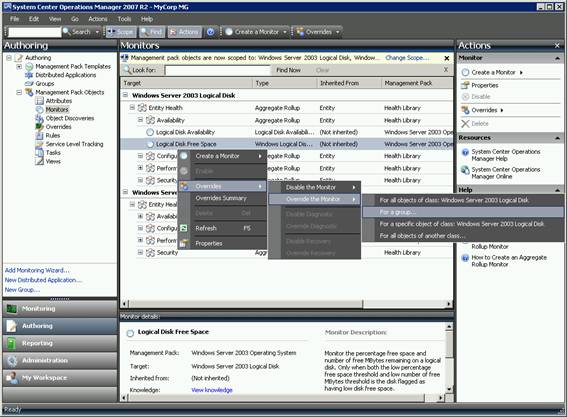
Figure 7: Override the Monitor: Logical Disk Free Space
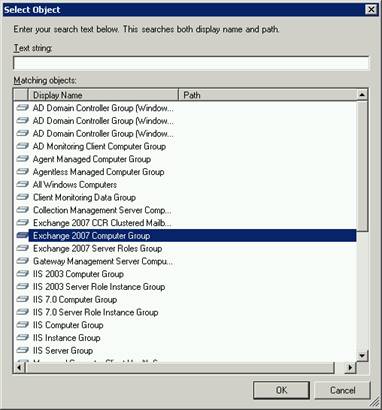
Figure 8: Select Object
- In the Override Properties dialog box, set the Enabled parameter to False, and then choose a destination management pack (Figure 9). Perform the same procedure for the Logical Disk Availability Monitor (Figure 10) as well as for the other disk monitors under Performance: Average Disk Seconds Per Transfer (Figure 11), Average Disk Seconds Per Read and Average Disk Seconds Per Write (these last 2 might not be enabled by default).
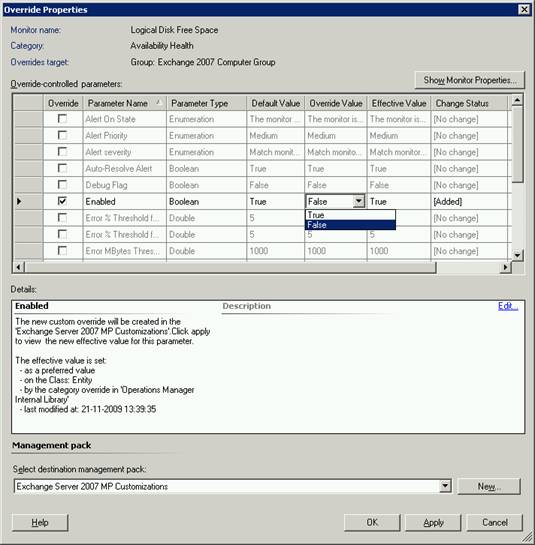
Figure 9: Logical Disk Free Space: Override Properties

Figure 10: Logical Disk Availability: Override Properties
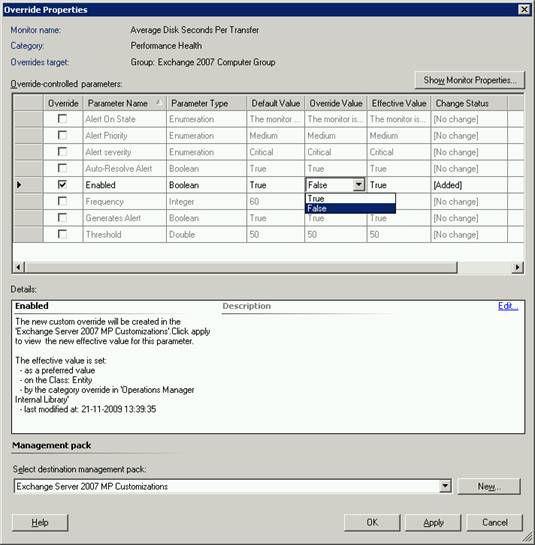
Figure 11: Average Disk Seconds Per Transfer: Override Properties
- There is a specific monitor from the Windows Operating system MP called Logical Disk Fragmentation Level (under Performance). Although this one is not duplicated on the Exchange 2007 MP, my recommendation is to disable it as well (Figure 12).
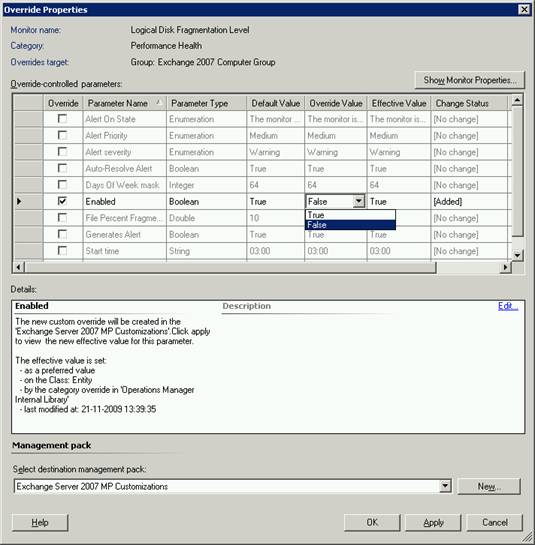
Figure 12: Logical Disk Fragmentation Level: Override Properties
- Repeat steps 2, 3 and 4 for logical disk monitors belonging to any other operating system versions.
- After preventing duplication of disk alerts, we should tune the Exchange 2007 monitors to match our environment thresholds. To configure Exchange 2007 Disk Monitoring, in the Operations Console, click Authoring and then click Monitors. Click the Scope button on the toolbar, ensure that View all targets is selected and in the Look for field, type Disk. Select Exchange 2007 Mailbox Database Disk, Exchange 2007 Mailbox Log Disk and Exchange 2007 Queue Disk, and then click OK (Figure 13).
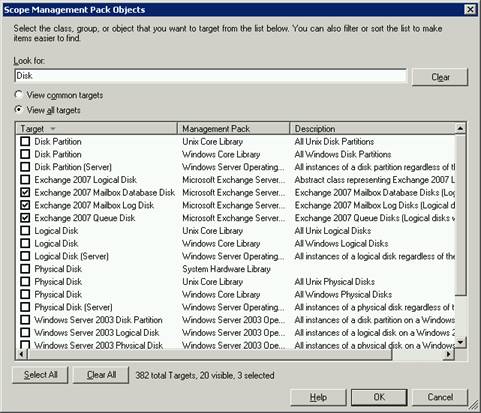
Figure 13: Scope Management Pack Objects: Disk
- Expand Exchange 2007 Mailbox Database Disk, expand Availability and right-click Exchange 2007 MDB Disk Free Space Monitor. Select Overrides | Override the Monitor | For all objects of class: Exchange 2007 Mailbox Database Disk (Figure 14).

Figure 14: Override the Monitor: Exchange 2007 MDB Disk Free Space Monitor
- In the Overrides Properties window, adjust the parameters to fit your environment (Figure 15). Note that you can set a megabyte warning or error threshold, as well as a percentage free space threshold (the alert will only be raised if *both* the parameters are exceeded). By applying overrides to this monitor, you can do it once for all Exchange 2007 disks with mailbox databases on them.
- Repeat steps 7 and 8 for the disk monitors from the Exchange 2007 Mailbox Log Disk and Exchange 2007 Queue Disk classes.
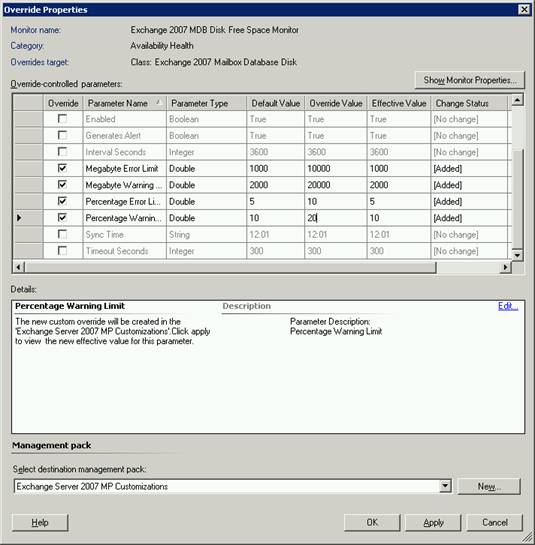
Figure 15: Exchange 2007 MDB Disk Free Space Monitor: Override Properties
Configure Internet Information Services (IIS) Monitoring
A similar situation to the one described in the previous section happens with service alerts for the WWW and IIS Admin Services on Client Access servers, since both the Exchange 2007 MP and the IIS Management Pack contain those monitors. To prevent duplication, we’ll disable these monitors in the Exchange Server 2007 MP.
- To disable WWW and IIS Admin Service monitors go to the Monitors node, under Management Pack Objects in the Authoring section of the Operations Console. Set your scope to Exchange 2007 Client Access Role and then expand Entity Health, expand Availability and expand Client Access Server Core Services Rollup.
Right click Exchange 2007 IIS Admin Service Monitor on CAS and then click Overrides | Disable the Monitor | For all objects of class: Exchange 2007 Client Access Role (Figure 16). - Repeat last step for Exchange 2007 WWW Publishing Service Monitor (Figure 17).

Figure 16: Disable the Monitor: Exchange 2007 IIS Admin Service Monitor on CAS

Figure 17: Disable the Monitor: Exchange 2007 WWW Publishing Service Monitor
Assign Edge Servers to a Particular Organization and Site
By default, the Exchange 2007 MP assigns all Edge Transport servers to a separate organization, Default-Edge Organization, and site called Default-Edge Site. This is what shows up in the topology view (Figure 18).

Figure 18: Exchange 2007 Topology before reassigning Edge
If you prefer visualizing Edge Transport servers under the same organization and site of your choice, overrides can be used.
- Go to the Object Discoveries node located under Management Pack Objects, in the Authoring section of the Operations Console. In the Look for field, type Exchange 2007 Site Edge and click Find Now. Right-click the Exchange 2007 Site Edge on Edge Discovery and select Overrides | Override the Object Discovery | For all objects of class: Exchange 2007 Edge Transport Role (Figure 19).
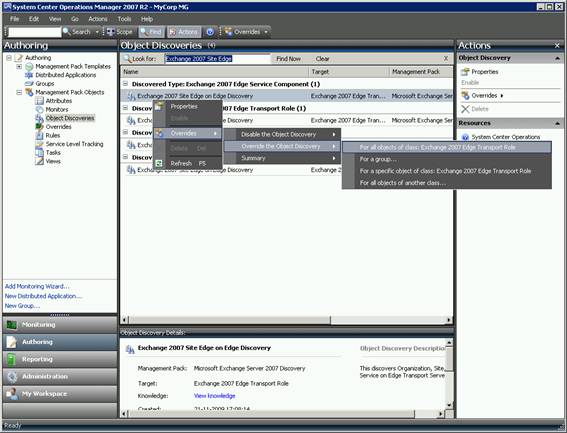
Figure 19: Override the Object Discovery: Exchange 2007 Site Edge on Edge Discovery
- In the Override Properties dialog box, there are 2 parameters that can be configured: AD Site Name and Forest DNS Name. Modify them accordingly to match your environment, select a destination management pack and click OK (Figure 20). If you enter the same organization and site names as existing organizations and sites discovered by other Exchange roles, the Edge Transport servers will join those existing sites in the topology view (Figure 21).
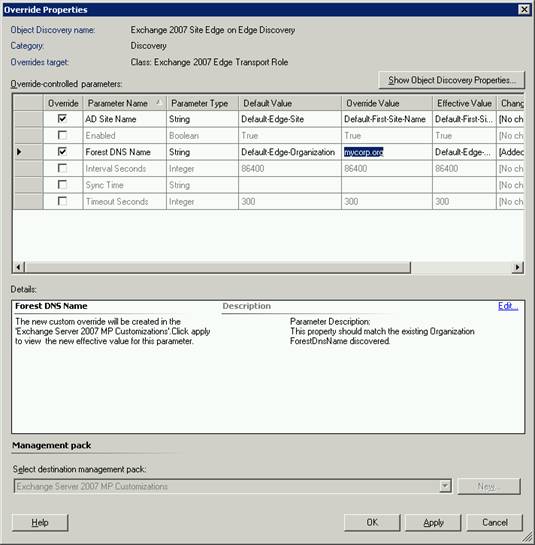
Figure 20: Exchange 2007 Site Edge on Edge Discovery: Override Properties
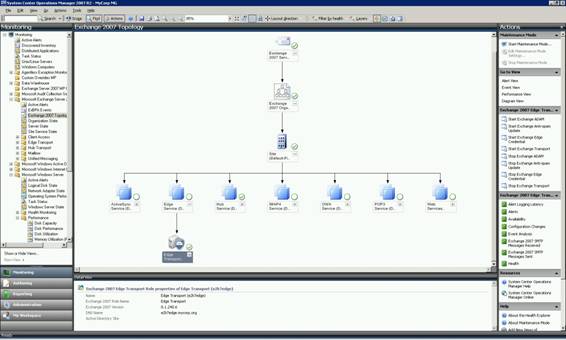
Figure 21: Exchange 2007 Topology after assigning Edge
Summary
And this concludes the 3rdpart of the article, with 7 configuration steps (out of 11) already covered. Part 4 will be dedicated to 1 step only: configuring mail flow and CAS synthetic transactions.
If you would like to be notified of when Rui Silva releases the next part in this article series please sign up to our MSExchange.org Real-Time Article Update newsletter.
If you would like to read the other parts in this article series please go to:
- Configuring the Native Exchange 2007 MP for OpsMgr 2007 R2 (Part 1)
- Configuring the Native Exchange 2007 MP for OpsMgr 2007 R2 (Part 2)
- Configuring the Native Exchange 2007 MP for OpsMgr 2007 R2 (Part 4)
- Configuring the Native Exchange 2007 MP for OpsMgr 2007 R2 (Part 5)
- Configuring the Native Exchange 2007 MP for OpsMgr 2007 R2 (Part 6)


