If you would like to read previous articles in this series, please go to:
- Deploying Windows 7 – Part 1: Windows AIK 2.0 Enhancements
- Deploying Windows 7 – Part 2: Using DISM
- Deploying Windows 7 – Part 3: Understanding MAP 4.0
- Deploying Windows 7 – Part 4: Using MAP 4.0
- Deploying Windows 7 – Part 5: MDT 2010 Enhancements
- Deploying Windows 7 – Part 6: Lite Touch using MDT 2010
- Deploying Windows 7 – Part 7: Automated LTI Deployment
- Deploying Windows 7 – Part 8: Understanding LTI Configuration Files
- Deploying Windows 7 – Part 9: Deploying 32-bit vs. 64-bit Windows
- Deploying Windows 7 – Part 11: Capturing an Existing Installation
- Deploying Windows 7 – Part 12: Planning for Application Compatibility
- Deploying Windows 7 – Part 13: Manual Migration from Windows XP to Windows 7
- Deploying Windows 7 – Part 14: Automated Migration from Windows XP to Windows 7
- Deploying Windows 7 – Part 15: Configuring the MDT Database
- Deploying Windows 7 – Part 16: Using the MDT Database
- Deploying Windows 7 – Part 17: Deploying Applications Based on Make and Model
- Deploying Windows 7 – Part 18: Determining the UUID of a Computer
- Deploying Windows 7 – Part 19: Building a Custom WinPE Tools CD
- Deploying Windows 7 – Part 20: Securing MDT (Part 1)
- Deploying Windows 7 – Part 21: Securing MDT (Part 2)
- Deploying Windows 7 – Part 22: Bulk Populating the MDT Database Using PowerShell
- Deploying Windows 7 – Part 23: Managing Drivers – Introduction
- Deploying Windows 7 – Part 24: Managing Drivers – Issues and Approaches
- Deploying Windows 7 – Part 25: Managing Drivers – Selection Profiles
- Deploying Windows 7 – Part 26: Managing Drivers – By Make and Model
- Deploying Windows 7 – Part 27: Managing Drivers – Tips and Tricks
- Deploying Windows 7 – Part 28: Managing Software Updates
- Deploying Windows 7 – Part 29: Completing the LTI Deployment Infrastructure

Tip:
You can find more information about automating LTI deployment in the Windows 7 Resource Kit from Microsoft Press. I’m the lead author for this Resource Kit and I also maintain the Unofficial Support Site for the Windows 7 Resource Kit where you will find the latest updates and other useful information.
Introduction
In articles 6 and 7 of this series we examined how to perform a simple, automated deployment of Windows 7 Enterprise by performing a Lite Touch Installation (LTI) using MDT 2010. Then in article 8 we examined the CustomSettings.ini and Bootstrap.ini files in detail and how these two configuration files can be used to customize the deployment process by making it more automated. In larger organizations however, performing one-off installs of Windows is too simplistic. Instead, you will want to do first create a reference computer, that is, a computer that is configured exactly how you want your users’ computers to be configured. Then you will want to capture the image of this reference computer and import the captured image into your deployment share. Finally, you will want to deploy this captured image to your users’ computers, that is, the target computers for the deployment. This is what we will look at in this present article.
Step 1: Install the Reference Computer and Capture its Image
After your planning work has been done, the first step in image-based deployment is to install your reference computer. As discussed in article 9 of this series, we are going to focus here on deploying Windows 7 Enterprise x64 edition from here on out in this series of articles. So begin by opening the Deployment Workbench on your technician computer, expand your deployment share, right-click on the Operating Systems folder, and select Import Operating System. Then follow the steps of the Import Operating System wizard to import a full set of source files from your Windows 7 Enterprise X64 DVD. Once you have finished the import process, your Deployment Workbench will look like Figure 1 below:
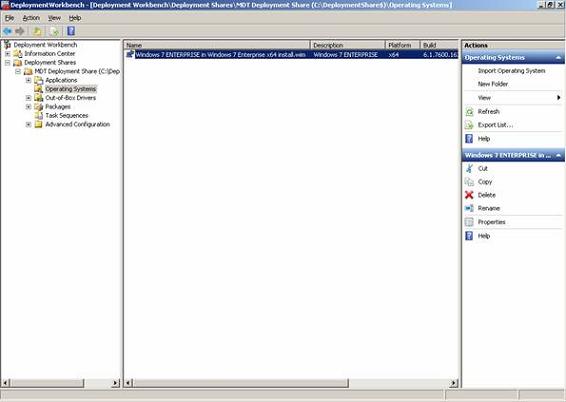
Figure 1: Windows 7 Enterprise x64 edition has been imported into the deployment share
Tip:
To speed the OS import process, first copy all the files and folders from the Windows DVD to a local folder on your technician computer, then import the OS from this local folder instead of from the DVD itself.
Next, create a new task sequence for deploying Windows onto your reference computer. In your deployment share, right-click on the Task Sequences node and select New Task Sequence to start the wizard. Type WIN7EX64_REF_001 as the task sequence ID and give the task sequence a descriptive name as shown in Figure 2 below:

Figure 2: Creating a task sequence for deploying Windows onto the reference computer
On the next page, select the Standard Client Task Sequence template. Then on the Select OS page, select the Windows 7 Enterprise x64 source files you previously imported (Figure 3):
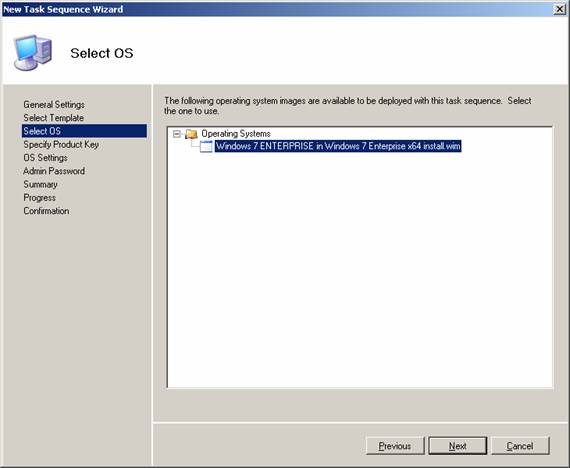
Figure 3: Associating an operating system with the task sequence
Complete the New Task Sequence Wizard in the usual way. Your new task sequence will be displayed in Deployment Workbench along with other task sequences you previously created (see Figure 4):
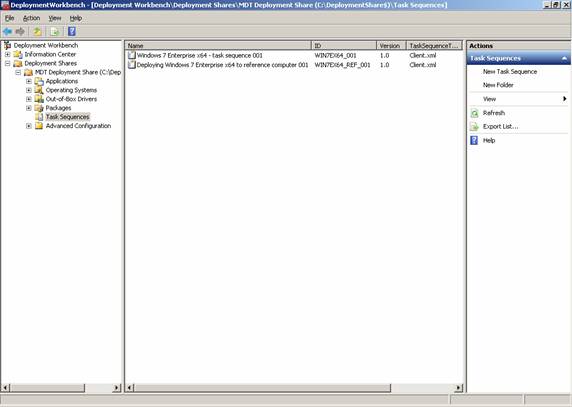
Figure 4: There are two task sequences in this deployment share
Now, before you deploy Windows to your reference computer, you need to make some changes to the CustomSettings.ini file on your technician computer. Right-click on your deployment share and select Properties, then select the Rules tab to display the contents of CustomSettings.ini. Modify what you see here so that it looks like Figure 5 below:
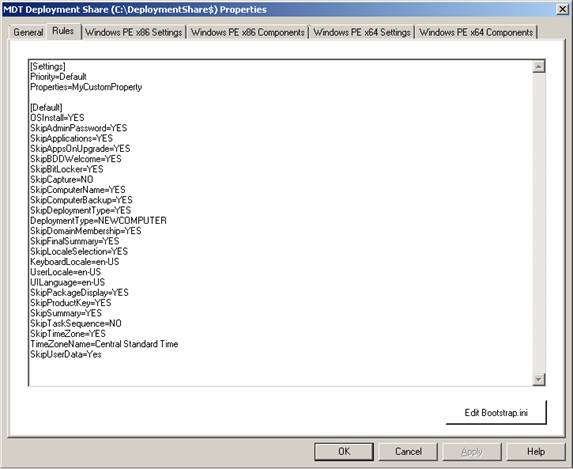
Figure 5: Modifying the CustomSettings.ini file for deploying Windows to the reference computer
Let us compare our new CustomSettings.ini file with the one we previously used in article 7 of this series for performing a completely unattended install. The table below shows these two configuration files side by side with the new file on the left and with differences highlighted in bold:
|
CustomSettings.ini file for deploying Windows to reference computer |
Customsettings.ini file for performing a completely automated LTI |
|
[Settings] Priority=Default Properties=MyCustomProperty [Default] OSInstall=YES SkipAdminPassword=YES SkipApplications=YES SkipAppsOnUpgrade=YES SkipBDDWelcome=YES SkipBitLocker=YES SkipCapture=NO SkipComputerName=YES SkipComputerBackup=YES SkipDeploymentType=YES DeploymentType=NEWCOMPUTER SkipDomainMembership=YES SkipFinalSummary=YES SkipLocaleSelection=YES KeyboardLocale=en-US UserLocale=en-US UILanguage=en-US SkipPackageDisplay=YES SkipProductKey=YES SkipSummary=YES SkipTaskSequence=NO SkipTimeZone=YES TimeZoneName=Central Standard Time SkipUserData=Yes |
[Settings] Priority=Default Properties=MyCustomProperty [Default] OSInstall=YES SkipAdminPassword=YES SkipApplications=YES SkipAppsOnUpgrade=YES SkipBDDWelcome=YES SkipBitLocker=YES SkipCapture=YES SkipComputerName=YES SkipComputerBackup=YES SkipDeploymentType=YES DeploymentType=NEWCOMPUTER SkipDomainMembership=YES JoinDomain=CONTOSO DomainAdmin=Administrator DomainAdminDomain=CONTOSO DomainAdminPassword=Pa$$w0rd SkipFinalSummary=YES SkipLocaleSelection=YES KeyboardLocale=en-US UserLocale=en-US UILanguage=en-US SkipPackageDisplay=YES SkipProductKey=YES SkipSummary=YES SkipTaskSequence=YES TaskSequenceID=WIN7_001 SkipTimeZone=YES TimeZoneName=Central Standard Time SkipUserData=Yes |
First, note that the value of the SkipTaskSequence property has been changed from YES to NO, and there is now no TaskSequenceID property. Making this change means that the Select A Task Sequence To Execute On This Computer page of the Windows Deployment Wizard will be displayed on the client (the reference computer) when the install is performed.
Second, note that the value of SkipCapture has been changed from YES to NO. This means that the Specify Whether To Capture An Image page of the Windows Deployment Wizard will also be displayed on the client when the install is performed.
Also, note that the JoinDomain and related properties are no longer specified. This is important. If you do not omit these lines, the Specify Whether To Capture An Image page of the wizard would not be displayed.
Now update your deployment share to create a LiteTouchPE_x64.iso file you can burn to a CD so you can boot your reference computer. To speed this up, you can clear the x86 checkbox on the General tab of the properties of your deployment share as shown in Figure 6 below. When you do, this MDT will only create a LiteTouchPE_x64.iso file when you update your deployment share and will not create a LiteTouchPE_x86.iso file. This will speed up the process of updating your deployment share if you are only deploying the 64-bit version of Windows.
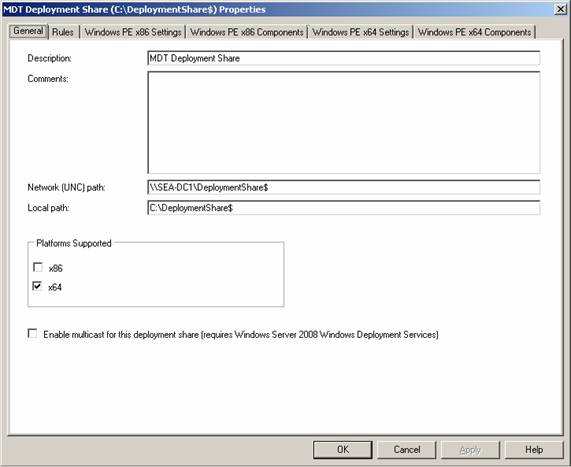
Figure 6: Configuring MDT to only create a 64-bit Windows PE image
At this point, you will want to add applications, packages and (if needed) out-of-box drivers to your deployment share. The goal here is to perform any customizations needed before you deploy Windows onto your reference computer. We will examine how to perform such customizations in a later article of this series.
At this point you are ready to deploy Windows onto your reference computer, so boot your reference computer, insert the 64-bit WinPE CD created by MDT, and wait for MDT to do its magic. When the Select A Task Sequence To Execute On This Computer page of the Windows Deployment Wizard appears, select the WIN7EX64_REF_001 task sequence from the list of task sequences displayed. Then when the Specify Whether To Capture An Image page appears, select the Capture An Image Of This Computer option and accept the default capture location and file name, which in this example will be:
Location: \\SEA-DC1\DeploymentShare$\Captures
File name: WIN7EX64_REF_001
The install will then proceed. Note that the install will take quite a bit longer than a simple LTI because once Windows has been installed on the reference computer and has been sysprepped, MDT will capture the image and upload it to the Captures folder of your deployment share, and capturing the image as a .wim file and copying it over the network to the deployment share can take some time. When the capture process is completed, the OOBE will be displayed on your reference computer (since it was sysprepped by MDT).
Step 2: Importing the Captured Image
The next step is to import the captured image of the reference computer. This captured image has been uploaded to the Captures folder of the deployment share as shown in Figure 7 next:
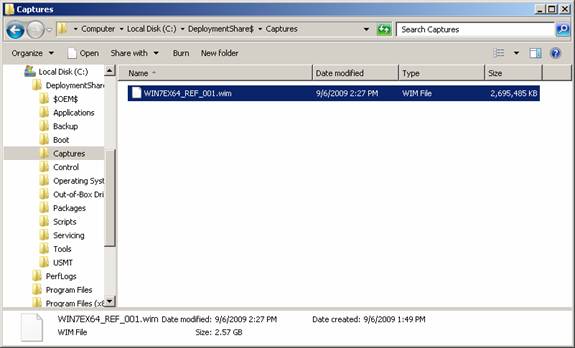
Figure 7: The captured image of the reference computer
To import this captured image into MDT, right-click on the Operating Systems folder in your deployment share and select Import Operating System. On the Source page of the Import Operating System Wizard, select Custom Image as shown in Figure 8:
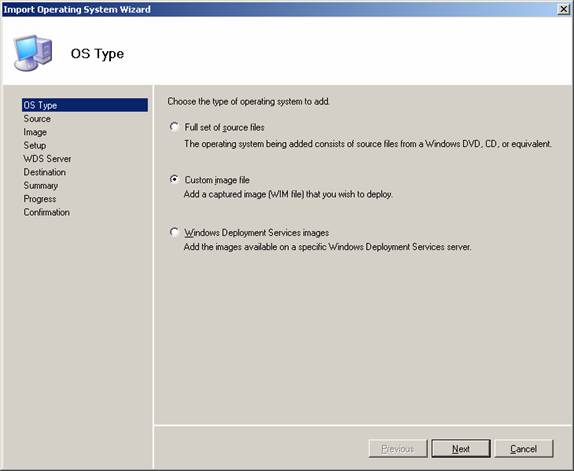
Figure 8: Importing a custom image
Click Next. On the Image page, browse to select the captured image (Figure 9). If you need to conserve disk space on the technician computer, you can select the checkbox to move the captured image instead of copying it.
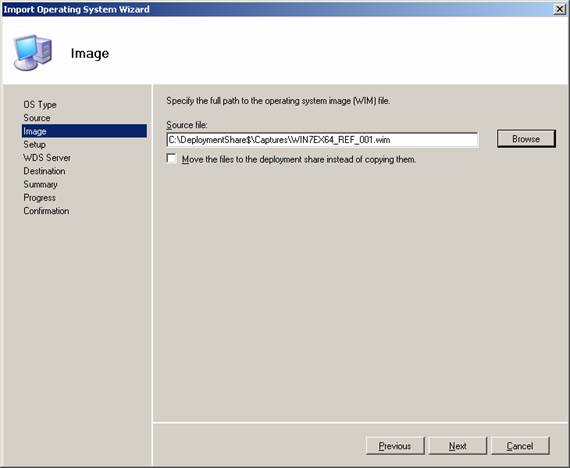
Figure 9: Selecting a custom image to import
Click Next. On the Setup page, leave the default option of Setup And Sysprep Files Are Not Needed selected (Figure 10):
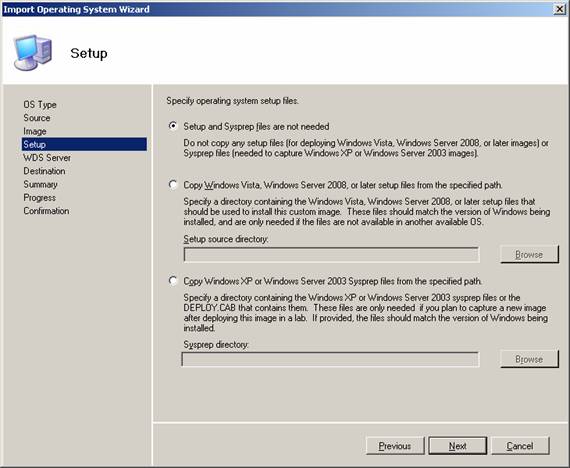
Figure 10: The Setup page of the Import Operating System Wizard
Now finish the wizard, accepting the defaults, to import the captured image into your deployment share. The captured image will be displayed in the Operating Systems folder of your deployment share (Figure 11) which means you can now deploy it to your target computers:
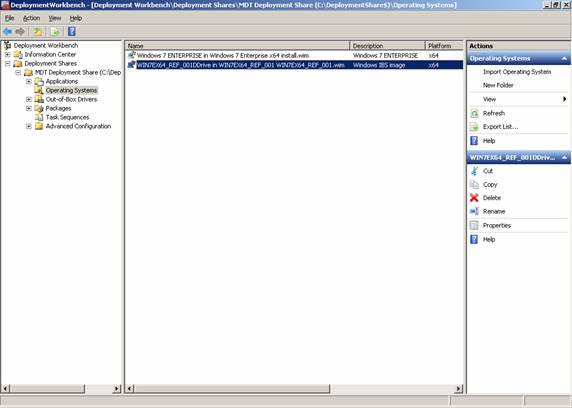
Figure 11: The captured image is ready to be deployed
Step 3: Deploying the Captured Image to Target Computers
You are now ready to deploy the captured image to target computers. Begin by creating a new task sequence with WIN7EX64_TARGET as its task sequence ID (Figure 12):
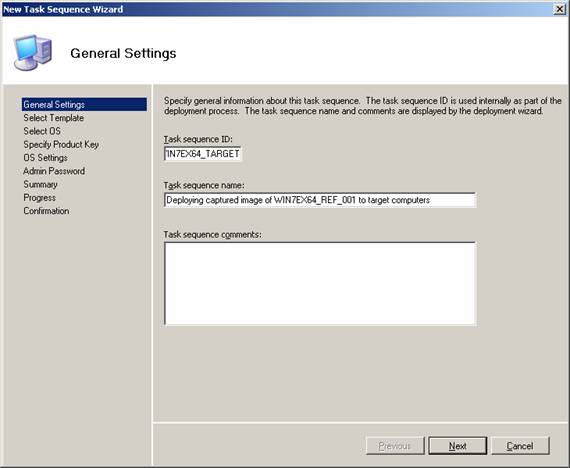
Figure 12: Creating a task sequence for deploying the captured image of the reference computer to your target computers
Select the Standard Client Task Sequence template, then associate the captured image with the task sequence as shown in Figure 13:
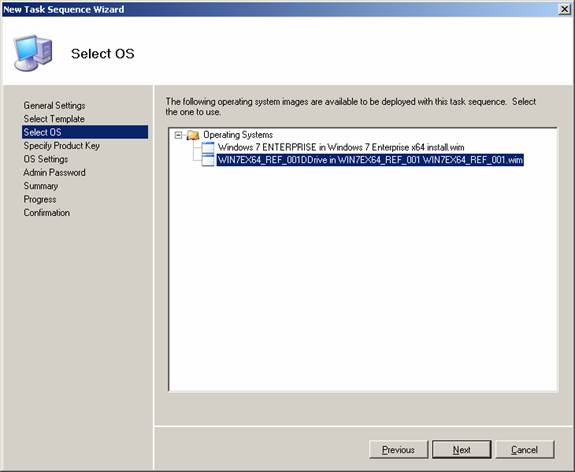
Figure 13: Associating the captured image of the reference computer with the task sequence
Now you will probably want to fully automate the deployment of the captured image of your reference computer to your target computers. To do this, open the Rules tab of the properties of your Deployment Share and restore the CustomSettings.ini file to the way it was before (see the right side of the table earlier in this article) with the exception that the TaskSequenceID property should have WIN7EX64_TARGET as its value (Figure 14):
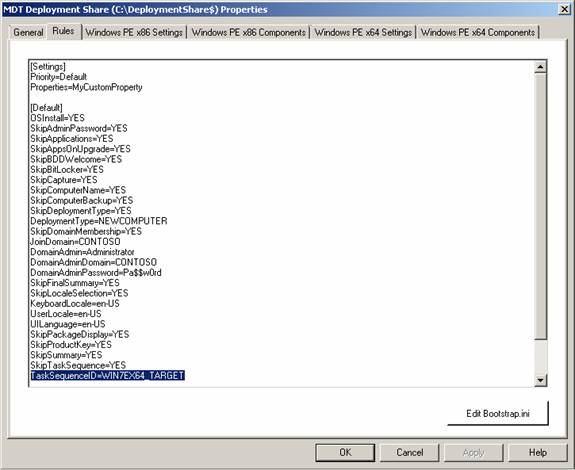
Figure 14: CustomSettings.ini file for fully automating the deployment of the captured image of the reference computer to target computers
Once you have modified your CustomSettings.ini file like this, boot one of your bare-metal target computers, insert your WinPE CD, and watch the captured image of your reference computer being automatically deployed to the target computer with no other intervention on your part.
If you would like to be notified when Mitch Tulloch releases the next part of this article series please sign up to the WindowsNetworking.com Real time article update newsletter.
If you would like to read previous articles in this series, please go to:
- Deploying Windows 7 – Part 1: Windows AIK 2.0 Enhancements
- Deploying Windows 7 – Part 2: Using DISM
- Deploying Windows 7 – Part 3: Understanding MAP 4.0
- Deploying Windows 7 – Part 4: Using MAP 4.0
- Deploying Windows 7 – Part 5: MDT 2010 Enhancements
- Deploying Windows 7 – Part 6: Lite Touch using MDT 2010
- Deploying Windows 7 – Part 7: Automated LTI Deployment
- Deploying Windows 7 – Part 8: Understanding LTI Configuration Files
- Deploying Windows 7 – Part 9: Deploying 32-bit vs. 64-bit Windows
- Deploying Windows 7 – Part 11: Capturing an Existing Installation
- Deploying Windows 7 – Part 12: Planning for Application Compatibility
- Deploying Windows 7 – Part 13: Manual Migration from Windows XP to Windows 7
- Deploying Windows 7 – Part 14: Automated Migration from Windows XP to Windows 7
- Deploying Windows 7 – Part 15: Configuring the MDT Database
- Deploying Windows 7 – Part 16: Using the MDT Database
- Deploying Windows 7 – Part 17: Deploying Applications Based on Make and Model
- Deploying Windows 7 – Part 18: Determining the UUID of a Computer
- Deploying Windows 7 – Part 19: Building a Custom WinPE Tools CD
- Deploying Windows 7 – Part 20: Securing MDT (Part 1)
- Deploying Windows 7 – Part 21: Securing MDT (Part 2)
- Deploying Windows 7 – Part 22: Bulk Populating the MDT Database Using PowerShell
- Deploying Windows 7 – Part 23: Managing Drivers – Introduction
- Deploying Windows 7 – Part 24: Managing Drivers – Issues and Approaches
- Deploying Windows 7 – Part 25: Managing Drivers – Selection Profiles
- Deploying Windows 7 – Part 26: Managing Drivers – By Make and Model
- Deploying Windows 7 – Part 27: Managing Drivers – Tips and Tricks
- Deploying Windows 7 – Part 28: Managing Software Updates
- Deploying Windows 7 – Part 29: Completing the LTI Deployment Infrastructure


