If you would like to read previous articles in this series, please go to:
- Deploying Windows 7 – Part 1: Windows AIK 2.0 Enhancements
- Deploying Windows 7 – Part 2: Using DISM
- Deploying Windows 7 – Part 3: Understanding MAP 4.0
- Deploying Windows 7 – Part 4: Using MAP 4.0
- Deploying Windows 7 – Part 5: MDT 2010 Enhancements
- Deploying Windows 7 – Part 6: Lite Touch using MDT 2010
- Deploying Windows 7 – Part 8: Understanding LTI Configuration Files
- Deploying Windows 7 – Part 9: Deploying 32-bit vs. 64-bit Windows
- Deploying Windows 7 – Part 10: Capturing and Deploying an Image of a Reference Computer
- Deploying Windows 7 – Part 11: Capturing an Existing Installation
- Deploying Windows 7 – Part 12: Planning for Application Compatibility
- Deploying Windows 7 – Part 13: Manual Migration from Windows XP to Windows 7
- Deploying Windows 7 – Part 14: Automated Migration from Windows XP to Windows 7
- Deploying Windows 7 – Part 15: Configuring the MDT Database
- Deploying Windows 7 – Part 16: Using the MDT Database
- Deploying Windows 7 – Part 17: Deploying Applications Based on Make and Model
- Deploying Windows 7 – Part 18: Determining the UUID of a Computer
- Deploying Windows 7 – Part 19: Building a Custom WinPE Tools CD
- Deploying Windows 7 – Part 20: Securing MDT (Part 1)
- Deploying Windows 7 – Part 21: Securing MDT (Part 2)
- Deploying Windows 7 – Part 22: Bulk Populating the MDT Database Using PowerShell
- Deploying Windows 7 Part 23: Managing Drivers – Introduction
- Deploying Windows 7 – Part 24: Managing Drivers – Issues and Approaches
- Deploying Windows 7 – Part 25: Managing Drivers – Selection Profiles
- Deploying Windows 7 – Part 26: Managing Drivers – By Make and Model
- Deploying Windows 7 – Part 27: Managing Drivers – Tips and Tricks
- Deploying Windows 7 – Part 28: Managing Software Updates
- Deploying Windows 7 – Part 29: Completing the LTI Deployment Infrastructure

Tip:
You can find more information about automating LTI deployment in the Windows 7 Resource Kit from Microsoft Press. I’m the lead author for this Resource Kit and I also maintain the Unofficial Support Site for the Windows 7 Resource Kit where you will find the latest updates and other useful information.
Introduction
In the previous article of this series we learned how to manually perform a basic Lite Touch Installation (LTI) deployment of Windows 7 Enterprise using MDT 2010. In this article we will learn how to complete and automate this process.
Automating LTI deployment of Windows 7 using MDT 2010 involves the following steps:
- Create a deployment share using the Deployment Workbench.
- Import Windows 7 source files into the share.
- Add packages, drivers, and applications to your share as needed.
- Create a basic task sequence based on the Standard Client Task Sequence template.
- Edit the CustomSettings.ini and BootStrap.ini configuration files as needed to automate the LTI deployment process.
- Update the deployment share to create Windows PE boot images (.iso and .wim files) and burn the .iso file to CD or DVD media.
- Boot the destination computer using the Windows PE boot image and let the install proceed entirely unattended.
We have already performed steps 1-4 in the previous article of this series, so all we need to do here is perform steps 5-7, so here goes.
Editing the Configuration Files
As in the previous version MDT 2008 Update , MDT 2010 uses configuration files to control the LTI deployment process. These configuration files provide input for the scripts that MDT uses to perform the install. There are two configuration files you must edit to perform a fully automated LTI deployment: CustomSettings.ini and BootStrap.ini. We have briefly examined these two files in Part 27 of my Deploying Vista series. Let us review what these files are for and dig into them a bit deeper this time.
To begin with, let us examine the default CustomSettings.ini file that MDT creates for the deployment share we created in the previous article. To view the contents of CustomSettings.ini, we will open the Deployment Workbench, right-click on the deployment share and select Properties, then select the Rules tab as shown in Figure 1:
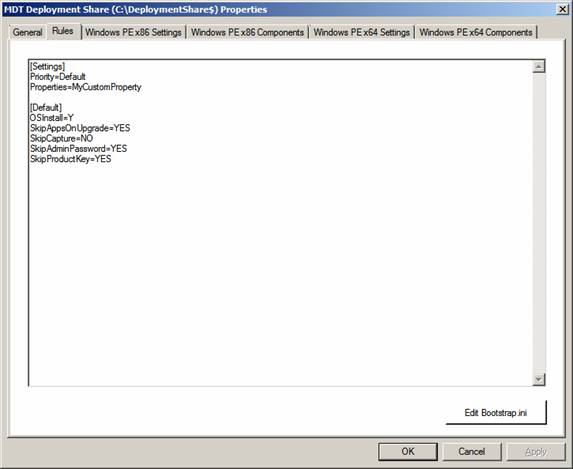
Figure 1: The default CustomSettings.ini file for a new deployment share
Notice that this default CustomSettings.ini file does not contain any information concerning which operating system image is to be deployed, which task sequence will be used, and so on. If this is the CustomSettings.ini file then information like that will need to be supplied during deployment, that is, by sitting at the destination computer and responding to the prompts of the Windows Deployment Wizard (see Part 26 of my Deploying Vista series for examples of such wizard prompts). Of course, that is not what we want to do—we want to automate the install.
Let us also examine the default BootStrap.ini file for our new deployment share, which is shown in Figure 2:
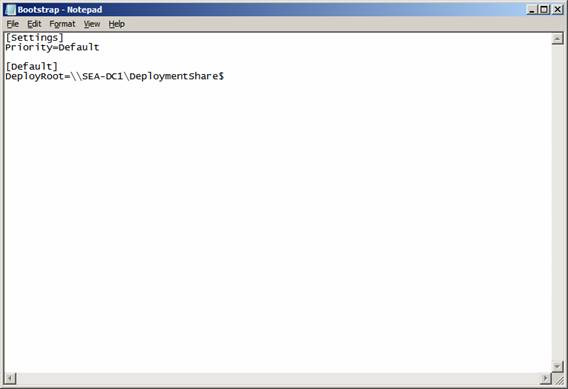
Figure 2: The default BootStrap.ini file for a new deployment share
Notice that this default BootStrap.ini file contains information about the network location of the deployment share, but it does not contain information concerning the credentials to be used in order to connect to this share. This is why one of the first things you are prompted to supply when you perform a manual LTI deployment is the credentials that the Windows Deployment Wizard will use to connect to the share. And of course, we do not want to have to supply this prompt or any prompt during installation—we want to fully automate the LTI deployment.
To do this, we need to make some changes to these two configuration files. But before we do this we need to ask ourselves some questions, such as:
- What time zone do we want to configure for the destination computer?
- What locale do we want to configure?
- Do we want to specify a computer name or let one be randomly assigned during installation?
- Do we want to join the computer to a domain or leave it in a workgroup?
- And so on.
The answers you provide for these questions and other questions will determine what property/value pairs you include in your CustomSettings.ini file. As an example of how to perform a fully automated LTI deployment, let’s change the default CustomSettings.ini to the following:
[Settings]
Priority=Default
Properties=MyCustomProperty
[Default]
OSInstall=YES
SkipAdminPassword=YES
SkipApplications=YES
SkipAppsOnUpgrade=YES
SkipBDDWelcome=YES
SkipBitLocker=YES
SkipCapture=YES
SkipComputerName=YES
SkipComputerBackup=YES
SkipDeploymentType=YES
DeploymentType=NEWCOMPUTER
SkipDomainMembership=YES
JoinDomain=CONTOSO
DomainAdmin=Administrator
DomainAdminDomain=CONTOSO
DomainAdminPassword=Pa$$w0rd
SkipFinalSummary=YES
SkipLocaleSelection=YES
KeyboardLocale=en-US
UserLocale=en-US
UILanguage=en-US
SkipPackageDisplay=YES
SkipProductKey=YES
SkipSummary=YES
SkipTaskSequence=YES
TaskSequenceID=WIN7_001
SkipTimeZone=YES
TimeZoneName=Central Standard Time
SkipUserData=Yes
Note:
The blank lines in the listing above are there only to make the contents of the file more readable, and they can be omitted if desired.
Figure 3 shows what this looks like after we have copied and pasted this into the Rules tab:

Figure 3: Example of a CustomSettings.ini file for a fully automated LTI deployment
We will also need to make changes to the default BootStrap.ini file in order to automate our deployment. Figure 4 shows what our new BootStrap.ini file will need to look like:

Figure 4: Example of a BootStrap.ini file for a fully automated LTI deployment
In the next article we will examine these two edited files line by line to understand them. But for now, if you have completed the walkthrough in the previous article, just make the changes indicated to these two files and save them. Then complete the steps in the two sections that follow.
Updating the Deployment Share
Updating a deployment share creates Windows PE boot images we can use for initiating deployment. We learned how to update a deployment share in the previous article of this series. In fact, we updated our deployment share in the previous article, so why do we have to update it again? Because we made changes to the BootStrap.ini file. Any time you make a change to your BootStrap.ini file, you must update your deployment share. So if you’re following along, update your deployment share now, then burn the LiteTouchPE_x86.iso file to CD-R/W media using third-party CD/DVD-burning software.
Launching the Unattended Install
Now turn on your bare-metal (no OS or partitions) destination computer, making sure it is connected to the network where your MDT computer resides. Insert the Windows PE CD you burned in the previous step, and sit back and watch. Windows PE will boot and display a blue screen with a Solution Accelerators banner across the bottom. Behind the scenes, Windows PE will establish a connection to your deployment share using the credentials provided in your BootStrap.ini file. Once this connection has been established, the installation will begin and an Installation Progress dialog box will be displayed. Your computer will reboot several times until finally, without the need of you supplying any further keystrokes, the Windows 7 desktop will appear and your install will be finished.
Conclusion
This article walked you through the steps for performing a fully automated LTI deployment using MDT 2010. The next article in this series will dig deeper into the CustomSettings.ini and BootStrap.ini property/value pairs you can use for automating LTI deployment.
If you would like to be notified when Mitch Tulloch releases the next part of this article series please sign up to the WindowsNetworking.com Real time article update newsletter.
If you would like to read previous articles in this series, please go to:
- Deploying Windows 7 – Part 1: Windows AIK 2.0 Enhancements
- Deploying Windows 7 – Part 2: Using DISM
- Deploying Windows 7 – Part 3: Understanding MAP 4.0
- Deploying Windows 7 – Part 4: Using MAP 4.0
- Deploying Windows 7 – Part 5: MDT 2010 Enhancements
- Deploying Windows 7 – Part 6: Lite Touch using MDT 2010
- Deploying Windows 7 – Part 8: Understanding LTI Configuration Files
- Deploying Windows 7 – Part 9: Deploying 32-bit vs. 64-bit Windows
- Deploying Windows 7 – Part 10: Capturing and Deploying an Image of a Reference Computer
- Deploying Windows 7 – Part 11: Capturing an Existing Installation
- Deploying Windows 7 – Part 12: Planning for Application Compatibility
- Deploying Windows 7 – Part 13: Manual Migration from Windows XP to Windows 7
- Deploying Windows 7 – Part 14: Automated Migration from Windows XP to Windows 7
- Deploying Windows 7 – Part 15: Configuring the MDT Database
- Deploying Windows 7 – Part 16: Using the MDT Database
- Deploying Windows 7 – Part 17: Deploying Applications Based on Make and Model
- Deploying Windows 7 – Part 18: Determining the UUID of a Computer
- Deploying Windows 7 – Part 19: Building a Custom WinPE Tools CD
- Deploying Windows 7 – Part 20: Securing MDT (Part 1)
- Deploying Windows 7 – Part 21: Securing MDT (Part 2)
- Deploying Windows 7 – Part 22: Bulk Populating the MDT Database Using PowerShell
- Deploying Windows 7 Part 23: Managing Drivers – Introduction
- Deploying Windows 7 – Part 24: Managing Drivers – Issues and Approaches
- Deploying Windows 7 – Part 25: Managing Drivers – Selection Profiles
- Deploying Windows 7 – Part 26: Managing Drivers – By Make and Model
- Deploying Windows 7 – Part 27: Managing Drivers – Tips and Tricks
- Deploying Windows 7 – Part 28: Managing Software Updates
- Deploying Windows 7 – Part 29: Completing the LTI Deployment Infrastructure


