It’s amazing how quickly time can pass and how much technology can progress over that time. Consider Hyper-V. It was released way back in 2008 — 12 years ago! Even though most organizations probably aren’t running Hyper-V on Windows Server 2008 (which isn’t even supported anymore), I am betting that most organizations have some VMs that are nearly as old as Hyper-V itself. I don’t have anything quite that old in my own organization, but I have several aging VMs that were created long before their current guest operating system was even released. Thankfully, there are a few things that you can do to bring these VMs up to date. If your goal is to modernize your Hyper-V VMs, then the first thing that I recommend doing is to see if you have any virtual machines that are still Generation 1 virtual machines.
Before I show you how to do that, I need to point out that the presence of Generation 1 VMs isn’t necessarily a bad thing. There are some operating systems that can’t run on Generation 2 VMs. Similarly, many modern virtual appliances (such as the AWS storage gateway virtual appliance) are created as Generation 1 virtual machines. The point is that you shouldn’t simply assume that all Generation 1 virtual machines need to be replaced with Generation 2 VMs.
Generation 1 virtual machines are still fully supported
Remember, even today Generation 1 VMs are still fully supported. Given the amount of effort involved in rebuilding a Generation 1 VM into a Generation 2 VM, doing so may not be worth the effort. It’s worth considering whether the benefits justify the effort. Here are a few of the potential benefits:
- Potentially better performance (although performance improvements are not guaranteed).
- Access to security features such as TPM and Secure Boot.
- The ability to allocate more CPU and memory than what is possible with Generation 1 VMs.
When to consider Gen 2
My general rule of thumb is that if a Windows VM is running Windows Server 2012 or higher, then it should probably be running on a Generation 2 VM, although there are exceptions. A 32-bit OS, for example, cannot run on a Generation 2 VM. Similarly, Generation 2 VMs don’t support certain virtual hardware devices such as floppy disks or COM ports.
If a Generation 1 VM is running a non-Windows OS, then it’s probably best to leave the VM as a Generation 1 VM.
Another thing that I need to mention before I show you how to track down Generation 1 VMs is that there is no officially supported way of converting a Generation 1 VM to Generation 2. Having said that, some backup applications are able to perform the conversion in a roundabout way. It is also possible to manually rebuild a VM as a Generation 2 machine.
Locating your Generation 1 VMs is a relatively simple matter. PowerShell’s Get-VM cmdlet supports a parameter called VirtualMachineSubType. This parameter reflects a virtual machine’s generation. Simply use a command like this one to retrieve a virtual machine’s generation:
Get-VM <virtual machine name> | Select-Object VirtualMachineSubType

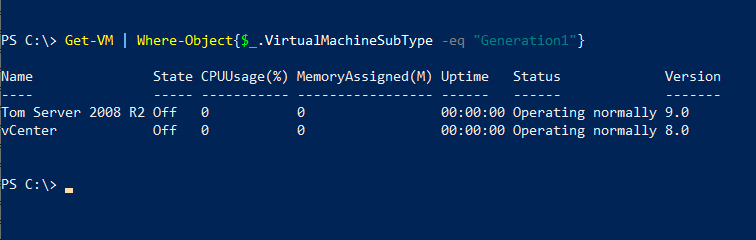
If you want to have PowerShell sort through all of the VMs on a given host and identify Generation 1 virtual machines, you will need to combine the Get-VM cmdlet with the Where-Object cmdlet. Here is what the command looks like:
Get-VM | Where-Object {$_.VirtualMachineSubType -eq “Generation1”}
As previously noted, whether or not you should consider rebuilding a Generation 1 VM into a Generation 2 VM depends on numerous factors, not the least of which is the guest OS. Unfortunately, the Get-VM cmdlet does not return a virtual machine’s OS. If you have System Center Virtual Machine Manager (VMM), then you can use a VMM specific cmdlet to determine which OS is running on a VM. The command used for doing so is:
Get-SCVirtualMachine -Name <vm name> | Select-Object OperatingSystem
If you don’t have System Center Virtual Machine Manager, then the only way to determine a virtual machine’s operating system from PowerShell is to use the Get-CimInstance cmdlet to query the VM directly.
Virtual machine versions
Another thing that you can do to update your Hyper-V virtual machines is to update their VM version. When you create a new Hyper-V VM, that VM is assigned a version number, which corresponds to the host operating system. Virtual machines created on Windows Server 2016, for example, are given a version number of 8.0.
A virtual machine’s version number determines which hosts a virtual machine is able to run on. Suppose, for instance, that you have an old VM that was created on Windows Server 2012 R2. That VM would have been given the version number 5.0. Assuming that the VM’s version number had not been upgraded over the years, it would be able to run on a Windows Server 2012 R2 Hyper-V host or a newer version of Hyper-V. If the VM is run on a new version of Hyper-V, however, it’s version number may cause the VM not to be able to take advantage of all the latest Hyper-V features. The VM is essentially maintained in a state of backward compatibility.
The good news is that a VM’s version number assignment is not permanent. A VM can be upgraded to a higher version so long as there is no chance that it will be run on an older version of Hyper-V. Let me show you how this works.
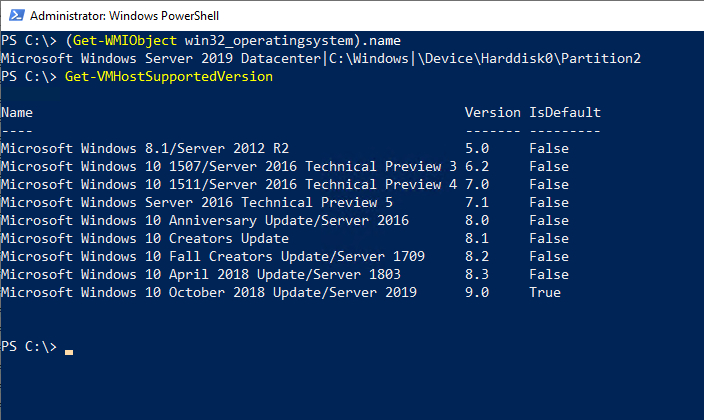
If you look at the figure below, you can see that I used the Get-WMIObject cmdlet on a Hyper-V host to retrieve the name of its operating system. In this case, the host is running Windows Server 2019 Datacenter. Next, I used the Get-VMHostSupportedVersion cmdlet to get a list of the VM versions supported by the operating system, and the name of the operating system associated with each version.
The next step in the process is to use the Get-VM cmdlet to retrieve a list of the virtual machine names and versions. In my case, I don’t have many VMs, so I just used the command below. If you have a lot of virtual machines; however, you can incorporate the Where-Object cmdlet to search for specific version numbers. Here is the command that I used:
Get-VM | Select-Object Name, Version

To update a virtual machine’s version to match that of the host that it is running on, just use this command:
Update-VMVersion <VM name>
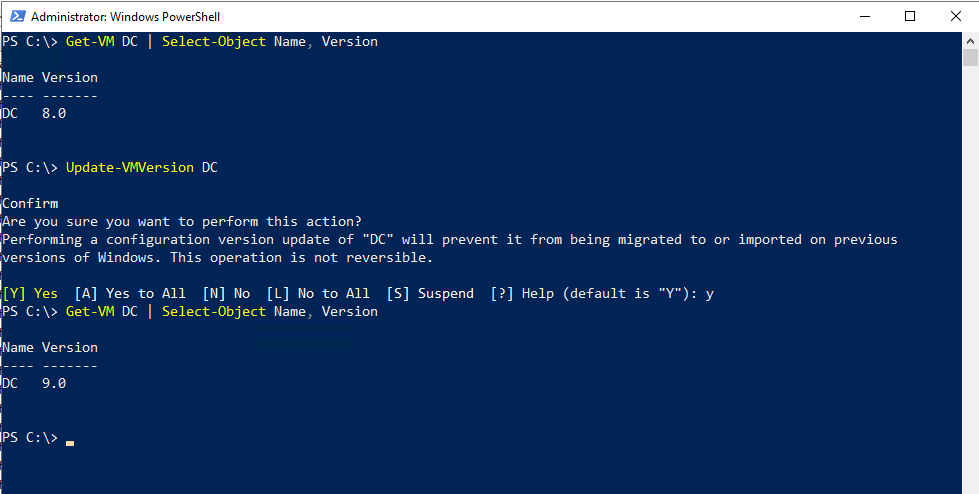
Remember, once you update a virtual machine’s version, it cannot run on a host with an operating system that is older than the host on which it is currently running.
Generation 1 virtual machines: Look before you leap to Gen 2
Updating a virtual machine’s version is easy, but there is no direct way to update a virtual machine’s generation without rebuilding the VM. Even so, rebuilding a VM may be worth the effort since Generation 2 VMs generally perform better than their Generation 1 counterparts. Just make sure that there are no operating system, application, or virtual hardware requirements necessitating the continued use of Generation 1.
Featured image: Shutterstock


