If you would like to read the other parts in this article series please go to:
- Managing Unified Messaging Auto Attendant (Part 1)
- Managing Unified Messaging Auto Attendant (Part 3)
- Managing Unified Messaging Auto Attendant (Part 4)
Managing the UM Auto Attendant
After creating a New UM Auto Attendant we have a lot of work to do before using it. At this point we have recorded voice prompts and created a new UM Auto Attendant from scratch. Let’s look at all the main tabs and see what we can do in each of them.
In the General tab (Figure 01) we can manage the extension numbers associated with the current UM Auto Attendant, we can also define if a UM Auto Attendant will recognize voice commands through Auto attendant is speech-enabled option. The Microsoft best practice recommends using a fallback Auto Attendant in the event that the caller fails using the ASR (Automatic Speech Recognition).
Note:
If the UM Server does not recognize the voice input for three consecutive times the DTMF fallback Auto Attendant will be used or the operator extension (if configured).
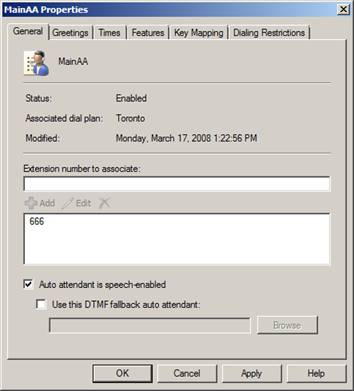
Figure 01
In the Greetings tab, we can add all our recorded Voice Prompts to customize the current UM Auto Attendant according to our company. In Figure 02 we can see all the greetings and main menu prompts that can be customized using recorded voice prompts.

Figure 02
Let’s start playing with Greetings that will be the first voice prompt that callers will listen to when they dial in to our UM Auto Attendant, for either Business hours and Non-Business hours. We just need to click the Modify button, select the option use custom greeting file, click on Browse (Figure 03) and then locate the recorded voice prompts in a local directory. After clicking OK the copy-UMCustomPrompt cmdlet will automatically run against the selected .wav file in order to validate if the format and all requirements are fine with this new recorded voice prompt.
Note:
In this tutorial all recorded voice prompts are under C:\RecordedVoicePrompts.
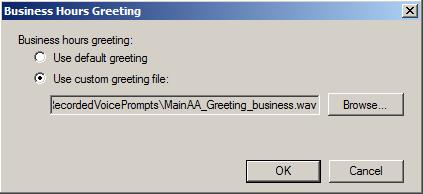
Figure 03
We have just configured business and non-business greetings however we still have the Informational announcement greeting that is disabled by default. We can use Informational announcements in different ways, such as: announce that in a future day the company will not be working or use it for compliance purposes. In some cases we must make sure that the caller listens to the entire announcement before sending any voice or touchtone command (Figure 04). For this case we can enable a special option called Allow information announcement to be interrupted which by default is disabled. If this option is enabled we force the caller to hear all the information before doing anything else.
The Informational Announcement is played after greetings (Business Hours or Non-Business hours) and before the main menu prompt.

Figure 04
Okay, we have just seen how to configure the greetings; our next step is to configure the main menu prompts for business and non-business hours. These prompts are the most import for the callers because they will receive instructions on how to use the UM Auto Attendant properly. Make sure that during the recording phase you add all the information required into the main menu voice prompts.
Note:
The main menu prompts will be available for the callers only after configuring the key mapping tab, this process will be shown further on in this article.
Moving on in our Auto Attendant configuration, we have the Times tab (Figure 05). Until now we have defined the business hours and non-business hours but we did not know when it starts or end. Using the Times tab we can define the Business hours using an existent value or we can personalize by clicking on the Customize button. We can also define the Time zone that will be used by an Auto Attendant.

Figure 05
We can also configure holidays in our Auto Attendant (Figure 06). For each holiday we can specify a Holiday Greeting file. The caller will receive the following voice prompt order when calling in an Auto Attendant during a specified holiday: first he will receive the holiday greeting file, then the non-business greeting file and finally the non-business menu prompt (if available).

Figure 06
In the Features tab, we can configure some nice features of UM Auto Attendant, such as:
- Language. We can define which language is used by this UM Auto Attendant. The language chosen will be used for the system default prompts and automatic speech recognition (if available).
- Operator extension. We can define the number used by an operator.
- Allow if a caller can either be transferred to users or leave a voice message
Note: to disallow a caller to search the company directory just uncheck these two options (Allow caller to transfer to users and Allow Callers to send voice messages)
Note: If both are selected the caller will receive a message from Exchange to choose between calling the extension or leaving a voice message. - Caller can contact. We can configure only users within a dial plan, a specific address list or any user in the default GAL. To use this feature the caller must be allowed to transfer or leave a voice message.
- Matched name selection method. When we have more than one user with the same name the UM Auto Attendant will display extra information for the caller to choose the correct user. The initial configuration is inherit from dial plan, however we can use Title, Department, Location, AD properties.
Note: if you are going to use any of those attributes make sure that all your users have their attributes filled out in their Active Directory accounts. - Define if the caller can transfer to an operator during business hours only or transfer during non-business hours as well.

Figure 07
Using Key Mapping will enable the UM Auto Attendant to use the Main Menu Prompt for both: business hours and non-business hours. Using our main table (Table 1) we have three options that will be said to the callers (sales, support or business hours and locations).
We can add key mapping to define conditions and actions from the caller to narrow his input to the appropriate result. All entries added at this point should be mentioned in the recorded main prompt, the caller should be able to listen to all possible options and all those options should be defined in this tab.
If we configure some entries in the Key Mapping and we do not define any personalized main prompt, the UM server will synthesize the information of all entries configured in this tab. This feature is called TTS (Unified Messaging Text-to-Speech).
We are going to define a new entry called Sales Department (Figure 08), that can be accessed either by hitting 1 on the telephone or saying the words “Sales”, “Inquiries”, “Licensing” and a funny one called “money”. Now, that we have defined our condition the actions are defined right below where we can play an audio file, Transfer to a defined extension (670 in our article) or to another Auto Attendant as well.
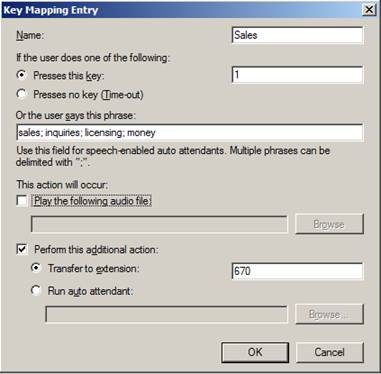
Figure 08
We can work on the user input through key numbers and words but we can also work on an exception rule. This exception rule can be created using the Press no key (time-out) item. Using this option we can control if there is no input from the user an action will be taken, we can assume that if the caller does not know which option he can be transferred to the operator.
After creating our first key mapping we can see the result in the Key Mapping tab (Figure 09). We can use two different main prompts: one for business hours and another one for non-business hours.

Figure 09
In Dialing Restriction, all the users using Auto Attendant are unauthenticated users and using this tab we can configure outbound call restrictions for the caller. The restrictions are based in in-country/region and international dialing rule groups. All this rule groups can be managed in the Dial Plan.
In the next article we are going to propose a scenario and deploy what we have seen in this article series to configure the Auto Attendant feature.
If you would like to read the other parts in this article series please go to:


