Introduction
SCVMM 2008 supports online migrations for Windows operating systems that have Volume Shadow Copy Service (VSS) support and requires offline migrations for Windows operating systems that do not have VSS support. The following article provides the prerequisites, procedures and considerations for offline P2V migrations. In addition I will provide recommendations for when you should consider using offline P2V migrations even if the Windows operating system supports online migrations.

P2V migrations are all performed using a wizard in SCVMM 2008. The same wizard is used for online and offline migrations. All that is required to install is the Virtual Machine Management server and a library server. Both are installed on the SCVMM server by default.
The offline P2V migration wizard gathers the required information, makes decisions based on that information, and finally creates the job that will be executed to perform the migration. The migration wizard for an offline P2V migration involves the following steps:
Launching the Wizard
Specifying the source physical server
Naming the virtual machine
Gathering system information from the source physical server
Modifying the volume configuration
Modifying the IP address used for migration
Modifying the processor and memory configuration of the migrated virtual machine
Selecting the Hyper-V host for placement
Selecting the path to place the virtual machine files on the target Hyper-V host
Selecting the virtual network mapping for each network adapter
Selecting additional properties like startup and shutdown actions
Resolving any potential conversion issues
Launching the migration process
Offline P2V Prerequisites
Before you attempt a P2V migration, there are a host of prerequisites that need to be validated. During the information gathering phase of a P2V migration, SCVMM will need to deploy a P2V agent (VMMP2VAGENT.EXE) to the source server to gather information. The source server is required to have a minimum of Windows Installer 3.1 installed for the agent to install successfully. Before you attempt a P2V migration, you should download Windows Installer from Microsoft Downloads. Search for KB893803.
During an offline P2V migration the source server is powered down and booted from a WinPE image so that the source server’s disks can be accessed without any locks on the files. The WinPE image will need access to the disk drives and the network interfaces to read the data from the source servers’ disk drives and transfer that data across the network to the host where the target virtual machine resides. During the information gathering phase, the P2V agent will identify any additional drivers or updates that are required and will be presented those requirements to you via the wizard. You will need to copy these files into the SCVMM folder structure following these steps:
Download the required update packages or drivers indicated from the Microsoft Web site. The update packages will need to be renamed to an 8.3 naming format and possibly will need to be extracted. It may also be necessary to extract the drivers to get the raw driver files.
Copy the renamed update packages into the folder C:\Program Files\Microsoft System Center Virtual Machine Manager 2008\P2V Patch Import.
Copy the raw driver files into the folder C:\Program Files\Microsoft System Center Virtual Machine Manager 2008\Driver Import
Make sure to use drivers designed for Vista or later operating systems, because the version of WinPE used in SCVMM 2008 is based on Windows Vista.
Offline P2V Considerations
For some servers you should use offline P2V migration to make sure that transactional data is properly saved to disk to avoid corruption. Active Directory domain controllers are prime example. An online migration of a domain controller could potentially cause a USN rollback situation as described in Appendix A of the white paper “Running Domain Controllers in Hyper-V”.
You should perform P2V conversion of a domain controller in offline mode so that the directory data is consistent when the domain controller is turned back on. At no time during the P2V migration should the physical DC and the new virtual DC be running and connected to the production corporate network. Once the P2V migration is complete, the virtual machine should be powered on while connected to an isolated network so you can verify that the P2V migration process is complete. Once the migration is verified, the physical DC should never be turned back on.
Offline P2V Migration Performance
The speed of the migration process is affected by network, processor and disk I/O capabilities of the source server and target host. To minimize the time of a P2V migration you should consider doing the following:
Dedicate a Hyper-V host for P2V migrations
Place the Hyper-V host as close to the source server as possible
Do not perform migrations over slow WAN links
Place the source server and the target Hyper-V host on gigabit Ethernet networks
Step-By-Step Offline Migration of a Windows 2000 Server
Windows 2000 Server is the only supported Windows operating system that requires a P2V migration. This is required because Windows 2000 Server does not have VSS support. To demonstrate an offline P2V migration, we will migrate a Windows 2000 Server called PHYSICAL1 to a virtual machine called VIRTUAL1. These procedures assume that you already have SCVMM 2008 installed with managed Hyper-V hosts that have the capacity to support the PHYSCIAL1 being migrated.
Use the following procedures to perform a physical to virtual migration:
In the SCVMM console Actions menu, click Convert Physical Server.
On the Select Source page, enter PHYSICAL1 as the name of the physical computer that you would like to convert, enter the credentials that have local administrative rights on the server, and then click Next.
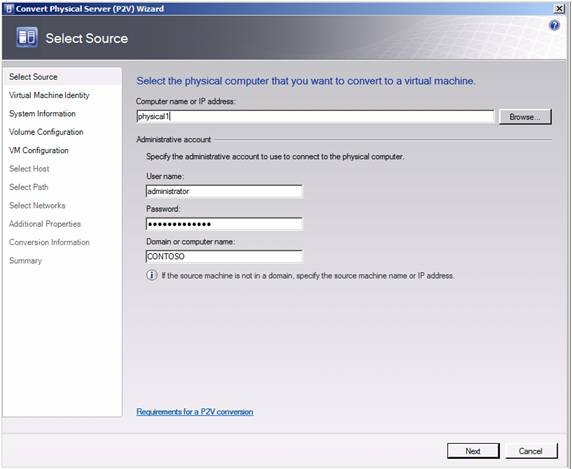
Figure 1
On the Virtual Machine Identity page, enter VIRTUAL1 for the virtual machine name, modify the virtual machine owner, enter a description if desired, and then click Next.
On the System Information page, click the Scan System button to scan PHYSICAL1. SCVMM will use the credentials you provided in step 2 and remotely connect to the server, transfer the P2V agent, install the agent, and then scan the server. When the scan is complete, the system information box at the bottom will display the operating system, the processor count, the hard drive information, and the network adapters. When you are done reviewing the system information, click Next.

Figure 2
On the Volume Configuration page you can modify the original source server configuration and define the disk controller that the new virtual machine should be connected when migrated. Make modifications to the hard drive type, size, and controller to which the volume should be connected and click Next.
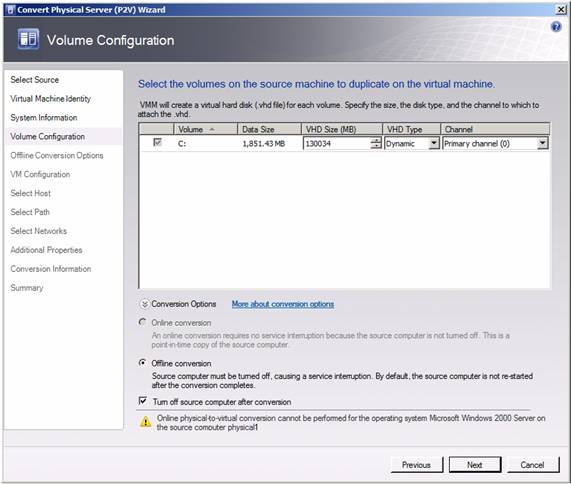
Figure 3
On the Offline Conversion Options page, select the method that the WinPE image should use to obtain an IP address (DHCP or static IPv4 or IPv6 address). If you select a static IP address you will need to provide the IP address information. Once the required information is provided, click Next.

Figure 4
On the Virtual Machine Configuration page, you will see that it is possible to modify the number of processors and the amount of memory to assign to the new virtual machine. For a Windows 2000 server, only a single processor configuration is supported. Make any required modifications to the memory, and then click Next.
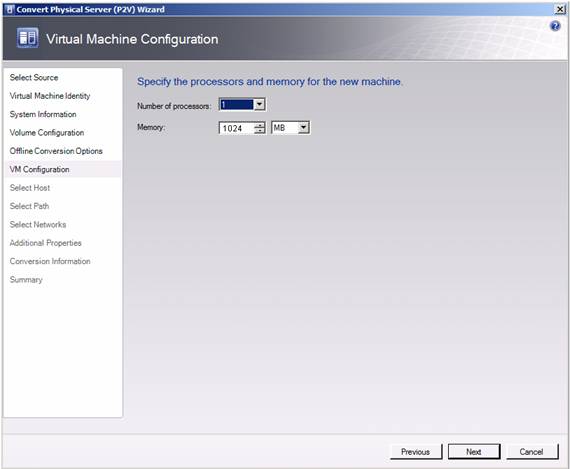
Figure 5
On the Select Host page, the available hosts are ranked based on performance and available capacity for this virtual machine. The hosts are ranked using a star ranking with the recommended host at the top of the list. Select the Hyper-V host that you want to place the new virtual machine and then click Next.
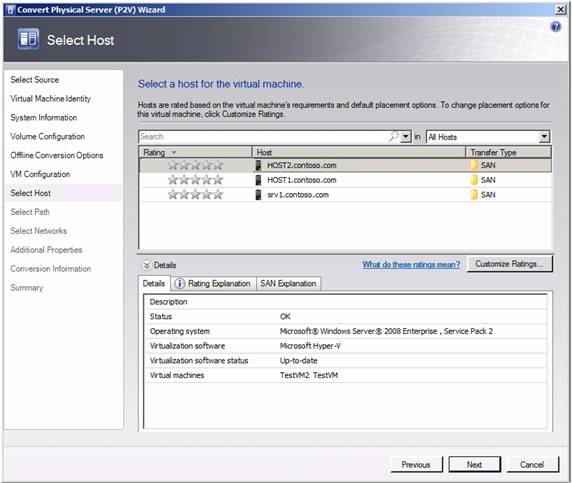
Figure 6
On the Select Path page, modify the path to store the new virtual machine in the desired location on the Hyper-V server and then click Next.
On the Select Networks page, select the virtual network connection binding that you want for the virtual machine. In the case of a DC migration select the virtual machine to be in the Not Connected state to prevent unwanted network communications until you have verified everything is working correctly. Click Next.

Figure 7
On the Additional Properties page, select the Automatic Stop and Start actions you prefer and then click Next.

Figure 8
On the Conversion Information page, review any open issues for PHYSICAL1, and then when you have completed your review and resolved these issues, click Next.
On the Summary page, review the conversion settings and click Create to start the physical to virtual migration process.

Figure 9
During the conversion process, the Jobs window is displayed. You can use it to track the progress of the conversion.
Conclusion
System Center Virtual Machine Manager 2008 is Microsoft’s solution for providing online and offline physical to virtual migrations and placement on Virtual Server 2005 R2 and Hyper-V. SCVMM support for offline migration is primarily focused on Windows 2000 Server migrations, but should also be used for situations where the online VSS approach would result in possible corruption of data. This article provided information about SCVMM offline migration options and the required prerequisites for a successful migration. The wizard based step-by-step approach makes a P2V migration a simple and quick process.


