Sponsored by Stellar Data Recovery
Besides the Exchange database, Exchange Server also creates a set of Transaction Logs and Checkpoint Files for each database to maintain integrity, ensure optimum performance and protect the database from inconsistency issues. In this guide, we’ll discuss the Transaction Logs and Checkpoint Files, their importance, and how these logs and files are used for backup and restore in the Exchange Server.
Transaction Logs
Exchange servers use the write-ahead model to safeguard data. It records all the transactions or operations and changes performed on the database (.edb) file in Transaction Logs (.log files). These transactions are then committed to the in-memory copy of the Exchange database to update the changes. However, an incomplete transaction is never committed to the database.
The Transaction Logs help the Exchange Server recover or roll back the database after a database failure. The logs also safeguard the data generated after the last backup.
For instance, if your current database or storage media storing the database files fails, you can restore the database copy from your last backup and then use the Transaction Logs accumulated between your last backup and database failure to restore the data.
However, this requires you to use two separate disk volumes to store the database files, Transaction Logs, and Checkpoint Files.
Ideally, you should store only one database on each disk volume and its Transaction Logs and Checkpoint Files in another disk volume.
Storing the database and Transaction Logs with Checkpoint Files separately in two different disks or RAID arrays helps ensure optimal server performance. This kind of setup is highly recommended for a standalone Exchange Server.
In case of high availability (DAG) Exchange environment consisting of two or more Exchange servers, you can store the database, Transaction Logs, and Checkpoint Files on the same disk volume. In a DAG environment, the recovery is automatic when a database, server, or network failure occurs. However, the best practice is to store no more than two databases and their logs/Checkpoint Files on the same volume.
However, logs files may accumulate with time and eat up a lot of the server storage. You can enable circular logging to automatically purge the logs after they are committed to the database. You may also perform or schedule automatic VSS backups to purge these logs automatically.
Checkpoint Files
The Checkpoint (.chk) files record all Transaction Logs that are either pending or already committed to the Exchange database file. The files also help to recover Exchange database from an inconsistent state caused by system failure or database corruption.
![]()
The Checkpoint Files help Exchange Server find the current transaction log file position and know which transactions are committed to the database. Exchange Server then commits the pending transactions that occurred after the checkpoint file to the mailbox database. This can also help reduce the time required to restore the database in case of database or server failure as it decreases the number of transactions required to replay on the database.
How Transaction Logs and Checkpoint Files Help Restore the Exchange database
Transaction Logs and Checkpoint Files may help restore the Exchange database (conceptually) after a system crash or when the database dismounts due to inconsistencies or failure. However, this is a tedious task and requires a certain level of expertise. To restore the Exchange database using Transaction Logs and Checkpoint Files, you can perform soft recovery via Eseutil. If soft recovery does not work, you can perform hard recovery.
The Eseutil utility is located in the EXCHSRVRBIN directory.

Steps to perform soft recovery
soft recovery can help restore a dismounted database from an inconsistent or Dirty Shutdown state caused by a server crash or abrupt shutdown, to a Clean Shutdown state. After it is recovered, administrators can mount the database and restore mailbox connectivity without much issue. It also helps restore the database when log files are missing. To perform the software recovery, follow these steps:
Step 1: Find database state
Check the current database state with the following command:
ESEUTIL /MH <database_name>
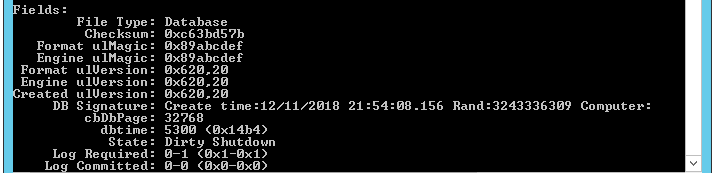
If the Dirty Shutdown state is displayed, proceed with the following steps.
Step 2: Check the Log Files
To check if the required log files are in a healthy state, run the following PowerShell command:
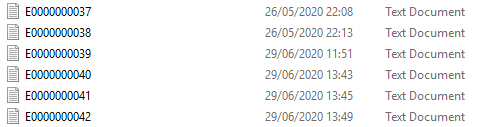
Eseutil /ml “Path of the log files\log prefix”

Eseutil /ml “C:\Program Files\Microsoft\Exchange Server\V15\Mailbox\logs\E0000000037”
Step 3: Execute the soft recovery command
If the log files are found in healthy state, you can perform the soft recovery using the following PowerShell command. This replays the uncommitted Transaction Logs and restores the database to a clean state. Using the checkpoint file in command decreases the recovery time. However, you can execute the command with the /s parameter.
ESEUTIL /r <log_prefix> /l [path to log files] /s [path to checkpoint file] /d [path to database file] /i

ESEUTIL /r E0000000037 /l “C:\Program Files\Microsoft\Exchange Server\V15\Mailbox\logs” /d “E:\MailboxDB\DB01”
After this command is executed successfully, you can check the database health once again using the eseutil /mh <database name> command and then mount the database using Mount-MailboxDatabase cmdlet.
Mount-MailboxDatabase –identity <database_name>
Steps to perform hard recovery
hard recovery is required when the log files are damaged, missing, or deleted from their location. However, hard recovery causes data loss as it purges anything that is deemed corrupted or non-recoverable. Therefore, you should perform this as a last resort.
To start hard recovery, execute the following Eseutil command:
ESEUTiL /P <path_to_the_database>

Click OK to accept the risk.
After this, defragment the database using the following command.
ESEUTIL /D <database_name> /T <UNC_path>
Here /T is the temporary UNC path.
Finally, run the IsInteg tool (in Exchange versions below 2010 SP1). New-MailboxRepairRequest replaces the IsInteg in Exchange 2010 SP1 and later versions. The tool is located at C:\Program Files\Microsoft\Exchange Server\Bin folder location.
Isinteg –s <server_name> -fix –test alltests
Repeat the command to get rid of all errors.
Conclusion
It is not guaranteed that soft recovery or hard recovery can bring your database to a Clean Shutdown state. However, if it does, you should immediately create a new database and transfer the mailboxes from the recovered database to the new database.
But if you don’t want to risk data loss and need to recover and restore the Exchange database, you can use a third-party Exchange recovery software, such as Stellar Repair for Exchange. It’s a GUI-based tool that helps Exchange administrators to recover mailboxes from corrupt or damaged databases quickly. The software can export the recovered mailboxes to PST and other formats or export them directly to a database on a live Exchange Server (in the same forest) or Office 365. It helps restore the critical email services halted by database inconsistencies and corruption without the Transaction Logs and Checkpoint file. Thus, even if the Transaction Logs are missing or truncated due to Circular Logging, you can recover and restore mailboxes without affecting the server performance or setting up a new Exchange server.
With Stellar Repair for Exchange, you can recover your mailbox databases with less effort, fewer resources and ultimately get the business back up and running in no time.
Featured image: Freepik / Abstract vector created by Vectorjuice


Hi Bharat,
It’s a great to-the-point guide. The last sentence in Step 3 pasted below may have a typo in it. Shouldn’t it read: …command without the /s parameter. Also, it would be appreciated if you can elaborate on what’s the difference between running the command with and without /s parameter, that is, w/o the checkpoint file.
“Step 3: Execute the soft recovery command
If the log files are found in healthy state, you can perform the soft recovery using the following PowerShell command. This replays the uncommitted Transaction Logs and restores the database to a clean state. Using the checkpoint file in command decreases the recovery time. However, you can execute the command with the /s parameter.”