If you would like to read the other parts in this article series please go to:
- Working With Terminal Services Remote Applications (Part 1)
- Working With Terminal Services Remote Applications (Part 2)
- Working With Terminal Services Remote Applications (Part 3)
- Working With Terminal Services Remote Applications (Part 5)
Introduction
In the previous article in this series, I mentioned that it was possible to make remote applications accessible through Terminal Service Web Access. In this article, I want to show you how that works. As I do, I will show you how to install Terminal Service Web Access, and what it looks like when you use TS Web Access to access a remote application.
Terminal Service Web Access
As you may recall, when you open the TS RemoteApp Manager, any of the applications that you have designated as being remotely accessible are listed at the bottom of the console screen, as shown in Figure A. If you look closely at the figure, you will notice that the listing of RemoteApp programs specifically tells you which applications are available using TS Web Access.

Figure A: The RemoteApp Programs list specifically tells you which remote applications are accessible using TS Web Access
You can control whether or not an application is accessible through TS Web Access by right clicking on the remote application and selecting either the Show in TS Web Access or the Hide in TS Web Access command from the resulting shortcut menu.
One thing that you have to keep in mind about using remote applications with TS Web Access is that simply enabling a remote application for use with TS Web Access does not enable TS Web Access. TS Web Access must be enabled manually by installing a role service.
I am going to show you how to enable TS Web Access so that you can access your remote applications. Before I do though, there is one very important thing that you need to know about accessing remote applications over the Web. When you access a remote application using TS Web Access, the application does not run through a Web browser. Instead, the Web interface only provides connectivity to the application. Think of it almost like having a VPN that is dedicated to the sole task of making applications available remotely.
So what does this mean for you? What it means is that even if you are accessing a remote program through Terminal Service Web Access, the client computer that you are using still has to have the Remote Desktop Client installed. This means that you would not be able to use Terminal Service Web Access as a way of running applications on otherwise incompatible client computers (such as Linux or Macintosh) unless those computers have a compatible Terminal Service client installed.
Enabling Terminal Service Web Access
Enabling and deploying Terminal Service Web Access is something of an art form. In a real world deployment there is extensive planning that must be done in order to make sure that your Web server is secure and that it scales to meet the needs of your Web based clients. For our purposes, I am going to show you a quick and dirty way of enabling Terminal Service Web Access, just so that you can see how it works and how remote programs are accessible through it.
To install Terminal Service Web Access, open the Server Manager and then navigate through the console tree to Server Manager <your server> | Roles | Terminal Services. Next, right click on the Terminal Services container, and choose the Add Role Services command from the resulting shortcut menu. This will cause Windows to launch the Add Role Service Wizard.
Select the TS Web Access check box from the list of available role services. At this point, Windows will display a warning message telling you that some additional role services are required. The reason why this happens is because TS Web Access is not a standalone service. It depends on the Windows Terminal Service and on the Internet Information Services (IIS). Therefore, IIS and a few dependencies will have to be installed before you can use TS Web Access. That being the case, go ahead and click the Add Required Role Service button to tell Windows that you want the necessary role services to be installed.
Click Next and Windows will display a screen that introduces you to IIS. Go ahead and click Next to ignore this screen, and you will be taken to a screen that shows you which role services will be installed. We do not need to make any changes to this screen, so go ahead and click Next. Now, take a quick look at the summary screen to make sure that the correct role services are about to be installed and then click Next, followed by Install and Close.
For our purposes that is all that we have to do. If this were a real world deployment, we would probably want to enable SSL encryption, and take some other security measures. For right now though, I just want to show you what TS Web Access looks like.
Using TS Web Access
You can access the TS Web Access site by opening Internet Explorer and navigating to: HTTP://<your server’s name>/ts
When you enter the URL listed above, you may receive a logon prompt. If you do, then enter your username in domain\username format, followed by your password. Keep in mind that you would not be able to log in unless the account that you are using has the permissions necessary to establish a normal Terminal Service session.
After you log on, you will be taken to the main TS Web Access screen, shown in Figure B. As you look at the figure, you will notice that the Web interface is divided into three separate tabs; RemoteApp Programs (which is selected by default), Remote Desktop, and Configuration. The Remote Desktop and Configuration tabs are beyond the scope of this article, but they allow you to access a full blown Terminal Service session and to configure the interface respectively.
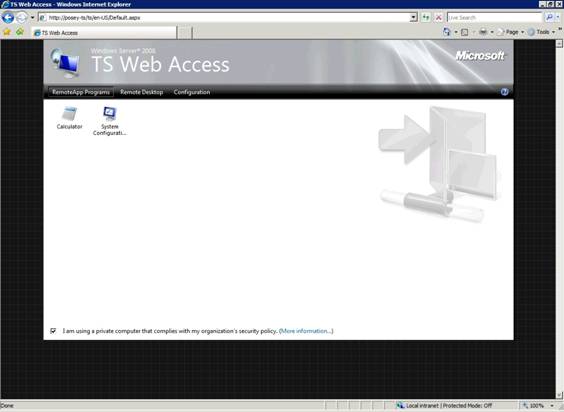
Figure B: You can access remote applications through a Web interface
As I mentioned earlier, the Web interface only provides connectivity to the remote applications, the applications do not actually run in a Web browser. If you double click on a remote application, you will see a screen similar to the one that is shown in Figure C, asking you which types of resources you want to allow to be redirected.

Figure C: You must confirm that you want to allow the remote computer to access local resources
Go ahead and click the Connect button and the remote application will launch. As this happens, you may be prompted to enter your credentials again (depending on how your server is configured). You will probably also notice that the Remote Desktop Client loads. Once the process completes, the remote application provides the illusion that it is running locally. The application is not bound to the Web browser. In fact, you can close Internet Explorer and the application will continue to run.
Conclusion
As you can see, it is easy to run a remote application through Terminal Services Web Access. In Part 5, I will conclude the series by showing you how to deploy remote applications to client computers through group policy settings.
If you would like to read the other parts in this article series please go to:
