If you would like to read the other parts in this article series please go to:
- Introduction to Exchange Online – Uncovering BPOS (Part 1)
- Introduction to Exchange Online – Uncovering BPOS (Part 2)
- Introduction to Exchange Online – Uncovering BPOS (Part 3)
- Introduction to Exchange Online – Uncovering BPOS (Part 4)
- Introduction to Exchange Online- Uncovering BPOS (Part 6) – Cleaning up and decommissioning on-premise Exchange servers
Introduction
In part 4 of this article series in which we took a deep dive into Exchange Online, we went through the steps necessary in order to set up directory synchronization between our on-premise environment and MSOL. More specifically, we installed the Directory Synchronization tool and replicated AD users, groups and contacts from our on-premise Active Directory to Exchange Online as disabled user accounts. Then we took a geeky, behind the scenes look at the Directory Synchronization engine which is based on the Identity Lifecycle Manager – ILM (formerly known as MIIS).
In this, part 5, we will enable a few of the disabled user accounts in the MSOL Administration Center, and then install the Microsoft Online (MSOL) migration tools so we can begin migrating mailbox content from the on-premise mailboxes to MSOL user mailboxes.
Activating Exchange Online users
Let us enable a few of the disabled user accounts in the MSOL Administration Center. We do this under the User List subtab underneath the Users tab. For the purpose of this article we will enable the 10 test user accounts selected in Figure 1.

Figure 1: List of disabled users in MSOL Administration Center
When you have selected a few users, click Activate User Accounts in the right pane as shown in Figure 2.

Figure 2: Activating Users
Now you have the option of having the username and passwords for the enabled users sent to an e-mail address you specify. If you do not want to have them sent at this time they will also show up on the confirmation page, so you can copy/paste them to a location of your choice (Figure 3).

Figure 3: Option to send passwords to an e-mail address
On the next page, you must specify the mailbox size limits for the users. When you have done so, click Activate (Figure 4).

Figure 4: Configuring Mailbox sizes
The selected users will now be updated and you will be taken to the confirmation page, which lists all the selected users and the temporary password that have been assigned to each of them (Figure 5). Click Finish.

Figure 5: Activated User accounts
Back under the User List subtab, we can now see that the icon for each of the activated users has changed. From now on changes made in the Active directory Users and Computers snap-in in the on-premise Active Directory environment will be synchronized to MSOL.

Figure 6: Activated Users under the User List Subtab
This can also be verified by opening the property page of an activated user (Figure 7).

Figure 7: Property page of activated user
Okay we have now activated the test users and changes being done in the on-premise environment will be synchronized to Microsoft Online.
Installing and configuring the MSOL Migration tool
With 10 activated users, the next step is to install the MSOL migration tool so that we can begin to migrate mailbox content and configure forwarding for the migrated user mailboxes.
To install the MSOL migration tool, the first thing you must do is to download the setup files. The setup files can be downloaded from the MSOL Administration Center. Select the Mailbox Migration subtab under the Migration tab, then, check Step 1 (I have read the planning document). In step 2, either click Download 32 bit (x86) or Download 64 bit (x64) depending on whether the domain member server on which you plan to install the MSOL migration tool is running the 32-bit or 64 bit version of Windows Server 2003.

Figure 8: Downloading the MSOL Migration Tool
On the machine on which you want to install the MSOL migration tool, launch the Transporter.msi file and click Next on the Welcome screen (Figure 9).

Figure 9: MSOL Migration Tool Setup – Welcome page
Accept the End-User License Agreement, and click Next.

Figure 10: Accepting the EULA
Specify a location for the Microsoft Transporter Tools folder or use the default and click Install (Figure 11).

Figure 11: Specifying the installation path
When the tool has been installed, click Finish (Figure 12).

Figure 12: MSOL Migration Tools Setup completed successfully
The MSOL Migration tool has now been properly installed.
Migrating mailboxes and setting up forwarding
Now that we have installed the MSOL migration tool, let’s launch it by clicking Start | All Programs | Microsoft Online Migration Tools | Microsoft Online Migration Console (Figure 13).
Note:
Just like with most newer Microsoft management consoles nowadays, there’s also a Command Shell provided with the MSOL Migration Tool.

Figure 13: Launching the MSOL Migration Console
Now enter the credentials of the MSOL administrator account as shown in Figure 14 and click Sign In.

Figure 14: Entering the credentials of the MSOL Administrator account
We are now presented with the MSOL Migration Tool console, which looks similar to the UI of the Exchange Management Console, the Microsoft Transporter Suite et cetera.
In the navigation pane to the left, you have a Microsoft Exchange and an Internet E-Mail work center. In this article series, we will concentrate on the Microsoft Exchange work center, which is the one used to migrate mailbox content from an Exchange-based on-premise environment.
Note:
The Internet E-Mail work center is used to migrate mailbox content from foreign messaging environments using IMAP.

Figure 15: Overview of the MSOL Migration Tools Console
Under the Microsoft Exchange work center, we have three nodes – All Mailboxes, Mailboxes Ready to Migrate, and Mailboxes Already Migrated. Let us select the All Mailboxes node. Here we get a list of all mailbox-enabled users in our Exchange based on-premise environment as shown in Figure 16.
For the purpose of this articles series, we will migrate test user 1-10.

Figure 16: Listing all Mailboxes in the Exchange organization
Let us now select the Mailboxes Ready to Migrate node. As can be seen in Figure 17 we get a list of all the users we activated via the MSOL Administration Center earlier on in this article.
We will move five mailboxes using the MSOL Migration Tool UI and five mailboxes using the MSOL Migration Tool Command Shell.

Figure 17: Listing all Mailboxes ready to be migrated
Select and right-click test user 1-5 and select Migrate mailboxes in the context menu (Figure 18).

Figure 18: Selecting the first five mailboxes to be migrated
This brings up the Migrate Exchange Mailboxes to Exchange Online wizard. On the Welcome page, click Next.

Figure 19: Mailbox Migration Wizard Welcome page
On the Migrate Mailbox Options page, select Copy the local mailbox content as shown in Figure 20, and then click Next.
Note:
If you for some reason did not want to copy the mailbox content of the local mailboxes to the respective Exchange Online mailboxes, you would select the second option.

Figure 20: Mailbox Migration options
The wizard will now calculate the estimated total size of the selected mailboxes (Figure 21). Review the mailbox sizes and click Next.

Figure 21: Mailbox Migration wizard calculated estimated mailbox sizes
Note:
Since the mailboxes migrated in this article series are test mailboxes, they have been populated with the same dummy data which means they all are of equal sizes.

Figure 22: Listing mailboxes and the size of each of them
Now we have the option of specifying what type of mailbox content we wish to migrate. Since we want to migrate all content, we select All types as shown in Figure 23.

Figure 23: Selecting what mailbox content to migrate
We are brought to the Review Mailboxes page where we should click Migrate in order to begin the migration.

Figure 24: Review Mailboxes page
As can be seen in Figure 25, mailbox content are now being migrated.
Note:
The mailbox migration wizard is single-threaded. If you want to migrate multiple mailboxes simultaneously, we need to use the Command Shell.
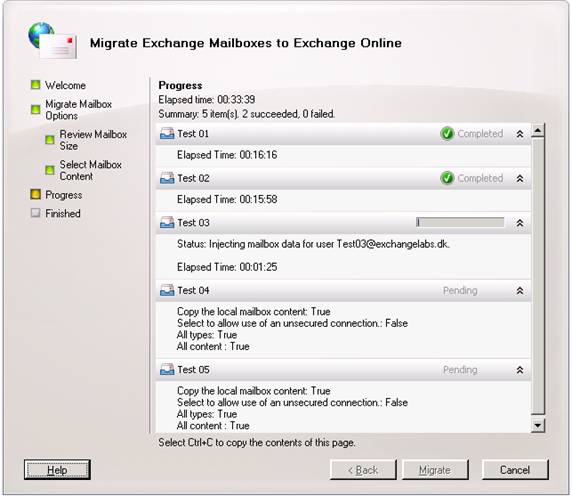
Figure 25: Mailbox content are being migrated to Exchange Online
When all mailboxes have been migrated, we can click Finish in order to exit the wizard.

Figure 26: Mailbox Migrations finished
With the mailboxes migrated, let’s select the Mailboxes Already Migrated node in the MSOL Migration Tools console. Here you can see the mailboxes we just migrated.

Figure 27: Listing all Mailboxes that have been migrated to Exchange Online
Let us check out what happen behind the scenes by logging on to a Domain Controller and open the Active Directory Users and Computers snap-in (or simply click Start > Run and type DSA.MSC on the member server on which the MSOL Migration Tool has been installed). In the ADUC snap-in navigate to the organizational unit (OU) containing the user accounts associated with the mailboxes you just migrated. Notice that a contact object for each migrated mailbox has been created in this OU as shown in Figure 28.

Figure 28: Looking at the contact objects created by the MSOL migration tool (via ADUC)
Now logon to a member server on which the Exchange 2007 Management Console (EMC) has been installed and launch the EMC. Select the Contacts node under the Recipient Configuration work center. Here you can see the Mail objects created by the MSOL Migration Tool as well.

Figure 29: Looking at the contacts created by the MSOL migration tool (via the EMC)
Now select the Mailbox node and then open the property page for one of the contact objects. On the General tab notice a contact object created by the MSOL migration tool by default is hidden from the GAL.

Figure 30: Property page of a contact object
Click the E-Mail Addresses tab. Here you can see that the contact object has an e-mail address pointing to domain1.microsoftonline.com domain.

Figure 31: Looking at the forwarding address of a MSOL contact object
Now open the property page of one of the Mailboxes migrated to MSOL and then select the Mail Flow Settings tab. Under the Mail Flow Settings tab, select Delivery Options and click Properties.
Here you can see that all mail sent to a migrated mailbox is being forwarded to the new Mailbox in MSOL. Also notice that a copy is delivered to the local on-premise mailbox.

Figure 32: Delivery options page of a migrated mailbox
Moving On-Premise Users with the MSOL Migration Command Shell
Alrighty it’s time to move the five last test mailboxes this time using the MSOL Migration Command Shell. So let us launch the Command Shell by clicking Start | All Programs | Microsoft Online Migration Tools | Microsoft Online Migration Command Shell as shown in Figure 33.

Figure 33: Launching the MSOL Migration Command Shell
To move an on-premise Exchange mailbox to Exchange Online, we must use the Move-XsExchangeMailboxToExchangeOnline cmdlet. But before we use this cmdlet we have to create two credentials variables (one for validation against the source and one to validate against the target) using the Get-Credential cmdlet.
Note:
If you are already logged on to the server with the necessary permissions you do not need to create a source credentials variable.
To create a source credentials variable type:
$scred = Get-Credential
This will bring up the credentials box shown in Figure 34.
Enter the administrator credentials of the on-premise administrator.

Figure 34: Entering the credentials of the on-premise administrator account
Now create the target credentials variable using:
$tcred = Get-Credential
Then enter the credentials of the Exchange Online admin account (Figure 35).

Figure 35: Entering the credentials of the Exchange Online Admin account
We are now ready to move a mailbox using the Move-XsExchangeMailboxToExchangeOnline cmdlet. For the purpose of this article, we’ll migrate Test user 6 using the following command:
Move-XsExchangeMailboxToExchangeOnline -SourceIdentity “Test07” -AllowUnsecureConnection -GlobalCatalog ehvms07 -TargetCredential $tcred –SourceCredential $scred

Figure 36: Migrating Test User 6’s Mailbox
The mailbox content for Test User 6 is now being migrated.

Figure 37: Test User 6 Mailbox content being migrated
Now you just need to repeat the above step for the last 4 mailboxes.
If you wanted to migrated users in bulk using the Command Shell, you could create a CSV listing on the users to be migrated and then use a PowerShell script such as the one posted in this thread by Erik Ashby (MSFT) in the Microsoft Online Services forum over at Microsoft TechNet.
Note:
Unlike the Migrate Mailbox wizard in the MSOL Migration console, you can also specify the number of simultaneous threads (using the -MaxThreadCount parameter) when migrating using the Move-XsExchangeMAilboxToExchangeOnline cmdlet.
Verifying Mailbox Content has been migrated to Exchange Online
Let us verify that all mailbox content from the on-premise Exchange mailboxes have been properly migrated to Exchange Online. The simplest way to do so is to open a browser and enter: https://yourdomain1.microsoftonline.com. This will take us to the to the OWA 2007 FBA page where you can login using your e-mail address and assigned password.
As can be seen in Figure 38 all items have been migrated successfully.

Figure 38: Content of Exchange Online mailbox
Now would also be a good time to test whether you can send, receive and reply to e-mail messages sent between Exchange Online users and on-premise users. If things work as expected your environment is ready for the next article which will be published soon here on MSExchange.org.
Summary
In this part 5 we enabled a few of the disabled user accounts in the MSOL Administration Center, and then installed the Microsoft Online (MSOL) migration tools so we could migrate actual mailbox content from the on-premise Exchange mailboxes to MSOL user mailboxes.
In part 6 we will continue where we left off in this part 5. That is we will delete the local mailbox for migrated users, disconnect the mailbox and switch the MX record so it points directly at Exchange Online. We will take a look at how you can rollback as well as explain how you access the migrated mailboxes using Exchange ActiveSync and Outlook Anywhere.
If you would like to read the other parts in this article series please go to:
- Introduction to Exchange Online – Uncovering BPOS (Part 1)
- Introduction to Exchange Online – Uncovering BPOS (Part 2)
- Introduction to Exchange Online – Uncovering BPOS (Part 3)
- Introduction to Exchange Online – Uncovering BPOS (Part 4)
- Introduction to Exchange Online- Uncovering BPOS (Part 6) – Cleaning up and decommissioning on-premise Exchange servers


