Any cloud administrator managing Azure should be acquainted with Azure Active Directory. It helps in the hybrid environment where your directory is synchronized with the cloud environment and facilitates the process to provision users and groups and keep consistency among environments. Azure Active Directory is a huge service and it has tons of functionalities and can be configured to meet your enterprise requirements. In today’s article, we are going to cover just a small but powerful portion — the Active Directory audit logs, where we can check all activity on any given Azure Active Directory using the Azure Portal, export to a CSV file, archive in a storage account, integrate with your SIEM (Security Information and Event Management) solution.
Using Active Directory audit logs, the cloud security administrator is able to track all changes performed in the Azure Active Directory, including changes in users, applications, groups, authentication, and so forth. Only users who are part of the Security Admin, Security Reader, or Global Admins are able to retrieve the information we are about to explore in this article.
The Active Directory audit logs is a powerful resource that shows you all activity in the Azure Active Directory. If you need more information about the activities and components being monitored, this link is a requirement.
Analyzing your Azure Active Directory audit logs
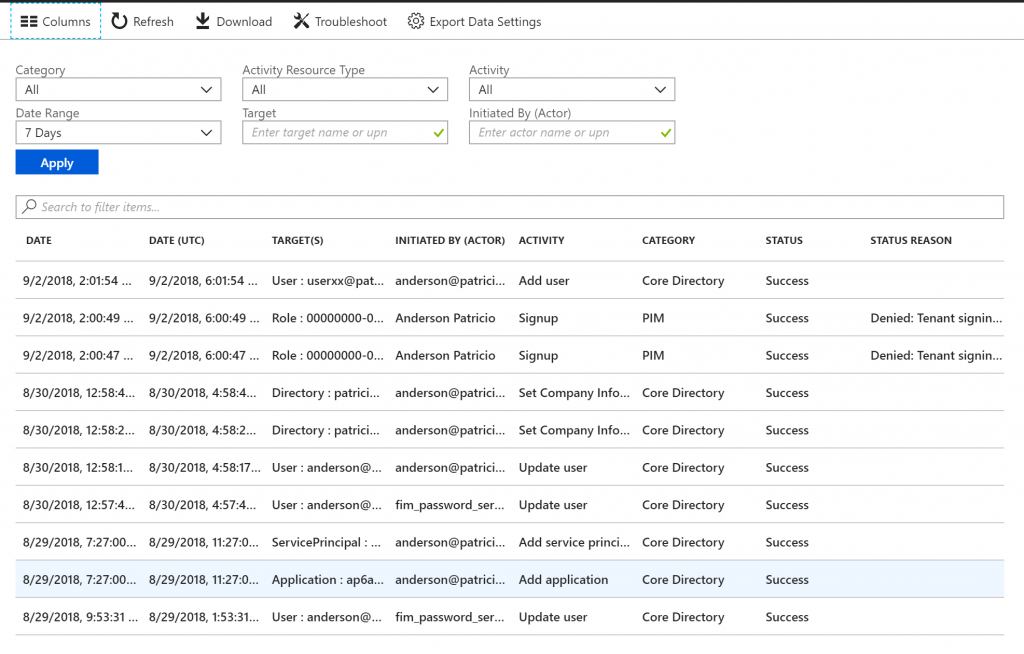
Logged on to Azure Portal, click on the Azure Active Directory service, and then click on Audit Logs under Activity section. In the blade that opens up on the right side, we have a top row with several actions that we will explore in this article as well, several options to narrow down the results that are being listed at the bottom (by default everything that happens in the last seven days will be listed).
We can narrow down the search and define a Target, Actor (who performed the action), Activity and even reduce the time window to narrow down the results.

By default, we have a lot of useful information in the first screen. We can use the Columns button to select more columns to be displayed. The columns available at the time of this article were: Date, Date (UTC), Target(s), Initiated By (Actor), Activity, Category, Status, and Status Reason. Just select the desired columns and the view will be updated automatically.
Having all columns selected helps security administrators see all data captured in any single event. We can also take advantage of the Search to filter items to enter a string, and that is helpful when looking for a specific event.
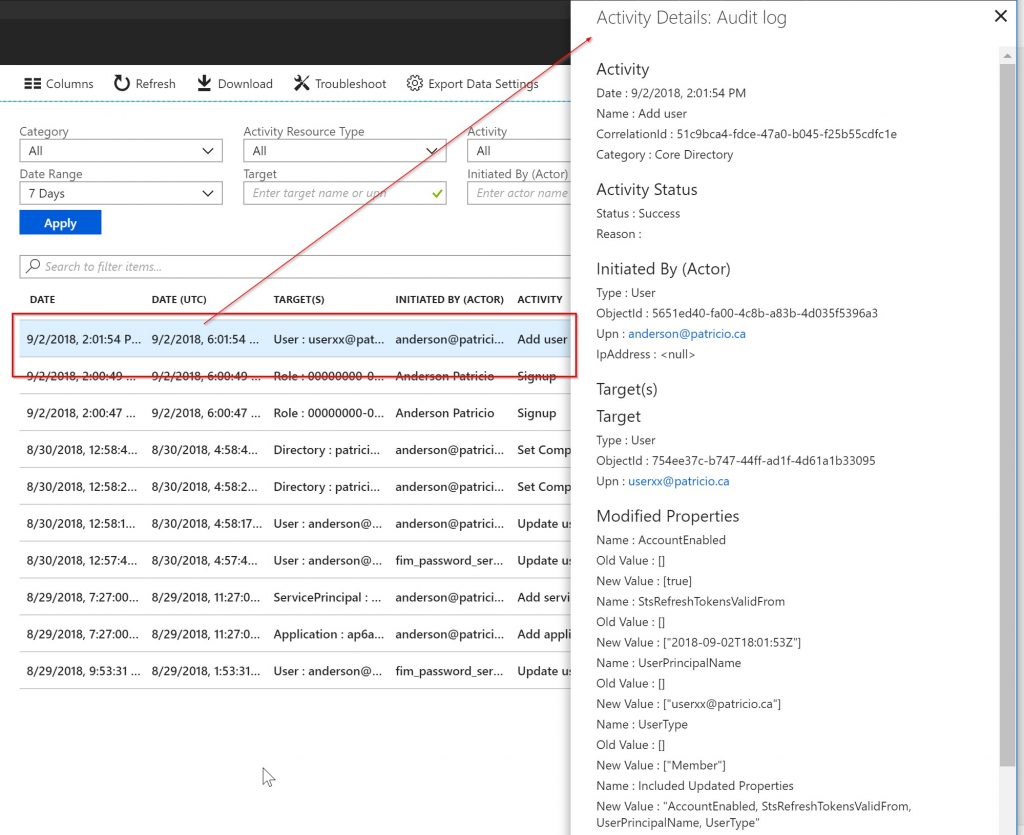
If you want to retrieve more information about any given event, click on it and a new blade will pop up on the right side containing all details about that entry. The information provided is the full data that is being collected and helps the security professional to have the necessary information to take a decision about the nature of the action.
Using Audit events in Excel
In the previous section, we saw that the first list of the events contains only the basic information, which is usually enough when looking for some specific event. But we may want to go deeper, and that is accomplished by getting more details of the event.
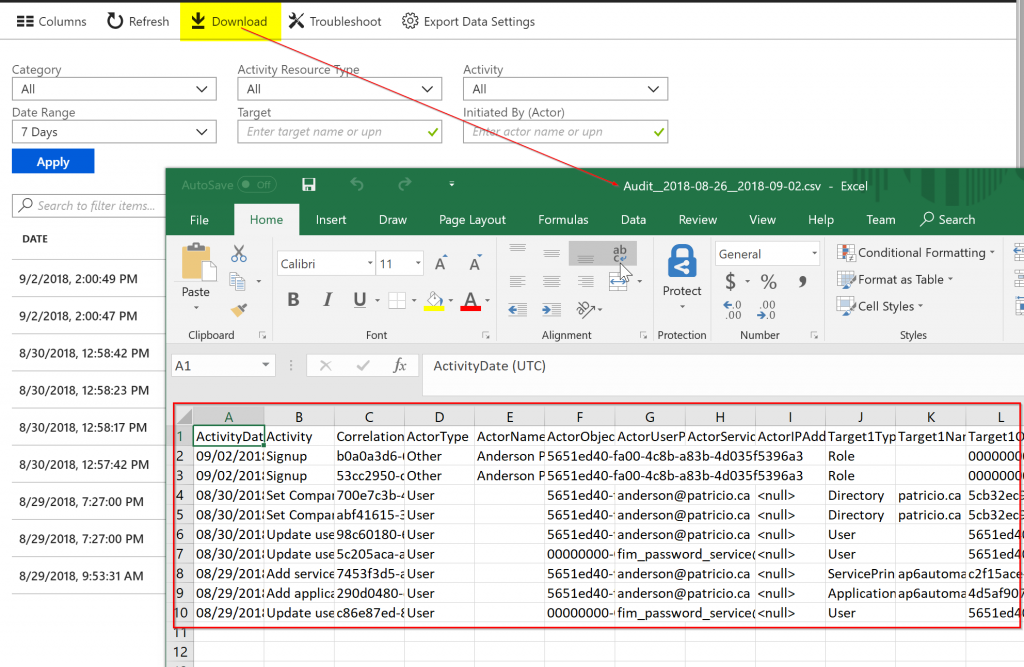
All data that is being displayed (and much more) can be exported to an Excel file. Make sure to get all entries based on your query at the bottom, and when ready, click on Download. The content of the file will be all information available in the Audit Logs for those selected events.
This will generate a CSV file with all entries that are listed in the current blade. The information in the Excel file has tons of details that are not displayed in the Azure Portal, and it helps with on-the-fly queries and investigations on your environment.
Archiving Azure Active Directory audit logs
By default, only the last seven days are kept in the Azure Active Directory audit logs when you are in the free tier (if you have Azure AD P1 or P2 the data is stored for 30 days). We can, however, move that data to a Storage Account or Event Hub. In the case of a Storage Account, we can retain that information for how long your security policy requires.
In order to configure the archive of the logs, click on Export Data Settings, and on the new blade click on Turn on diagnostics.
We need to define the name for the diagnostic settings and select what is going to be the target, which is either Storage Account or Event Hub.
Note: We can have more than one diagnostic setting for this component, and that allows a different retention range for some datasets (nowadays we have AuditLogs and SigninLogs).
Note 2: The dataset Signinlogs require Azure AD P1 or P2 license, which means is not available on the free tier.

You may be wondering how much time is required to move the data from the Active Directory audit logs to the targets defined in the diagnostic settings. For Event Hubs, Microsoft says that may take two to five minutes, and Storage Accounts may take five to 15 minutes.
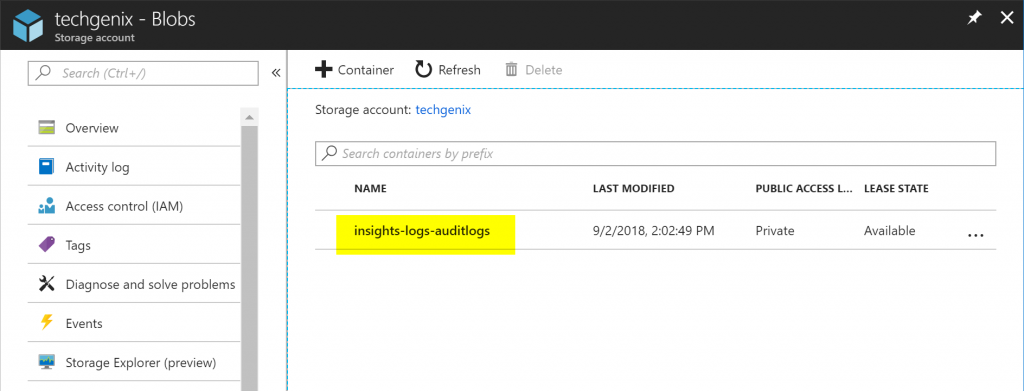
If you configured Storage Accounts, we will see a new container called insights-logs-auditlogs and the data is stored in the following format, where each item represents a container/folder: tenant id / year / month / day / hour / minute.
At the end of that folder structure, we will have a JSON file called PT1H.json and all the information recorded in that one hour will be in a JSON format. The following example below is one record that represents the creation of a single Azure AD account. It is the same information that is in the CSV file that we mentioned at the beginning of this article.
{
“time”: “2018-09-02T18:01:54.9335802Z”,
“resourceId”: “/tenants/5cb32ec9-c3de-4121-85dc-35fdde035503/providers/Microsoft.aadiam”,
“operationName”: “Add user”,
“operationVersion”: “1.0”,
“category”: “AuditLogs”,
“tenantId”: “5cb32ec9-c3de-4121-85dc-35fdde035503”,
“resultType”: “Add”,
“resultSignature”: “None”,
“durationMs”: 0,
“callerIpAddress”: “<null>”,
“correlationId”: “51c9bca4-fdce-47a0-b045-f25b55cdfc1e”,
“Level”: 4,
“properties”: {“id”:”Directory_4M9BL_23544394″,”category”:”Core Directory”,”correlationId”:”51c9bca4-fdce-47a0-b045-f25b55cdfc1e”,”result”:0,”resultReason”:””,”activityDisplayName”:”Add user”,”activityDateTime”:”2018-09-02T18:01:54.9335802+00:00″,”loggedByService”:null,”initiatedBy”:{“user”:{“id”:”5651ed40-fa00-4c8b-a83b-4d035f5396a3″,”displayName”:null,”userPrincipalName”:”[email protected]”,”ipAddress”:”<null>”}},”targetResources”:[{“userPrincipalName”:”[email protected]”,”id”:”754ee37c-b747-44ff-ad1f-4d61a1b33095″,”displayName”:null,”modifiedProperties”:[{“displayName”:”AccountEnabled”,”oldValue”:”[]”,”newValue”:”[true]”},{“displayName”:”StsRefreshTokensValidFrom”,”oldValue”:”[]”,”newValue”:”[\”2018-09-02T18:01:53Z\”]”},{“displayName”:”UserPrincipalName”,”oldValue”:”[]”,”newValue”:”[\”[email protected]\”]”},{“displayName”:”UserType”,”oldValue”:”[]”,”newValue”:”[\”Member\”]”},{“displayName”:”Included Updated Properties”,”oldValue”:null,”newValue”:”\”AccountEnabled, StsRefreshTokensValidFrom, UserPrincipalName, UserType\””}]}],”additionalDetails”:[]}
}
Featured image: Shutterstock


