Azure backup and Hyper-V replication are powerful tools to help you protect data and provide a fail-over disaster recovery solution for virtual machines at a very reasonable cost. The setup is completely wizardized so you’ll have no trouble getting things going.
Backup is designed for servers, applications on servers, and workstations. I use it for workstations. With so much syncing going on now, I’m finding that we have data on laptops whose cloud application sync service may or may not be working, so I like to capture that data in a backup just in case. Between mobility and cloud data syncing, I think a little paranoid backup is in order. Prior to this, I didn’t worry much about user machine backups because I knew that we didn’t have any data there. Times have changed.
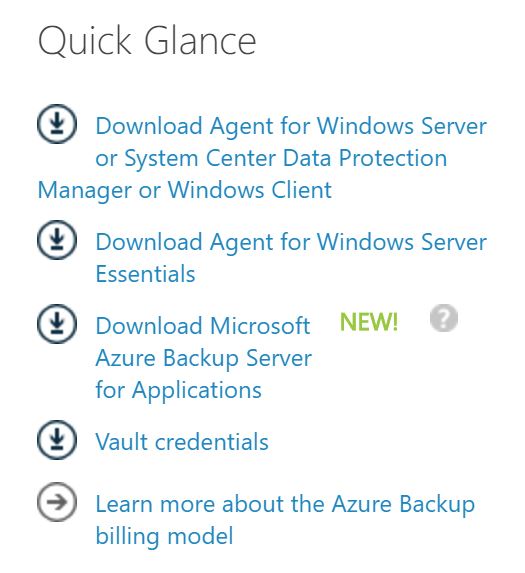 The Recovery Services wizard will set up all of the necessary components of Azure for you. Once you’ve run through it you’ll find that you now have a recovery service vault and a storage account. After that, on the recover service pages, you’ll find the software and vault credentials ready for download. These are the local software components that you’ll install on the systems you want to back up. The item with the NEW tag next to it is for backing up Exchange, SQL, Hyper-V VM’s, physical disks, and more. In addition to the software, you also need the vault credentials. During installation of the software you’ll be prompted for that file.
Figuring out what it costs
Pricing is often the most confusing part about Azure for people new to it. There are a couple of basic principles for pricing.
- Data going into Azure is free.
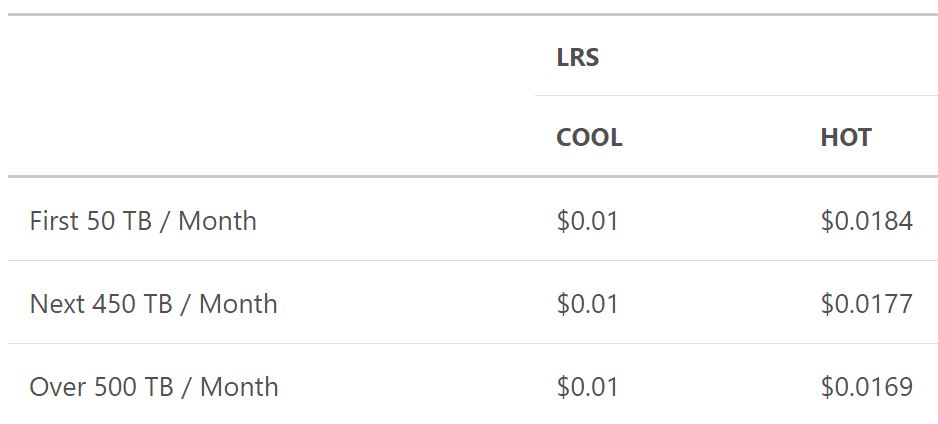
- Storing data has a price tag that depends on how often the file is accessed and how many times it is replicated.
- Data going out of Azure has a price, except in the case of recovery services. In that case, it is free.
With the basic principles in mind, here is what the pricing of Azure looks like. First you determine the size of the data that you’ll be backing up. If you are doing file/folder backup, then it’s the size of those folders. If you are doing disk backup, then it is the size of the disk. You can think of this part as the software licensing fee.

Next, you add to that the cost to store the data. Most backup data will be cool storage. In the case of the file/folder backups that I capture from laptops, they cost me $5 plus $0.01 per GB each month. I consider this to be very cheap insurance against a failed cloud sync.
In the case of providing a fail-over location for Hyper-V virtual machines or even non-virtual physical servers, the costs are exactly the same. Site recovery comes with the added feature of being able to test your fail-over in Azure.
Summary
In the previous article of this getting started with Azure series, we have explored the possible options for hosting a website using the Web Apps service. Here, we glanced over the process of setting up a cloud-hosted backup solution in Azure and how the costs add up at the end of the day. Both of these provide a great entry point into Azure since almost everyone runs websites these days and have valuable data to backup for safety purposes. On top of that, these features are also easy enough to set up, not to intimidate anyone from Azure right off the bat.
There is one more area that most IT pros can benefit from without any additional costs, and it’s the Azure Active Directory service which is – not known by many – included in every Office 365 subscription by default. How to activate it? That is exactly what I will show you in the next article!


