Citrix Program Neighborhood Agent (PNa) consists of a server and client component. There is no separate installation package for the server component of PNa as it is integrated in the Citrix Web Interface setup. The PNa Client is part of the Citrix Presentation Server Client Packager.
The PNa client provides centralized management of the client settings via the Access Management Console and Published Application settings. PNa also offers pass-through authentication, automatic desktop and start menu integration, as well as client to server content redirection, whereby the local Windows File Type Association is altered so that local files automatically launch the associated Citrix Published Application. These features make PNa the Citrix Client of choice for many organizations, as they can deploy a domain member workstation with only the PNa client installed. Some organizations also run PNa on Citrix Servers and publish desktops, so users log on from a thin client device and their desktop is automatically populated with their application set by PNa.
Software pre-requisites (for the machine to host Web Interface 4.6 and Program Neighborhood Agent Site):
- Windows Server OS, i.e. 2003 Web or 2003 Standard Edition.
- IIS w/ ASP.Net.
- .Net Framework 2.0.
- Microsoft Visual J# Version 2.0 Redistributable Package.
- Access Management Console for Presentation Server 4.5 (Framework only).
- Web Interface 4.6 Access Management Console Extension.
Hardware Requirements:
- Server capable of running Windows Server OS w/ IIS.
Program Neighborhood Agent Services Site Configuration
After installing software pre-requisites 1 thru 6 download and launch the Web Interface installation program (WebInterface.exe). Install Web Interface and accept the defaults.
Launch the Access Management Console (AMC). The first time the AMC is run, discovery is performed to identify the components that will be managed.

Select the option, “Do not contact servers running the configuration service”, unless you want to centrally store the Web Interface Configuration (refer to the Web Interface Administrators Guide).

After the discovery process completes, right click on the Web Interface node on the left pane of the AMC -> Select “Create Site”.

Select the second option, “Program Neighborhood Agent Services site”.

Accept the default options for the rest of the Create Site Wizard.
After the site is created, the initial settings must be configured. Right click on the site and select “Manage server farms”.

On this screen, enter the name of the Citrix Farm, then enter at least one server from the Citrix Farm with which the Program Neighborhood Agent Services site will communicate. The site communicates with the XML Service on the configured Citrix Server via the Farm XML Port (80 is the default). Refer to the Citrix Server Farm Properties in the Presentation Server Console if unsure what port number to enter.
Best practice would be to enter at least two XML Servers (for redundancy) and to enter Citrix Servers configured as Data Collectors. The Program Neighborhood Agent Services site communicates with the XML Service to authenticate the user and return the Application Set for that user.
XML Servers can be entered as their NetBIOS, FQDN or IP Address, depending on which name resolution mechanism is in place.

At this point the Program Neighborhood Agent Services Site is configured enough to operate, however there are several more configuration steps that are “recommended”.
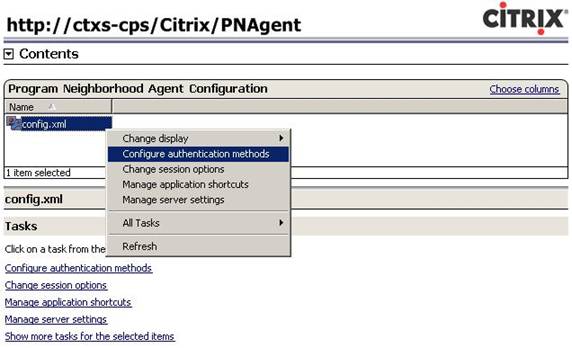
In the Access Management Console, right click on “config.xml”, select “Configure authentication methods”.
Deselect “Prompt” and select “Pass-through. This assumes that the credentials entered on the local Windows PC are the same as those that will be used to logon to the Citrix Farm.

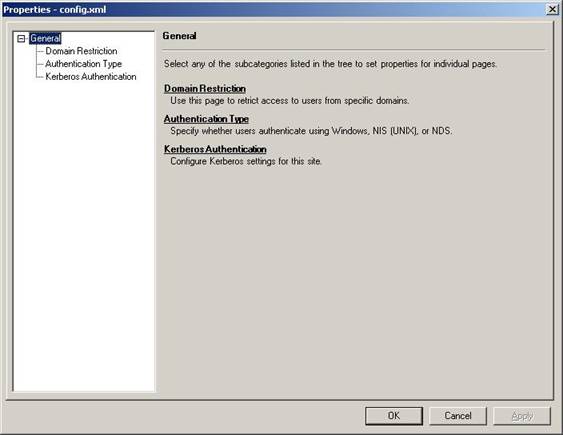
Clicking the Properties button in the Configure Authentication Methods exposes the following screen, where one can limit which domains can logon to the PNa Site, whether or not the Authentication Type is Windows, UNIX or Novell’s NDS. Additionally one can restrict communication to “Kerberos Only”. This setting should only be enabled if all clients are capable of authenticating via Kerberos, i.e. 2000, XP Pro and Vista domain member workstations.
For initial configuration, it’s recommended that one leaves the default settings as is.
In the Change Session Options screen, one may customize the Client Session Sizes, Client Resources (color depth, Windows Keyboard Settings and Audio Settings), and Workspace Control Options.
Once again, for the initial configuration, accept the default settings.

In the Manage Server Settings screen, one can configure the automatic refresh frequency (useful if changes are often made to published applications during working hours), Backup URLs (additional PNa Services Sites that can be contacted by the client in the event that the primary site is offline), and Site Redirection, where an administrator can redirect users to an alternate site.

For a centrally managed installation, the following screens are very important. On the Start Menu Shortcuts, and Desktop Shortcuts screens, select “Use Server Farm Settings (defined in published application)”. This means that the location of the application shortcuts will be determined by what is selected in each Citrix Published Application, not by settings in the PNa Services Site.

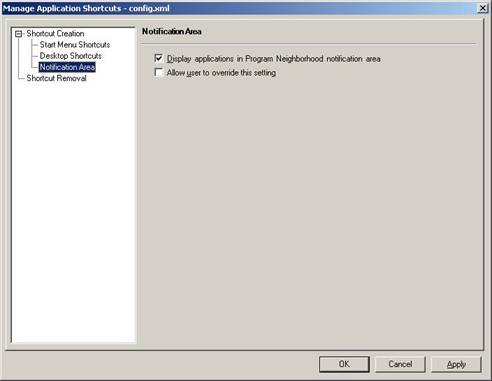
On the Notification Area screen, the administrator can control whether or not applications are displayed as a menu option in the Citrix Program Neighborhood Connection Center (White Floppy Disk Icon with Red Center). Additionally the administrator can control whether or not the user can enable or disable displaying the Applications Menu in the Citrix Program Neighborhood Connection Center.
On the Shortcut Removal Screen, the administrator can control when a user’s Citrix Published Application Shortcuts are removed from the desktop and start menu.

If an administrator right clicks on the config.xml -> All Tasks -> Manage Application Refresh, they will be presented with the following screen which provides more granular control over when and how often a user’s application set is refreshed.

Program Neighborhood Client Configuration
The Program Neighborhood Agent is included in the Citrix Presentation Server Client Packager. To customize the client to include the features one desires, as well as the address of the Program Neighborhood Agent Services Site, do the following:
Start -> Run -> msiexec /A \\ServerName\ShareName\ica32pkg.msi
This cmd line switch launches the installer in administrative mode, so the administrator can predefine answers that the user would see if they were to run the unmodified MSI. It also allows the administrator to hide, or make unavailable features and menus that are shown in the default installation.
When the MSIEXEC is run in administrative mode, the software is not installed, it merely repackages a new MSI that includes the administrator’s customizations. An administrative install of the Citrix Presentation Server Client Packager cannot be changed via Add/Remove Programs, i.e. to add features the administrator disabled. The MSI can only be uninstalled.
A typical install of the Citrix Presentation Server Client Packager for use with PNa would include the Web Client, PNa Client, and disable/hide the installation of the Citrix Program Neighborhood. It would also enable Pass-through authentication, use the client’s machine name as the Citrix Client Name, and hide all unnecessary screens where user would be prompted to make a decision. This would allow a simple installation that can be performed by another administrator, or pushed out via Group Policy Software Assignment or Microsoft SMS.
Once the PNa Client is installed, the client workstation must be rebooted before Pass-through authentication will work. When Pass-through authentication is enabled for the PNa client, the end user is not prompted to enter and store their credentials like they are with the Program Neighborhood client. The PNa Client automatically passes-through the local credentials, so users can access Citrix Published Applications as if they were installed locally.
Published Application Configuration
Published applications have the following settings that pertain to the Program Neighborhood Client.
Shortcut Presentation -> Application Shortcut Placement:
- Add to the Client’s Start Menu.
- Place under the Program Folder.
- Start Menu Folder, i.e. an administrator could place all Microsoft Office Applications in a Start Menu Folder named Microsoft Office, so it looks like it does when the applications are installed locally.
- Add shortcut to the client’s desktop.
Content Redirection: (allows local client files to launch Citrix Published Applications).

Summary
Citrix Program Neighborhood Agent is the preferred client for LAN Connected Windows Clients, as it offers the most features and centralized management. It is possible, but unsupported (by Citrix) to connect PNa Clients to the Program Neighborhood Agent Services Site via Citrix Secure Gateway. To do so, the administrator would edit the webinterface.conf file in “\Inetpub\wwwroot\Citrix\PNAgent\conf” and include the following entries:
ClientAddressMap=*,SG
CSG_EnableSessionReliability=On
CSG_Server=Fully_Qualified_Domain_Name_of _CSG
CSG_ServerPort=443
CSG_STA_URL1=http://Fully_Qualified_Domain_Name_of _CSG/scripts/ctxsta.dll
