If you would like to read the other parts in this article series please go to
- Deploying and Configuring Server Core VMs on Hyper-V (Part 1)
- Deploying and Configuring Server Core VMs on Hyper-V (Part 2)
- Deploying and Configuring Server Core VMs on Hyper-V (Part 4)
- Deploying and Configuring Server Core VMs on Hyper-V (Part 5)
- Deploying and Configuring Server Core VMs on Hyper-V (Part 6)
- Deploying and Configuring Server Core VMs on Hyper-V (Part 7)
Introduction
In the previous article in this series, I showed you how to deploy Windows Server 2008 as a core server. Now that the deployment is complete, we need to configure the server in order to make it usable.
As you saw at the end of the previous article, there is a freeware utility called Server Core Configurator that you can use to make the initial configuration process a lot easier. Microsoft has also built a similar utility called Sconfig into Windows Server 2008 R2. Although I will be showing you how to use the Sconfig utility at the end of this article series, I want to first show you how to perform a manual configuration.
Right now you might be wondering why I am even bothering with manually configuring a server when configuration utilities such as Sconfig and Server Core Configurator exist. The reason why I am doing this is because server core environments are unique in that you may be forced to manage the server from the command line. A great way to get used to command line based server management is to start out by configuring the server from the command line.
Network Configuration
There are a lot of different tasks that you might perform as a part of the server’s initial configuration. I want to start out by showing you how to connect your core server to the network. After all, you won’t even be able to join the server to your domain unless you first establish basic network connectivity.
The good news is that Microsoft makes establishing network connectivity easy. When you deploy a server core virtual machine on top of Hyper-V, the integration services are installed automatically. This means that you won’t have to worry about installing a network card driver because the integration services automatically provision a virtual network adapter for the server. This virtual adapter is connected to a physical network adapter via a virtual switch.
Another way in which Microsoft has made things easy on you is in the fact that core servers are DHCP enabled by default. Therefore, if you have a DHCP server on your network then the core server should receive an IP address without you having to do anything.
To find out whether or not your core server has been assigned an IP address, enter the following command:
IPCONFIG /ALL
This command will show you each of the virtual server’s network adapters and the IP addresses that have been bound to each adapter. You can see an example of this in Figure A.
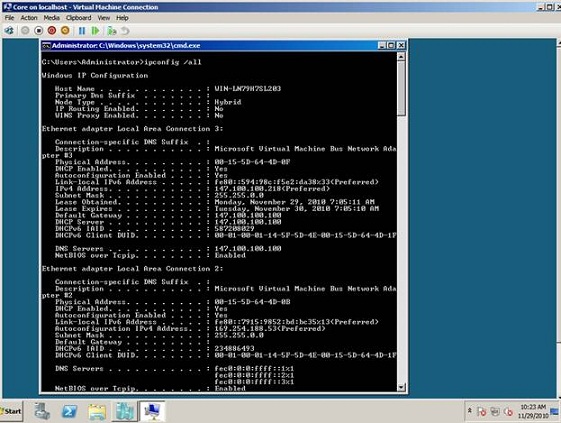
Figure A: You can use the IPCONFIG /ALL command to view the virtual machine’s current network configuration.
It’s great that Microsoft provides out of the box network connectivity, but in some cases you may need to assign a static IP address to your core server. Fortunately, this is a relatively simple process. You must begin by entering the following command:
Netsh interface IPv4 show interfaces
Upon entering this command, Windows will show you a list of all of the network connections that are present on the server, as shown in Figure B. You must locate the interface that you want to assign an IP address to, and then make note of the value that is displayed in the interface’s IDX column. For example, if I wanted to assign an IP address to the interface that’s listed as Local Area Connection then I would use an IDX value of 3.

Figure B: Make note of the IDX value for your chosen interface.
Now, you must use the NETSH command to assign an IP address to your chosen interface. The syntax for the command is:
Netsh interface ipv4 set address name=”<IDX>” source=static address=<IP address> mask=<subnet mask> gateway=<default gateway>
To give you a more concrete example, let’s assume that I wanted to assign the address 147.100.100.4 to the interface with the IDX value of 3. Let’s also use 255.255.0.0 as the subnet mask and 147.100.100.100 as the default gateway. When I use these values, the command looks like this:
Netsh interface ipv4 set address name=”3” source=static address=147.100.100.4 mask=255.255.0.0 gateway=147.100.100.100
If you look at Figure C, you can see that when I entered this command, Windows does not provide you with any sort of confirmation that the command completed successfully. As such, I entered the IPCONFIG command so that I could verify that the IP address had been assigned correctly. In my case, IPCONFIG returned information about three different interfaces, but you can see that the IP address that I specified has been assigned to the last interface that was listed.
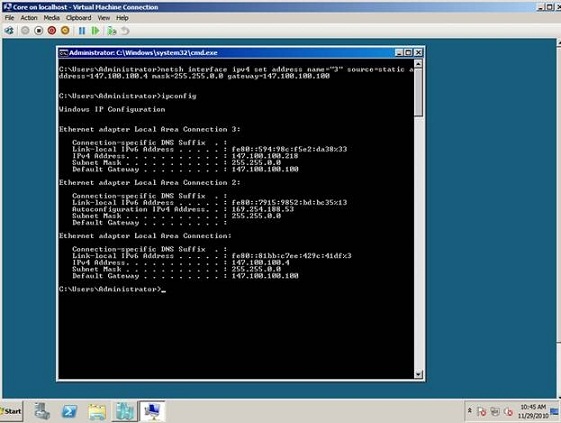
Figure C: You must use the IPCONFIG command to verify that the IP address was assigned correctly.
Although we have assigned an IP address to the virtual server, we aren’t quite ready to join the server to a domain just yet. As I’m sure you know, a server cannot join an Active Directory domain unless it can access the domain’s DNS server. Although we have assigned an IP address to the server, the server is currently unaware of my domain’s DNS server’s existence.
To assign a DNS server to the virtual machine, we will have to use the NETSH command once again. As was the case before, we will have to use the IDX value to specify the network interface to which we want to assign the DNS server.
The syntax for the command that you will use to assign a DNS server to a network interface is as follows:
Netsh interface ipv4 add dnsserver name=”<IDX>” address=<DNS server IP address> Index=1
For example, if I wanted to assign a DNS server with an IP address of 147.100.100.43 to the interface with the IDX value of 3, the command would look like this:
Netsh interface ipv4 add dnsserver name=”3” address=147.100.100.43 Index=1
You can see what this command looks like in Figure D.
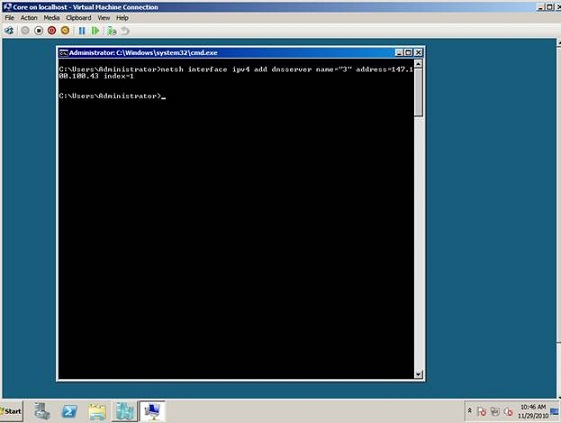
Figure D: You can use the Netsh command to assign a DNS server to a network interface.
Obviously it’s nice to be able to assign a static IP address to a core server, but occasionally you may discover that your needs change over time and that you need to revert to using dynamic IP addresses. You can easily use the Netsh command to reset an interface to use a dynamic IP address. The syntax that you will use in doing so is as follows:
Netsh interface ipv4 set address name=”<IDX>” Source=DHCP
To see this command in action, check out Figure E. There are several different things going on in this figure. First, although the top portion of the window is cut off, I used the IPCONFIG /ALL command to check the current state of each interface. You can see that my DNS server assignment from the previous step was successful.
Next, I used the Netsh command to revert to using a dynamic IP address. Once again though, Windows does not provide any sort of confirmation that the operation was successful. As such, I used the IPCONFIG command to verify that a dynamic IP address is in use. You will notice in the figure that Windows does not specifically tell you that a dynamic IP address is being used, but you will notice that the server is now using a different IP address from the one that is listed in the upper portion of the screen capture.
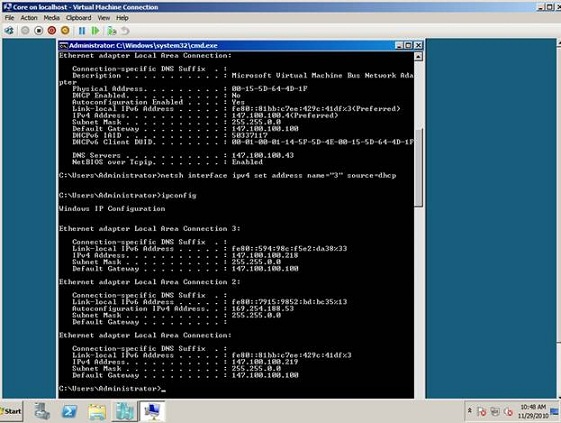
Figure E: The server is once again using a dynamic IP address.
Conclusion
Now that I have shown you how to configure the core server’s IP address, it is time to join the server to a domain. I will show you how to do that and much more in Part 4.
If you would like to read the other parts in this article series please go to
- Deploying and Configuring Server Core VMs on Hyper-V (Part 1)
- Deploying and Configuring Server Core VMs on Hyper-V (Part 2)
- Deploying and Configuring Server Core VMs on Hyper-V (Part 4)
- Deploying and Configuring Server Core VMs on Hyper-V (Part 5)
- Deploying and Configuring Server Core VMs on Hyper-V (Part 6)
- Deploying and Configuring Server Core VMs on Hyper-V (Part 7)


