If you would like to read the other parts in this article series please go to
- Deploying and Configuring Server Core VMs on Hyper-V (Part 1)
- Deploying and Configuring Server Core VMs on Hyper-V (Part 2)
- Deploying and Configuring Server Core VMs on Hyper-V (Part 3)
- Deploying and Configuring Server Core VMs on Hyper-V (Part 4)
- Deploying and Configuring Server Core VMs on Hyper-V (Part 6)
- Deploying and Configuring Server Core VMs on Hyper-V (Part 7)
Introduction
Throughout this article series I have demonstrated techniques for deploying Server Core machines on Hyper-V and for configuring core VMs. I had originally intended to spend this article talking about how you can assign server roles to your VMs, but I decided to wait until Part 6 to talk about server roles because there are a few more configuration options that I want to show you first. You may find that learning these configuration tasks now may make it easier for you to work with the server roles later on.
Display Resolution
The first trick that I want to show you is how to change the display resolution used by your core server. Although some might consider this trivial, especially for an operating system that is managed by the command line, adjusting the display resolution can actually be very handy. Remember that we are talking about deploying core servers as virtual machines running on top of Hyper-V. When I set up a core server as a virtual machine on one of my lab servers I find that the default screen resolution is larger than my Hyper-V desktop and therefore extends beyond the boundaries of the screen. While it is possible to manually adjust the size of the window, a better solution is to simply tell Windows what resolution you want to use.
Before I show you how to set the display resolution for your virtual machine I need to caution you that this technique requires you to use the Registry Editor. Editing the Windows registry can be dangerous because if you make a mistake you can destroy Windows. As such, I recommend making a full system backup of your virtual machine before you attempt this technique.
I also need to point out that the registry location that you will use varies depending on whether your core server is running Windows Server 2008 or Windows Server 2008 R2.
If your core server is running Windows Server 2008 then begin the process by opening the Registry Editor by entering the REGEDIT command at the command prompt. Now, navigate through the Registry Editor until you reach HKEY_LOCAL_MACHINE\System\CurrentControlSet\Control\Video
When you select the Video container you will see one or more GUIDs. Expand each one until you find a GUID that contains a sub-key named 000\VolatileSettings. You are only looking for the existence of a VolatileSettings key, we are not going to modify this key. Instead, go into the 000 key just above the VolatileSettings key and look for a setting named DefaultSettings.XResolution. Change this key to reflect the horizontal resolution that you want to use. Now, modify the DefaultSettings.YResolution key to reflect your preferred vertical resolution.
Regardless of whether you are using Windows Server 2008 or Windows Server 2008 R2, the screen resolution must be entered in hexadecimal format. The easiest way to accomplish this is to double-click on the value that you want to change and then set the Registry Editor to use decimal rather than hexadecimal. Enter your preferred screen resolution in decimal format as you normally would, but before clicking OK switch back to hexadecimal. When you do, the resolution that you have entered will be converted to a hexadecimal number that Windows can use.
If you are using Windows Server 2008 R2, then the basic instructions are the same except that the required keys are located in a different area of the registry. You will have to go to HKEY_LOCAL_MACHINE\System\CurrentControlSet\Hardware Profiles\001\System\CurrentControlSet\Video\{guid}\000.
In Windows Server 2008 R2, you don’t have to worry about looking for a VolatileSettings key (it doesn’t exist). Just look for a GUID in which the 000 container contains the DefaultSettings.XResolution and DefaultSettings.YResolution values, as shown in Figure A. You will notice in the figure that I have changed the values in a sub container beneath the 000 container. Depending on how your server is set up, there is a chance that you may have to change the display resolution in both the 000 container and in a sub container beneath it.
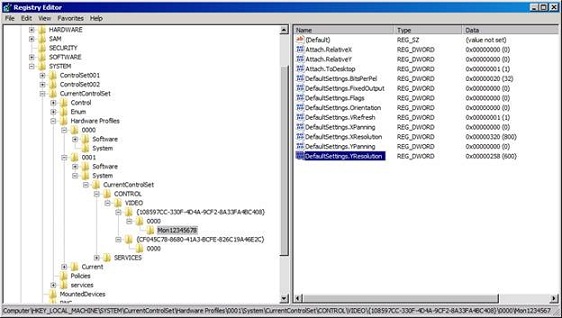
Figure A: You must modify the registry to change the video resolution.
The new video resolution will not take effect until you log off and log back on.
Remote Desktop
By now you have no doubt discovered that setting up a core server can be a tedious process. As such, one thing that may make the rest of the job easier on you is if you set up Remote Desktop so that you can administer the server from the comfort of your own PC.
Microsoft provides a couple of scripts that you can use to enable Remote Desktop on a core server. The first command that you will have to run is:
Cscript %windir%\system32\SCRegEdit.wsf /ar 0
This command enables Remote Desktop administration from systems running Windows Vista, 7, 2008, and 2008 R2. If you need to manage your core server from a system that is running an older Windows operating system then you will also need to run this command:
Cscript %windir%\system32\SCRegEdit.wsf /cs 0
You can see these commands, as well as a core server being managed remotely in Figure B.

Figure B: Microsoft provides scripts for enabling Remote Desktop on a core server.
Windows Firewall
The last thing that I need to show you before I move on is how to manage the Windows Firewall. As you install server roles or applications, you may find that you need to allow certain services to move packets through the firewall.
Some administrators like to disable the firewall completely. If you are running Windows Server 2008 then you can do so by using this command:
Netsh Firewall opmode Disable
If you want to enable the firewall you can use this command:
Netsh Firewall opmode Enable
Although you can use the Netsh command to manage the Windows firewall in Windows Server 2008 R2. Fortunately, there is an even easier way of managing the firewall. From a computer that is running either Windows Server 2008 R2 or Windows 7, enter the MMC command at the Run prompt. When you do, Windows will load an empty management console. Choose the Add / Remove Snap-In command from the console’s File menu and then select the Windows Firewall option from the list of available snap-ins.
Click the Add button and Windows will ask you if you want to manage this computer or another computer. Choose the Another Computer option and then enter either the name or the IP address of your core server, as shown in Figure C.
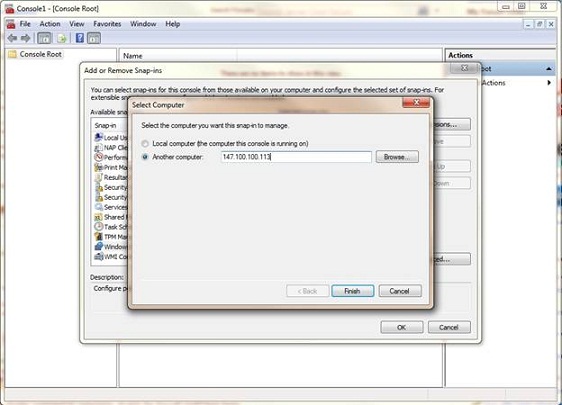
Figure C: Specify the name or IP address of your core server.
Click Finish followed by OK and you will be able to manage the core server’s firewall through the console.
Conclusion
In this article, I have shown you how to change the display resolution, enable remote administration through Remote Desktop, and manage the firewall settings for your core server. As you begin to configure your core server, keep in mind that many configuration tasks work differently depending on whether you are running Windows Server 2008 or Windows Server 2008 R2. If you find that you have difficulty performing a configuration task, don’t be afraid to use one of the graphical configuration tools that I showed you earlier in this series.
If you would like to read the other parts in this article series please go to
- Deploying and Configuring Server Core VMs on Hyper-V (Part 1)
- Deploying and Configuring Server Core VMs on Hyper-V (Part 2)
- Deploying and Configuring Server Core VMs on Hyper-V (Part 3)
- Deploying and Configuring Server Core VMs on Hyper-V (Part 4)
- Deploying and Configuring Server Core VMs on Hyper-V (Part 6)
- Deploying and Configuring Server Core VMs on Hyper-V (Part 7)


